Polymer Discovery Gives 3D-printed Sand Super Strength

Research activity into 3D printing never seems to end, with an almost constant stream of new techniques and improvements upon old ones hitting the news practically daily. This time, the focus is on a technique we’ve not covered so much, namely binder jetting additive manufacturing (BJAM for short, catchy huh?) Specifically the team from Oak Ridge National Laboratory, who have been exploring the use of so-called hyperbranched Polyethyleneimine (PEI) as a binder for jetting onto plain old foundry silica sand (nature, free access.)

Roll, spray, bake. Simples.

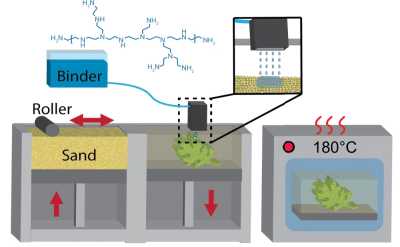
The PEI binder was mixed with a 75:25 mix of water and 1-propanol (not to be mixed up with 2-propanol aka isopropanol) to get the correct viscosity for jetting with a piezoelectric print head and the correct surface tension to allow adequate powder bed penetration, giving optimal binding efficiency. The team reported a two-fold increase in strength over previous jetting techniques, however, the real news is what they did next; by infusing the printed part (known as the green part) with common old ethyl cyanoacrylate (ECA, or super glue to us) the structural strength of the print increased a further eight times due to the reaction between the binder and the ECA infiltrate.

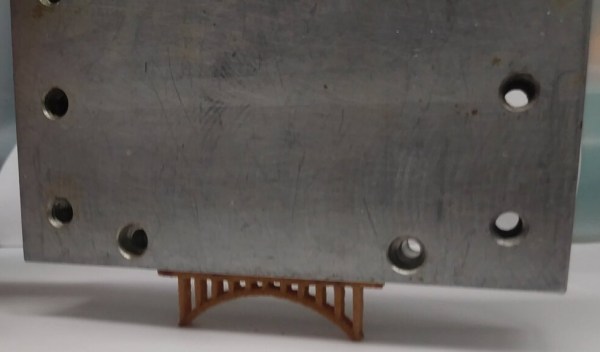
To further bestow the virtues of the PEI binder/ECA mix, it turns out to be water-soluble, at least for a couple of days, so can be used to make complex form washout tooling — internal supports that can be washed away. After a few days, the curing process is complete, resulting in a structure that is reportedly stronger than concrete.  Reinforce this with carbon fiber, and boy do you have a tough building material!

Not bad for some pretty common materials and a simple printing process.

We covered a similar binder jetting process for using sawdust a little while ago, and a neat way of printing with metal powder by carrying it in a stream of argon and cooking it with a laser, but there is an opening for a DIY effort to get in on the binder jetting game.

Thanks [Victor] for the tip!

Bringing High Temperature 3D Printing To The Masses

Despite the impressive variety of thermoplastics that can be printed on consumer-level desktop 3D printers, the most commonly used filament is polylactic acid (PLA). That’s because it’s not only the cheapest material available, but also the easiest to work with. PLA can be extruded at temperatures as low as 180 °C, and it’s possible to get good results even without a heated bed. The downside is that objects printed in PLA tend to be somewhat brittle and have a low heat tolerance. It’s a fine plastic for prototyping and light duty projects, but it won’t take long for many users to outgrow its capabilities.

The next step up is usually polyethylene terephthalate glycol (PETG). This material isn’t much more difficult to work with than PLA, but is more durable, can handle higher temperatures, and in general is better suited for mechanical parts. If you need greater durability or higher heat tolerance than PETG offers, you could move on to something like acrylonitrile butadiene styrene (ABS), polycarbonate (PC), or nylon. But this is where things start to get tricky. Not only are the extrusion temperatures of these materials greater than 250 °C, but an enclosed print chamber is generally recommended for best results. That puts them on the upper end of what the hobbyist community is generally capable of working with.

Industrial 3D printers like the Apium P220 start at $30,000.

But high-end industrial 3D printers can use even stronger plastics such as polyetherimide (PEI) or members of the polyaryletherketone family (PAEK, PEEK, PEKK). Parts made from these materials are especially desirable for aerospace applications, as they can replace metal components while being substantially lighter.

These plastics must be extruded at temperatures approaching 400 °C, and a sealed build chamber kept at >100 °C for the duration of the print is an absolute necessity. The purchase price for a commercial printer with these capabilities is in the tens of thousands even on the low end, with some models priced well into the six figure range.

Of course there was a time, not quite so long ago, where the same could have been said of 3D printers in general. Machines that were once the sole domain of exceptionally well funded R&D labs now sit on the workbenches of hackers and makers all over the world. While it’s hard to say if we’ll see the same race to the bottom for high temperature 3D printers, the first steps towards democratizing the technology are already being made.

Continue reading “Bringing High Temperature 3D Printing To The Masses”

A Close Look At The Prusa I3 MK3

The Prusa i3 MK3 is, for lack of a better word, inescapable. Nearly every hacker or tech event that I’ve attended in 2018 has had dozens of them humming away, and you won’t get long looking up 3D printing on YouTube or discussion forums without somebody singing its praises. Demand for Prusa’s latest i3 printer is so high that there’s a literal waiting list to get one.

At the time of this writing, over a year after the printer was officially put up for sale, there’s still nearly a month lead time on the assembled version. Even longer if you want to wait on the upgraded powder coated bed, which has unfortunately turned out to be a considerable production bottleneck. But the team has finally caught up enough that the kit version of the printer (minus the powder coated bed) is currently in stock and shipping next day.

I thought this was a good a time as any to pull the trigger on the kit and see for myself what all the excitement is about. Now that I’ve had the Prusa i3 MK3 up and running for a couple of weeks, I can say with confidence that it’s not just hype. It isn’t a revolution in desktop 3D printing, but it’s absolutely an evolution, and almost certainly represents the shape of things to come for the next few years.

That said, it isn’t perfect. There’s still a few elements of the design that left me scratching my head a bit, and some parts of the assembly weren’t quite as smooth as the rest. I’ve put together some of those observations below. This isn’t meant to be a review of the Prusa i3 MK3 printer, there’s more than enough of those already, but hopefully these assorted notes may be of use to anyone thinking of jumping on the Prusa bandwagon now that production has started really ramping up.

Continue reading “A Close Look At The Prusa I3 MK3”

BuildTak, PEI, And Early Adopter Syndrome

I’m guessing most of the members of the Hackaday community are what most people would consider early adopters. Sure, there’s variation among us, but compared to the general population we probably all qualify. I’ve spent many years being an early adopter. I owned a computer, a TiVO, a digital camera, a 3D printer, a drone, and many other gadgets before they became well known. I’ve avoided the self-balancing conveyance craze (I’ll stick with my motorcycle).

Of course, you know if you are an early adopter, you will overpay. New has a premium, after all. But there is another price: you often have the first, but not the optimum. My first digital camera took 3.5 inch floppies. My TiVO has an analog tuner.

I was reminded of this last week. A number of years ago, I built a 3D printer. A lot of printers back then didn’t have heated build plates, so printing ABS required rafts and ABS juice and frustration. I made sure to get a heated bed and, like most people in those days, I had a glass print surface covered in Kapton.

That works pretty well with ABS, but it isn’t perfect. Aqua Net hair spray makes it stick better, but large flat prints still take a little work. With a little practice, it isn’t bad. I eventually switched to an aluminum bed and didn’t have to level the head quite as often, but it didn’t really make things any better, just more repeatable.

The years pass and other gadgets beckon. I use the printer about like I use a drill press. I don’t use it every day, but when you need it it is handy. I have to admit, I’ve been getting partial to PLA since it doesn’t warp. But PLA in the hot Houston sun isn’t always a good mix, so I still print a fair amount of ABS.

The other day I noticed a product called BuildTak. I also heard some people are printing on PEI sheets. I decided to try the BuildTak. Wow! What a difference.

Continue reading “BuildTak, PEI, And Early Adopter Syndrome”

Build A 3D Printer Workhorse, Not An Amazing Disappointment Machine

3D printers have become incredibly cheap, you can get a fully workable unit for $200 – even without throwing your money down a crowdfunded abyss. Looking at the folks who still buy kits or even build their own 3D printer from scratch, investing far more than those $200 and so many hours of work into a machine you can buy for cheap, the question “Why the heck would you do that?” may justifiably arise.

The answer is simple: DIY 3D printers done right are rugged workhorses. They work every single time, they never break, and even if: they are an inexhaustible source of spare parts for themselves. They have exactly the quality and functionality you build them to have. No clutter and nothing’s missing. However, the term DIY 3D printer, in its current commonly accepted use, actually means: the first and the last 3D printer someone ever built, which often ends in the amazing disappointment machine.

This post is dedicated to unlocking the full potential in all of these builds, and to turning almost any combination of threaded rods and plywood into a workshop-grade piece of equipment.

Continue reading “Build A 3D Printer Workhorse, Not An Amazing Disappointment Machine”