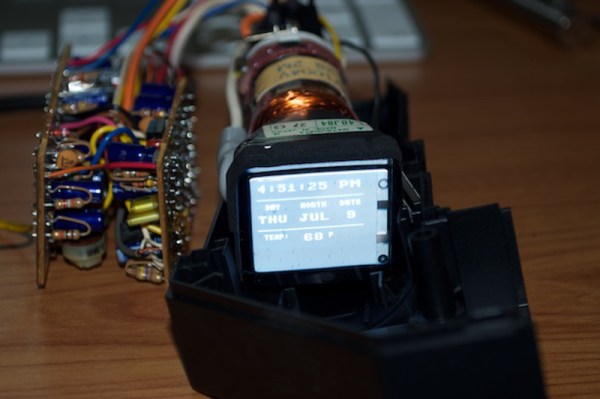
Hack A Cake

What’s a hacker going to do with an oven? Reflow solder? Dry out 3D printing filament? If you are [Alicia Gibb] you’d be baking a cake. While complaining that projects aren’t a hack seems to be a favorite past time for Hackaday commentators, we think [Alicia] will be in the clear. Why? Because these cakes have Arduinos, LEDs, and motorized candles among other gizmos.

The Game Boy cake is undeniably cool, although we have to admit the cake that screams when cut got our attention (see video below), even if it would unnerve guests.

As you might expect, you can’t bake the electronics directly into the cake. [Alicia] uses Tupperware or parchment paper to create cavities for the electronics. Connections and other solder joints get professional grade Saran wrap to keep the lead and other awful chemicals out of the cake.

Continue reading “Hack A Cake”

Bubble Catcher Watches Your Booze Burp

Making your own booze involves a lot of sitting around waiting for things to happen, like waiting for the fermentation process to finish so you can get on with bottling and drinking it. That involves watching the bubbles in the airlock: once the frequency of the bubbles falls below a certain level, your hooch is ready for the next step.

[Waldy45] decided to automate this process by building a bubble catcher that measures the frequency of bubbles passing through the airlock. He did this using an optocoupler, a combination of LED and light sensor that changes resistance when something passes between them. You can’t see it in the image, but the horseshoe-shaped optocoupler is slotted around the thin neck in the bubble tube to sense when a bubble passes through.

The optocoupler is connected to an Arduino, running a bit of code that generates an interrupt when the optocoupler is triggered. At the moment, this just outputs an average time between bubbles to the serial port, but [Waldy45] is looking to add an ESP8266 to wirelessly connect the Arduino and contact him when the bubble frequency falls, indicating that the booze is ready for bottling.

We’ve seen a couple of over the top beer breweries before (here and here), but none of them have automated the actual fermentation stage, so something like this would definitely be an addition. Cheers!

USB Volume Control

If you buy expensive computer speakers, they often have a volume knob you can mount somewhere on your desk so you aren’t dependent on the onboard volume control. [Kris S] decided to build his own version of the remote volume control. Not surprisingly, it uses an Arduino-compatible Digispark board and a rotary controller. The Digispark (that [Kris S] bought for $2) is compatible with the Adafruit Trinket. This is key because the Trinket libraries are what make it easy to send media keys over the USB (using the HID interface) to control the volume.

Really, though, the best part of the build is the good looking knob made out of a pill bottle (see the video below). The micro Digispark is small enough to fit in the lid of the pill bottle, and some wax and pellets add some heft to the volume control. Continue reading “USB Volume Control”

Control Your HTPC With Scavenged IR Parts

If you’ve built yourself a home theater PC, one of your highest priorities is probably coming up with a convenient control solution. The easiest way to do this is to simply use something like a wireless keyboard and mouse. But, that’s not very conducive to an enjoyable home theater experience, and it feels pretty clunky. However, if you’ve got the right components lying around, [Sebastian Goscik] has instructions and an Arduino sketch that will let you control your HTPC with any IR remote control.

There are a number of ways you could control your HTPC, and we’ve featured more than one build specifically for controlling XBMC over the years. Unfortunately, most of those methods require that you spend your hard earned money (which is better spent on popcorn). [Sebastian’s] setup can be replicated with things you probably have on hand: an Arduino, an IR remote, and a scavenged IR receiver. The IR receiver can be found in many devices, like old stereos or TVs that themselves were controlled via an IR remote.

It starts with an Arduino Sketch that lets you can see on the serial monitor what code is being generated by the button presses on your remote. These are then scripted to perform any task or function you like when those buttons are pushed. The most obvious use here is simple directional control for selecting your movies, but much more complex tasks are possible. Maybe someone can program a T9 script to type using the number buttons on most remotes?

Physical Fitness For The Truly Lazy

We’re going to get in shape around here, starting today. Well… in the United States, it is almost Thanksgiving, so we might as well wait until… but then it is going to be the end of the year and between Christmas, Hanukkah,  and New Year’s, we should put it off until then.

OK, we get it. There’s always some excuse. We know we should go on and do some push ups today. Of course, we are a lazy bunch, so not everyone’s going to do a full push up. Then we’ll all argue how many we actually did. If this sounds like you, maybe you need an Arduino-based project that counts proper push ups.

Continue reading “Physical Fitness For The Truly Lazy”

FleaFPGA + Arduino Uno = FleaFPGAUno

Some things are better together: me and my wife, peanut butter and jelly, and FPGAs and Arduino Unos. Veteran hacker [Valentin Angelovski] seems to agree: the FleaFPGA Uno is his latest creation that combines an FPGA (a Lattice MachX02 700HC) with an Arduino-compatible CPU.

It’s a step-up model from the origional FleaFPGA. With a few other components thrown in (such as a HDMI and composite video output and a WiFi option), you have a killer combination for experimenting with FPGAs or building an embedded system. That is because the Arduino part frees the FleaFPGA Uno from the breadboard: you can easily program, control and interface with the FPGA over a serial line or a wireless link using the Arduino IDE. There is even support for Arduino shields (albeit only 3.3V ones), making it even more expandable. This would be an awesome starting point for a retro gaming system, as many 8-bit consoles can be easily emulated in an FPGA. [Valentin] is currently selling the boards directly, and they are very reasonably priced at $50 or $60 for the WiFi version.

Continue reading “FleaFPGA + Arduino Uno = FleaFPGAUno”

Tiny Arcade, Based On Arduino

Who can resist video games when they’re packed up in tiny, tiny little arcade machines? [Ken]’s hoping that you cannot, because he’s making a cute, miniature Arduino-based arcade game platform on Kickstarter. (Obligatory Kickstarter promo video below the break.)

The arcades are based on [Ken]’s TinyCircuits Arduino platform — a surprisingly broad range of Arduino modules that click together using small snap connectors in place of pin headers. The system is cool enough in its own right, and it appears to be entirely open source. Housing these bits in a cute arcade box and providing working game code to go along with it invites hacking.

There’s something about tiny video cabinets. We’ve seen people cram a Game Boy Advance into a tiny arcade cabinet and re-house commercial video game keyfobs into arcade boxes. Of course, there’s the Rasbperry Pi. From [Sprite_TM]’s cute little MAME cabinet to this exquisite build with commercially 3D-printed parts, it’s a tremendously appealing project.

But now, if you’re too lazy to build your own from scratch, and you’ve got $60 burning a hole in your pocket, you can get your own tiny arcade — and tiny Arduino kit — for mere money. A lot of people have already gone that route as they passed the $25k funding goal early yesterday. Congrats [Ken]!

Continue reading “Tiny Arcade, Based On Arduino”