Head-to-head Mountain Climbing From The Safety Of Your Game Room

Why risk frostbite and altitude sickness when you can marvel at the view from atop your own mountain climbing game?

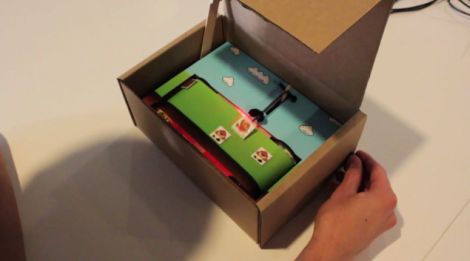
[Jeff] built this delightful piece which you can see in action after the break. he combined several very simple ideas and he did it really well. The climbers are both mechanical. They grip the mountain’s face (which is covered with of carpet) with a tack pointed downward on the end of each limb. Their motion is provided by two tiny servos that make up the body of the climber. The two potentiometers in each controller directly affect the movement of the top and bottom limbs. The game plays music during the contest, and precisely detects a winner by sensing when an arm comes in contact with the metal snow cap at the summit.

Obviously weight was an issue during the design process. After some hemming and hawing [Jeff] decided to tether the climbers in order to avoid rolling a battery into each. But he overcame the issue with weighted cable management on the inside of the mountain.

Continue reading “Head-to-head Mountain Climbing From The Safety Of Your Game Room”

Stream Music Anywhere In Your House With These WiFi Speakers

wifi_speakers

[Rui] needed an easy way to play music in several different zones from one centralized location, but he didn’t want to run any new wiring in the process.

He figured that the best way to do this would be to stream his music directly to his speakers over Ethernet. Earlier this year, he put together a handful of Ethernet-connected speaker nodes using a few Arduinos equipped with both Ethernet and MP3 shields. To interface with these speaker nodes, he wrote an application utilizing VLC’s network streaming engine. This software monitors his network for newly attached speakers, adding them to his inventory automatically. He can choose to play music on any set of speakers using a multicast audio stream.

The setup was pretty slick, but what about locations that didn’t already have Ethernet drops? He thought of that too, revising his design just recently. The newest set of speakers he constructed ditches the Ethernet board for a Wifly shield, all of which he crammed inside the speaker cabinets. Now, he has the ability to stream music anywhere he’d like, no matter what sort of infrastructure is in place.

If you have a need to do this in your home, [Rui] has made his software available for free on his site, so be sure to grab a copy.

Continue reading to see a short video of the speakers in action.

Continue reading “Stream Music Anywhere In Your House With These WiFi Speakers”

Arduino Link Libraries

Arduino is great, but it sometimes gets in the way due to its entry level style of doing things. One limitation is making your own library that also includes other libraries.[Scott] has sent in a great tutorial that deals with just that issue.

He covers how to make your own custom libraries while building off of preexisting ones. That’s something Arduino’s automatic magic wont touch.He covers getting your library to compile while including aanother library, linking versus compiling, and getting it all linked up.

Add in clear examples, lots of explanation and a hand full of good practices for C with libraries (like Forward Class Declaration vs Includes, and Using Brackets vs Quotation Marks for Includes), and this is one tutorial that any aspiring AVR or Arduino developer should check out.

Nanode: A Low-cost Network-enabled Arduino Ethernet Alternative

nanode_ethernet_enabled_arduino_board

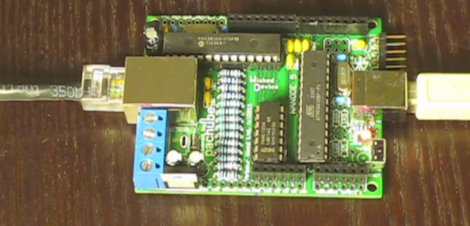
The folks over at Hackspace London have been working hard to create a “very low cost, open source, Internet connected platform on which others can develop their ideas”, which they have dubbed “Nanode”.

Essentially an Arduino with Ethernet networking on-board, the Nanode is armed with an ATMega 328 microcontroller along with all the other standard goodies you would expect from an Arduino-compatible device. The Nanode can be controlled with a web browser right out of the box, thanks to some custom Ethernet libraries. Additionally network of Nanodes can be easily configured to communicate with a “master” unit via a multidrop serial bus, allowing the device to be used for a wide array of distributed control tasks.

Obviously most of these features can be had in the form of an Arduino Ethernet board, or achieved by using an Ethernet shield. The Nanode is a touch cheaper than either option at $40 for a kit, and the native networking capabilities sound like they would be quite handy. That said, we are a bit bummed that it only has 10BaseT networking capabilities, though it is always nice to have options when it comes to choosing a microcontroller board.

[Thanks, TheHypnotist]

Control LED Lighting With An Old Stereo Receiver

stereo_controlled_home_lighting

[Marklar] needed an IR receiver for a project he was working on, and his local electronics store was fresh out. He dug through his junk pile and found an old stereo receiver, so he decided to pull the IR module from it before tossing it out. Once he had it taken apart, he figured that he could utilize the wide array of electronic components he found inside, and set off to start a new project.

The control panel housed the components which interested him most of all. Using an Arduino, he was able to easily interface with the rotary encoders as well as the buttons, giving him a cheap and easy way to control his home lighting system. With a bit of programming, he was able to map lighting presets to various buttons, as well as use the rotary encoder to control the LEDs’ brightness and color. As an added bonus, he kept the IR receiver intact and can control his setup wirelessly as well.

Check out the video we have embedded below to see his scavenged control system at work.

[via HackedGadgets]

Continue reading “Control LED Lighting With An Old Stereo Receiver”

An Introduction To DC Boost Converters

simple_boost_converter

If you are planning on creating some sort of Nixie tube display, you will undoubtedly need to find yourself a high voltage DC power supply. If you don’t want to add a transformer to your project, you can always opt to build a boost converter instead. [Andrew Moser] shows us just how easy it is to build one, discussing the theory behind simple boost converters along the way.

Boost converters are often driven by dedicated ICs, but in this case the PWM signal from an Arduino does the job just fine. [Andrew] covers the process of choosing the proper components for the circuit, discussing duty cycles and components to avoid lest your boost converter die an untimely death.

He shows us how to implement a feedback system to get a more precise output voltage, but as Lady Ada has shown us, an open loop works pretty well too.

For the beginners that want to just get things up and running, his instructions and code should be sufficient, but [Andrew] provides plenty of reference links for those looking to delve deeper into the subject.

Impressive Lighting Console Offers Professional Features For A Fraction Of The Price

diy_dmx_lighting_control_panel

Hackaday reader [Michael] wrote in to share the build details of an impressive lighting console he has been working on for some time. He says that the 36+ channel console is on par with lighting rigs costing upwards of $5,000, but his was constructed for just around $1,000 – quite the substantial savings.

The console was constructed around an old IBM desktop computer, which handles all of the DMX output as well as preset management. An array of 20 ATMega 328Ps running the Arduino bootloader are scattered throughout the device, 18 of which are used to manage the six fader panels, while the remaining two handle management tasks. Aside from the fader banks, the console features a main control board featuring several LCD screens along with 17 capacitive touch buttons used for menu navigation and console control.

While [Michael] is finished building the board, he has just begun the documentation of the construction process. His blog should be updated regularly with more details, so be sure to check back often. Code, as well as hopefully tons of pictures and videos are all forthcoming.

[Edit: Cost comparison update]