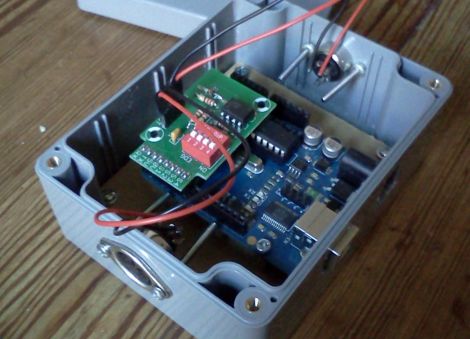
Laptop Touchpad-based LED Lighting Control

touchpad_lighting

[Dave] needed some extra light above his desk/workbench area and decided to wire up some RGB LED light strips to brighten the place up a bit. He wasn’t content with using a standard switch to toggle them on and off, and after some brainstorming, he decided to build a capacitive touch circuit using a pair of copper tubes mounted in a project box. Just as he was putting the finishing touches on his switch, he saw a project online where a Synaptics touchpad was used in conjunction with an Arduino for lighting control. The copper tube switch was pitched, and he got busy working with his Arduino.

When connected to an Arduino, the touchpads can be used in two modes – relative and absolute. Relative mode is familiar to most people because it is used to guide the mouse cursor around on a laptop’s screen. Absolute mode however, relays coordinate information back to the Arduino, allowing the user to map specific areas of the pad to specific functions. [Dave] enabled his touchpad to use absolute mode, and mapped a handful of different functions on the Arduino. He can now fade his lights on and off or light the room on a timer, as well as use a sliding function to tweak the LEDs’ brightness.

It’s a neat, yet simple hack and a great way to repurpose old laptop touchpads.

Continue reading for a quick demo video he put together, and swing by his site if you want to take a look at the source code he used to get this working.

Continue reading “Laptop Touchpad-based LED Lighting Control”

Video Experimenter Shield

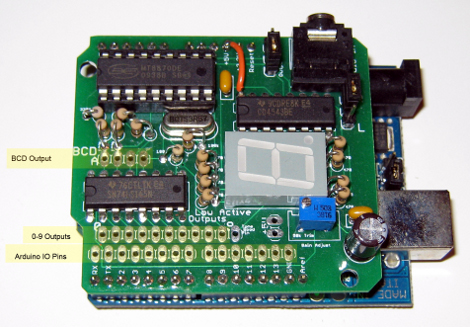
People always want to do more with less and the Video Experimenter Shield is no exception. Consisting of an LM1881 video sync separator, a handful of passive components, and a stylish PCB in the standard Arduino shield footprint.

The board features simple but useful controls and features, a removable jumper allows you to select a sync source, either from incoming video or the Arduino, a potentiometer to adjust the analog threshold, and there is a convenient signal breakout header.

Software is an enhanced version of the popular TV out library and allows you to start off with video graphics overlay, closed caption decoding, a simple gun game, and basic, but still effective frame capture, and computer vision. Of course, there are all sorts of other fun and amusing experiments that start to pop in mind once you check out a quick demo video after the break.

Continue reading “Video Experimenter Shield”

Geiger Counter A/D Conversion For Radiation Level Crowdsourcing

arduino_geiger_counter

[Akiba] and the crew at Tokyo Hakerspace are still hard at work trying to help out their fellow countrymen after the recent earthquake, tsunami, and ongoing nuclear crisis in Japan. You may remember the group as they are behind the Kimono Lantern project we featured last week. This time around, their efforts are focused on getting usable information out to those who need it.

With all of the talk about nuclear fallout, they wanted to see what sort of measurements they could get in Tokyo, however they could not locate a Geiger counter anywhere nearby. Luckily, they were eventually able to source two old counters from the Reuseum in Idaho. One is being lent out to individuals in order to check if their home’s radiation levels are safe, but it was decided that the other would reside outdoors in order to collect radiation readings from the air.

[Akiba] wanted to put the results from the external Geiger counter up on Pachube, however these old units are all analog. He figured that a quick and dirty way to do analog to digital conversion would be to monitor the chirps coming off the counter’s speaker. This was done by wiring up an Arduino to the speaker leads, and keeping track of each time the speaker was activated. This resulted in an accurate digital radiation reading, matching that of the counter’s analog display. The Arduinio wirelessly sends the information to another Arduino stationed inside his apartment, which then uploads the data to Pachube.

A walkthrough of his conversion as well as the source code for both the Arduino counter and the Pachube uploader are available on his site, in case anyone else in the Tokyo area has a Geiger counter handy and wishes to do the same.

Roll Away Clock Becomes A Programmable Rover

The parts laid bare in the picture above all make up a roll away alarm clock that flees when you don’t get out of bed. It’s an interesting idea, but considering most folks don’t sleep on hardwood floors we can understand why [TheRafMan] was able to pick this gem up for under $5. That’s quite a deal because there’s a very usable LCD module at the top. But for this hack, he focused on using the gearhead motors to make a programmable rover.

In order to make this programmable [TheRafMan] had to add a microcontroller. He chose an Arduino variant, called the Ardweeny. It’s a board that piggy-backs the ATmega328. But he didn’t use a stock Ardweeny; he’s altered it to play nicely with jumper wire. The uC is able to interface with the gearhead motors thanks to an L293D h-bridge motor driver chip. As you can see in the clip after the jump, the rover can now be driven around using a Wii Nunchuck or via a USB connection. If you’ve got a Bluetooth module lying around it wouldn’t be hard to make this a wireless solution that can be controlled with the accelerometers in a Wii remote.

Continue reading “Roll Away Clock Becomes A Programmable Rover”

Autonomous Paintball Sentry Gun

What is the best thing about making a computer program that targets and kills anything that enters its sight? Why giving it a weapon, of course! No, we are not talking for real, but the next best thing, an Autonomous Paintball Sentry Gun.

The autonomous part of the device comes from a pc on the sideline and is fed input though a standard webcam. The feed is ran though a processing script where, once accustomed to the background has the option to fire at anything it sees moving, or a nice point n click manual mode.

The Arduino part is in a the role of driving the servo motors for X/Y movement and a trigger and is powered by a fist full of D cell batteries to give plenty of time for fun. Also, be sure to check out our other sentry guns, one using Microchip PIC, and another sporting a super compact computer running Ubuntu

GPS-enabled Bag Allows For Carefree City Roaming

mapbag_lilypad

[Josh] was looking for a way to enjoy exploring the city of Chicago safely, and hacked together a messenger bag navigation system to ensure he always knew where he was going.

While riding, he wanted to embrace the idea of Dérive, but he felt that he was being too overly conscious of time as well as his location, which took all the fun out of his unplanned excursions. Having recently been “doored” by a car, he was also looking for a way to help him navigate the city streets without being overly distracted with finding his way around.

His “Map Bag” solves both of these problems for him, without being obtrusive. He fit a messenger bag with a LilyPad Arduino and a GPS receiver for keeping track of his location. The Arduino can constantly monitor speed, heading, and location, directing [Josh] to his destination by vibrating one of 8 shaftless motors that are installed throughout the bag’s chest strap. Now while he rides, he can take in the city’s atmosphere while also knowing that he will get exactly where he needs to – on time.

He does not have any source code or schematics on his site as of yet, but we hope to see some in the near future. If you are interested, check out the videos of the bag’s construction embedded below.

Continue reading “GPS-enabled Bag Allows For Carefree City Roaming”

Gameboy ROM Backups Using An Arduino

gameboy_cart_reader

[Alex] collects retro gaming consoles. One day while playing a SNES title, his save games got wiped when he powered off the system. It turned out that the battery inside the game cartridge got disconnected somehow, and it got him thinking. He decided he wanted to find a way to back up his save games from the cartridges for safe keeping.

While cart readers exist, he says that they are hard to find nowadays, so he decided to construct his own using an Arduino. SNES cartridges are relatively complex, so he opted to focus on Gameboy cartridges for the time being. Before attempting to back up save games, he first chose to learn how to communicate with the cartridges in general, by reading the ROM.

He breaks the cartridges down in detail, discussing how they are constructed as well as how they can be addressed and read using the Arduino. He was ultimately successful, and offers up code as well as schematics on his site for any of you interested in doing the same. We imagine that save game reading (and perhaps editing) will likely happen in the near future.

Check out the video below to see his cart reader in action.

Continue reading “Gameboy ROM Backups Using An Arduino”