Pidato Box Adds Vibrato Effect To Digital Pianos

piano_vibrato_box

[Joren] likes his digital piano, but it was missing one key component that he wanted to use: the ability to produce vibrato while playing. Vibrato can be done in several different ways on regular pianos, but it seemed as if there was not a lot of consideration given to the effect when designing digital pianos.

He enjoys playing all sorts of music, including solos from Franz Liszt which suggest using vibrato at times, so he decided to build himself a vibrato box. Constructed with a bit of assistance from the friendly folks at Hackerspace Ghent, his “Pidato” incorporates an Arduino and three-axis accelerometer to get the job done.

The Arduino is connected to both the MIDI output of the piano as well as to the accelerometer, which he has mounted on his wrist. While playing, all he needs to do is simply move his hand rapidly to produce the vibrato sound as you can see in the video below. The Arduino code filters out any other sorts of movements to ensure that he does not accidentally trigger the effect when it is not desired.

Check out the video below for a quick demonstration of the Pidato box.

Continue reading “Pidato Box Adds Vibrato Effect To Digital Pianos”

minibloq

Drag And Drop Programming Gets Kids Started Early

While programming an Arduino is a piece of cake for EEs who have been around the block a few times, there are some groups who would still find it difficult to get started with the IDE. It is touted for its ease of use, but there is a steep learning curve if say, you are 5 or 6 years old. [Julián da Silva] has been hard at work for a while now, to make the Arduino more accessible than ever.

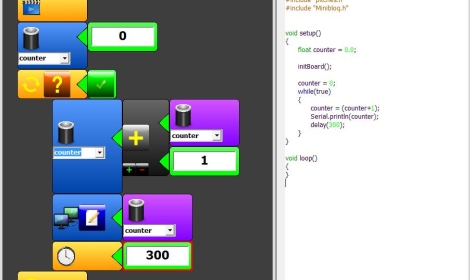
Earlier today, we posted a story about moldable putty which can be used by children to build rudimentary circuits, enabling them to enter the fun world of hobby electronics at a young age. [Julián’s] project “Minibloq” aims to do the same thing with the Arduino. A work in progress, Minibloq uses a graphical interface to “build” Arduino code a block at a time. The code components are dragged and dropped into place on one side of the screen, while the source code is generated on the other half. This helps gently introduce those people new to the Arduino how to write actual code, a little bit at a time.

[Julián] is working hard to ensure that his application works well on OLPC and other classroom-oriented computers to ensure it can reach as wide an audience as possible. We think this would be a great introduction to the world of micro controllers for children as well as those who have never tinkered with electronics at any point in their lives.

Keep reading to see a quick demo of the software in action.

Continue reading “Drag And Drop Programming Gets Kids Started Early”

Push Notifications For Snail Mail On An IPhone

[Matt] over at Make came up with a way to send push alerts to his iPhone whenever his mailbox is opened.

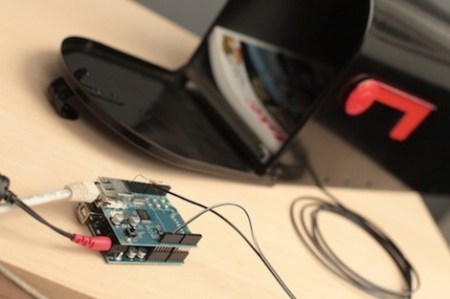
The electronics are just a switch mounted to the mailbox connected to an Arduino with an ethernet shield, but the interesting part of the build is the code. [Matt] got the Arduino WebClient to request a PHP script sitting on a server. This script connects to the Prowl API to push the notification onto an iPhone.

[Matt]’s project has been up for a few months now, and we still haven’t seen any projects using an Arduino+Push combo, or really any other phone except for the iPhone. We think this could be done on an Android phone with cloud to device messaging, but that can’t be the only solution. Any hackaday readers have an idea of how to implement this outside the iOS world? What would Hackaday readers do with a microcontroller that can send push alerts to your phone?

Video of [Matt] walking us through the project after the break

Continue reading “Push Notifications For Snail Mail On An IPhone”

Real-time GPS Tracker With Mobile Phone Uplink

[jayesh] wasn’t actually trying to solve any clever problems when we built his homebrew GPS tracker. He just had the hacker mentality and wanted to build something fun and useful while geeking out with electronics and software.

On the hardware side, he started with an Arduino, then added a GPS module for location detection and a GMS/GPRS module for the data uplink to his server over AT&T’s network. The Arduino uses several libraries and plenty of custom code. On the server, he worked up some wizardry with open-source packages and the Google Maps API. All of the source code and hardware details are well-documented. Put together, it’s a GPS tracker that can update a map in real-time. Sure, there are commercial products that do roughly the same thing, but where’s the fun in that? The principles here can also be put to good use in other microcontroller-based projects.

knex_plotter

K’nex Whiteboard Plotter

[Jerry] has been wanting to put together a whiteboard plotter for some time and just recently got around to building one.

The plotter draws pretty much about anything he can imagine on a white board measuring just shy of 2′ x 3′. The design first started off with a Basic Stamp board at the helm, which he sourced from another project he no longer had any use for. The Stamp worked for awhile, but eventually he ran into problems due to the board’s limited 128 bytes of program space. Needing a more robust micro controller, he switched to an Arduino mid-project, which he says runs the plotter far faster than the Stamp ever did.

The plotter uses a pair of stepper motors mounted on a horizontal platform situated above the whiteboard. Much like this large-format printer we featured earlier this week, the steppers vary the length of a pair of fishing lines, moving the pen precisely across the board.  As you can see in the image above, [Jerry] has been able to create some pretty intricate patterns with his plotter, and we imagine they will only get better with more refinement.

Be sure to check out his site for more details on his build process as well as several additional samples of the plotter’s capabilities.

Haptic GPS Sneakers For The Visually Impaired

gps_haptic_shoe

The world can be a pretty difficult place to navigate when you lack the ability to see it. There are many visually impaired people across the globe, with some figures claiming up to 40 million individuals affected. While walking canes and seeing-eye dogs can be a huge help, [Anirudh] of Multimodal Interactions Group, HP Labs India, and some students at the College of Engineering in Pune, India (COEP) have been hard at work constructing a haptic navigation system for the blind.

[Anirudh Sharma and Dushyant Mehta] debuted their haptic feedback shoe design during an MIT Media Lab Workshop hosted at COEP. In its current form, Google Maps and GPS data is sourced from an Android device, which is fed to an Arduino via Bluetooth. The Arduino then activates one of four LEDs mounted on a shoe insert that are used to indicate which direction the individual should travel in order to safely reach their destination. While the current iteration uses LEDs, they will be swapped out for small vibrating motors in the final build.

We’re always fans of assistive technology hacks, and we think this one is great. The concept works well, as we have seen before, so it’s just a matter of getting this project refined and in the hands shoes of those who need it.

Stick around for a quick video about the project filmed at the MIT/COEP event.

Continue reading “Haptic GPS Sneakers For The Visually Impaired”

Booby Box – It’s A Trap!

Here’s a puzzle oddity that challenges you to open the box without falling into one of the booby-traps. It was built as a side-distraction from the more serious events happening at Insomni’hack 2011. [Sergio] and a colleague built the box to resemble a ticking bomb like in the blockbuster action movies we know you look forward to seeing each summer. A display on top of the device counts down for ninety seconds with an audible beep to mark the passage of time and boost your tension level. See it ticking away in the clip after the break.

Two wires meet at the edges of the box halves, completing a circuit that will set off an alarm when the contact is broken. There’s also a photocell on the bottom of the box which triggers the alarm if you lift it and expose this sensor to light. The combination necessary to open the box was provided to each competitor; it was not a numerical code, but a color code. Three potentiometers control the red, green, and blue anodes of an RGB LED, while being monitored by an Arduino at the same time. If you can dial in the appropriate color, the lid trap is disabled and the box can be opened. What does the winner get? Why an Arduino, of course!

Continue reading “Booby Box – It’s A Trap!”