Pour One Out For This Bottle-Playing Robot

If you have an iota of musicality, you’ve no doubt noticed that you can play music using glass bottles, especially if you have several of different sizes and fill them with varying levels of water. But what if you wanted to accompany yourself on the bottles? Well, then you’d need to build a bottle-playing robot.

First, [Jens Maker Adventures] wrote a song and condensed it down to eight notes. With a whole lot of tinkling with a butter knife against their collection of wine and other bottles, [Jens] was able to figure out the lowest note for a given bottle by filing it with water, and the highest note by emptying it out.

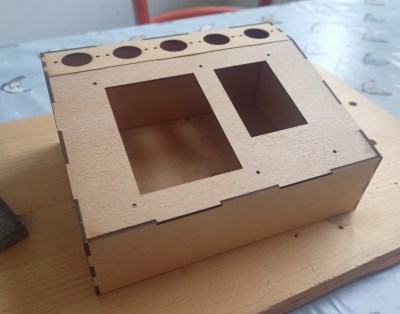
With the bottle notes selected, the original plan was to strike the bottles with sticks. As it turned out, 9g servos weren’t up to the task, so he went with solenoids instead. Using Boxes.py, he was able to parameterize a just-right bottle holder to allow for arranging the bottles in a circle and striking them from the inside, all while hiding the Arduino and the solenoid driver board. Be sure to check it out after the break.

Don’t have a bunch of bottles lying around? You can use an Arduino to play the glasses.

Continue reading “Pour One Out For This Bottle-Playing Robot”

2023 Halloween Hackfest: Quoth The Raven, “Caww!”

Sometimes, projects start in somewhat unlikely places. This one began when [Istvan Raduly] scored a fake raven at a neighbor’s garage sale and decided to turn it into a thunder-and-lightning decoration that would frighten even the bravest trick-or-treater.

Get close enough to this raven and you’ll set off the PIR sensor, which triggers lighting and sound effects, including some spooky glowing and blinking red eyes, general cawing, and of course, thunder. The light comes from a whopping 10-watt, 12-volt power LED. This bird’s brain is an Arduino Nano, which is protected from the 12V supply with a boost converter. As you might expect, the sounds are on an SD card and played through a DF Player Mini.

Spookiness aside, our favorite part might be the absolutely lovely job that [Istvan] did decorating the raven’s base. Hiding electronics and hot glue is one thing, but this is above and beyond. Be sure to check it out after the break, both in the safety of the house, and outside in the scary darkness.

Continue reading “2023 Halloween Hackfest: Quoth The Raven, “Caww!””

Open Source Key Programmer For HiTag2 Keys

Hitag transponders have been used in a wide variety of car keys as a protective measure against hot-wiring and theft. They’re also a reason why it’s a lot more expensive to get car keys duplicated these days for many models that use this technology. However, there is now an open source programmer that works with these transponder keys, thanks to [Janne Kivijakola].

The hack uses an old reader device salvaged from a Renault in a scrapyard, hooked up to an Arduino Mega 2560 or Arduino Nano. With this setup, key transponders can be programmed via a tool called AESHitager, which runs on Windows. It’s compatible with a variety of Hitag transponders, including Hitag2, Hitag3, and Hitag AES, along with the VVDI Super Chip and certain types of BMW keys.

If you’ve been having issues with coded keys, this project might just be what you need to sort your car out. Everything you need is available on GitHub for those wishing to try this at home. We’ve seen some interesting hacks in this space before, too. Video after the break.

Continue reading “Open Source Key Programmer For HiTag2 Keys”

Interactive Chameleon Lamp Changes Color At Your Whim

You never forget your first diorama, especially when it’s interactive. Although admittely a bit late to celebrate Erntedankfest (Germanic Thanksgiving), [Markus Bindhammer] is ahead of the curve when it comes to the American version.

This interactive diorama lamp features a cute chameleon that [Markus sculpted from a wire frame and a lump of clay]. In the chameleon’s midsection is a ping pong ball that does the work of diffusing an RGB LED. Wires run out the far side and through the bamboo stand and connect to a TCS34725 RGB color sensor and an Arduino Pro Micro.

The lamp does what you think — hold any colored object up to the color sensor, and the chameleon will change colors to match. When no one is interacting with the lamp, it slowly runs through a rainbow of colors. Be sure to check out the build video after the break.

Don’t have a color sensor? You can roll your own with an RGB LED, a photocell, and not much else. If you’re wondering how they work, we’ve seen the color sensor demystified.

Continue reading “Interactive Chameleon Lamp Changes Color At Your Whim”

Simple Badge Is Simple, But It’s Yours

Making conference badges, official or unofficial, has become an art form. It can get pretty serious. #badgelife.

But DEFCON-goers aren’t the only people making fancy personalized nametags. Hams often had callsign badges going back as far as I can remember. Most were made of engraved plastic, but, at some point, it became common to put something like a flashing LED on the top of the engraved antenna tower or maybe something blinking Morse code.

Going back to that simpler time, I wanted to see if I could make my own badge out of easily accessible modules. How easy can it be? Let’s find out. Along the way, we’ll talk about multicore programming, critical sections, namespaces, and jamming images into C++ code. I’ll also show you how to hijack the C preprocessor to create a little scripting language to make the badge easier to configure.

Bottom Line Up Front

The photo shows the Pico badge. It has an RP2040 CPU but not a proper Raspberry Pi Pico. The Waveshare RP2040-Plus clone has a battery connector and charger. It also has a reset button, and this one has 16 MB of flash, but you don’t need that much. The LCD is also a Waveshare product. (This just happened to work out. I bought all of this stuff, and I don’t even know anyone at Waveshare.) The only other thing you need is a USB C cable and a battery with an MX 1.25 connector on it with the correct polarity. Hardware done! Time for software.

Continue reading “Simple Badge Is Simple, But It’s Yours”

Simple Hack Lets Smartphone Take Resin Printer Time-Lapses

With how cheap they’re getting, everyone seems to be jumping on the resin printer bandwagon. They may not be able to fully replace your trusty old FDM printer, but for certain jobs, they just can’t be beaten. Sadly though, creating those smooth time-lapse videos of your prints isn’t quite as easy to do as it is on their filament-based counterparts.

Not as easy, perhaps, but not impossible. [Fraens] found a way to make time-lapses on any resin printer, and in a wonderfully hacky way. First, you need to find a smartphone, which shouldn’t be too hard, given how often we all tend to upgrade. [Fraens] recommends replacing the standard camera app on the phone with Open Camera, to prevent it from closing during the long intervals with nothing happening. The camera is triggered by any readily available Bluetooth dongle, which is connected via a simple transistor circuit to an Arduino output. To trigger the shutter, a light-dependent resistor (LDR) is connected to one of the microcontroller’s inputs. The LDR is placed inside the bed of the resin printer — an Anycubic Photon in this case — where light from the UV panel used to cross-link the resin can fall on it. A simple bit of Arduino code triggers the Bluetooth dongle at the right moment, capturing a series of stills which are later stitched together using DaVinci Resolve.

The short video below shows the results, which look pretty good to us. There are other ways to do this, of course, but we find the simplicity of this method pleasing.

Continue reading “Simple Hack Lets Smartphone Take Resin Printer Time-Lapses”

Arduino-Controlled Coil Winder

Coil winders are a popular project because doing the deed manually can be an incredibly tedious and time consuming task. After building one such rig, [Pisces Printing] wanted to find even further time savings, and thus designed an improved, faster version.

At it’s heart, it’s a straightforward design, using a linear rail and a leadscrew driven by a stepper motor. Control is via an Arduino Nano, with a few push buttons and a 16 x 2 LCD display for user feedback.

Often, completing a first build will reveal all manner of limitations and drawbacks of a design. In this case, the original winder was improved upon with faster stepper motors to cut the time it took to wind a coil. A redesigned PCB also specified a better buck converter power supply to avoid overheating issues of the initial design. A three-jaw lathe-style chuck was also 3D printed for the build to allow easy fixing of a coil bobbin.

Designing custom tools can be highly satisfying in and of itself, beyond the productivity gains they offer. Video after the break.

Continue reading “Arduino-Controlled Coil Winder”