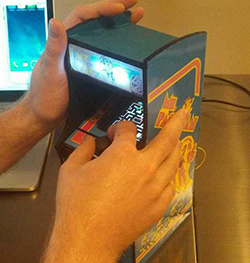
Further Teardown Of The Saturn V Flight Computer

[Fran] has been working on tearing down and reverse engineering the Saturn V Launch Vehicle Digital Computer (LVDC). In her finale, she’s succeeded in depotting the legacy components while keeping them intact.

She accomplished this by carefully removing the silicone compound using a gum brush. This was a laborious process, but it allowed her to see the device’s innards. With this knowledge, she could recreate the logic modules on a breadboard.

[Fran]’s work on the LVDC has been very interesting. It began with a look at the PCB, followed by an x-ray analysis. Next up was a three part series of the teardown. With each part is a detailed video on the progress.

While this is the end of [Fran]’s work on the project, she will be handing off the LVDC hardware to another engineer to continue the analysis. We’re looking forward to seeing what comes out of this continued research.

Reverse Engineering An LCD Display

ipod

The current marketplace allows hobbyists to easily find inexpensive, well-documented displays, but what if you wanted to interface with something more complicated, such as the screen on an iPod Nano 6? [Mike] has given us a detailed and insightful video showing his process for reverse engineering a device with little-to-no documentation. Here he covers the initial investigation, where one scours the web in search of any available information. In [Mike’s] example, the display uses an MIPI D-PHY interface, which he has never worked with. He learns that the MIPI Alliance will provide design specs in exchange for a signed NDA (Non-Disclosure Agreement) and a modest $8000 fee. Nice.

[Mike] shows off some serious hardware hackery, tackling some extremely difficult soldering in order to set up a proper test platform. He then demonstrates how to use a rather awesome oscilloscope to better understand the display protocol. We found it fascinating to see the video signals displayed as waveforms, especially when he shows how it is possible to count the individual binary values. The amount of information he uncovers with the oscilloscope is nothing short of amazing, proving these little devices are more complex than they seem.

[via Hacked Gadgets]

Continue reading “Reverse Engineering An LCD Display”

Reverse Engineering Serial Ports

Can you spot the serial port in the pic above? You can probably see the potential pads, but how do you figure out which ones to connect to? [Craig] over at devttys0 put together an excellent tutorial on how to find serial ports. Using some extreme close-ups, [Craig] guides us through his thought process as he examines a board. He discusses some of the basics every hobbyist should know, such as how to make an educated guess about which ports are ground and VCC. He also explains the process to guessing the transmit/receive pins, although that is less straightforward.

Once you’ve identified the pins, you need to actually communicate with the device. Although there’s no easy way to guess the data, parity, and stop bits except for using the standard 8N1 and hoping for the best, [Craig] simplifies the process a bit with some software that helps to quickly identify the baud rate. Hopefully you’ll share [Craig’s] good fortune if you reach this point, greeted by boot messages that allow you further access.

Putting A Mac Plus On The Internet

plus

[Jeff] has a Mac Plus, an 8 MHz computer with 4 MB of RAM and a 512×342 1-bit screen. It was his first ‘real’ computer, and like those guys that take Model A Fords out for a Sunday drive, [Jeff] decided to put this old box on the Internet.

A Plus has a few options to get on the Internet. The best, but most expensive, is a SCSI to Ethernet computer. For a somewhat slower connections, a PowerPC mac can be used as an Ethernet to Localtalk (the Macintosh serial port networking protocol) bridge. Lacking either of those pieces of hardware, [Jeff] decided to use a Raspberry Pi. The Pi does the heavy lifting, and a handful of serial adapters and voltage converters turns the Pi into something that can talk to the Plus’ serial port.

Even with the MacTCP stack and the MacWeb browser, there are still some things this ancient computer couldn’t do. HTTPS hadn’t been invented until 1994, cookies are just a pain, and CSS is right out. This means modern websites (except, of course, the Hackaday retro edition) simply won’t render properly. To fix this issue, [Jeff]’s friend [Tyler] came up with a Python script using Requests, Beautiful Soup, and Flask to strip out all the Web 2.0 cruft, handle the cookies, and to get rid of SSL.

The end result is a Mac Plus with 4 Megabytes of RAM on the Internet, able to pull up Wikipedia and Hacker News. It isn’t fast by any means – in the video below, it takes about five minutes to pull up the front page of Hacker News – but it is a 27-year-old computer on the Internet.

Continue reading “Putting A Mac Plus On The Internet”

Veronica Gets A Pair Of Gamepads And A Bugged Chip

veronica

[Quinn Dunki]’s awesome 6502-based computer is coming right along, and she decided it’s time to add one of the most important features found in the 80s microcomputers she’s inspired by – gamepads.

There were two ways of implementing gamepads back in the 80s. The Apple II analog joysticks used a potentiometer for each joystick axis along with a 556 timer chip to convert the resistance of a pot into a digital value. Analog controls are awesome, but a lot of hardware is required. The other option is the Atari/Commodore joystick that uses buttons for each direction. Surprisingly, these joysticks are inordinately expensive on the vintage market but a similar hardware setup – NES gamepads – are common, dirt cheap, and extremely well documented.

[Quinn] wrote a few bits of 6502 assembly to read these Nintendo controllers with Veronica’s 6522 VIA with the help of an ATMega168, and then everything went to crap.

In testing her setup, she found that sometimes the data line from the controller would be out of sync with the clock line. For four months, [Quinn] struggled with this problem and came up with one of two possible problems: either her circuit was bad, or the 6522 chip in Veronica was bad. You can guess which option is correct, but you’ll probably be wrong.

The problem turned out to be the 6522. It turns out this chip has a bug when it’s used with an external clock. In 40 years of production this hasn’t been fixed, but luckily 6502 wizard [Garth Wilson] has a solution for this problem: just add a flip-flop and everything’s kosher. If only this bug were mentioned in the current datasheets…

Now Veronica has two NES controller inputs and the requisite circuitry to make everything work. Video evidence below.

Continue reading “Veronica Gets A Pair Of Gamepads And A Bugged Chip”

Internet-Enabling A Lamp With The Raspberry Pi

lampcontrol

[Jack] sent in his writeup for internet enabling a home lamp. While we will certainly have some comments saying this is too simple, it does a great job of breaking things down to the basics. For those that aren’t confident in their electronic skills, this is an easy hack to a commercial device that greatly expands it’s capabilities. [Jack] started with a cheap wireless outlet controller. By opening the remote and wiring each switch to a 2N222A transistor, you can very easily control the remote from the GPIO pins on the Raspberry Pi. In [Jack’s] case, he set up a web page using Flask that allows quick on/off control.

Of course, this method can be used in any number of instances where you have a wireless controller, from small lamps to garage doors. Given it’s simplicity, anyone can do it with even basic skills. If you’re a beginner who’s been itching to do some home automation, follow [Jack’s] writeup and check an item off your todo list!

VFD And Nixie Clock Twofer

Clocks

Sometimes the stars align and we get two somewhat similar builds hitting the Hackaday tip line at the same time. Recently, the build of note was clocks using some sort of display tube, so here we go.

First up is [Pyrofer]’s VFD network time clock (pic, above). The build started as a vacuum flourescent display tube he salvaged from an old fruit machine – whatever that is. The VFD was a 16 character, 14 segment display, all controlled via serial input.

The main control board is, of course, an Arduino with a WizNet 5100 Ethernet board. The clock connects to the Internet via DHCP so there’s no need to set an IP address. Once connected, the clock sets itself via network time and displays the current date, time, and temperature provided by a Dallas 1-wire temperature probe.

Next up is [Andrew]’s beautiful Nixie clock with enough LEDs to satiate the desires of even the most discerning technophile. The board is based on a PIC microcontroller with two switching power supplies – one for the 170VDC for the Nixies, and 5V for the rest of the board.

A battery backed DS1307 is the real-time clock for this board, and two MCP23017 I/O expanders are used to run the old-school Nixie drivers

All this is pretty standard for a Nixie clock build, if a little excessive. It wasn’t enough for [Andrew], though: he used the USB support on his PIC to throw a USB port on his board and wrote an awesome bit of software for his PC to set the time, upload new firmware, and set the color fade and speed. With this many LEDs, it’s not something you want in your bedroom with all the lights on full blast, so he implemented a ‘sleep’ mode to turn off most of the lights and all the Nixie tubes. It’s a great piece of work that could easily be successfully funded on Kickstarter.