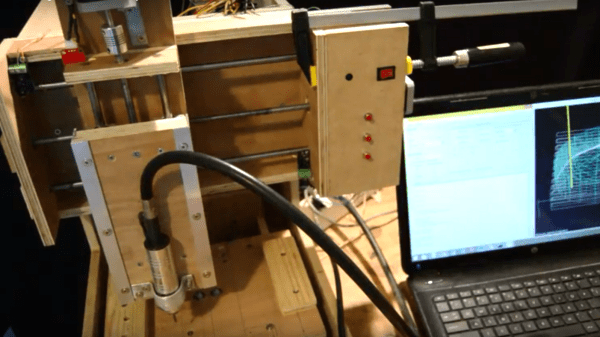
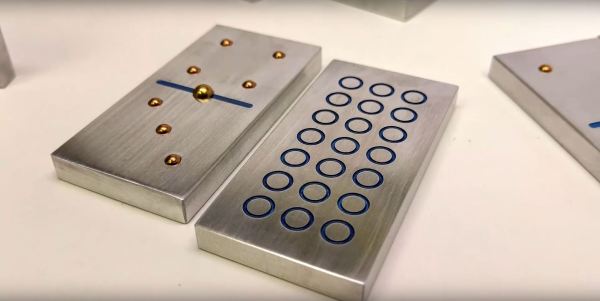
Fidget Pyramid With Help From A 2500 Pound Robot

Depending on whom you ask, fidgeting is an unsightly habit or a necessity for free-form ideation. Fan of the latter hypothesis? Well, why aren’t you making yourself a fidget pyramid?

[lignum] sculpted his fidget toy out of a chunk of 2000 year old bog-oak using hand tools and a little precision help from a Kuka KR 150 industrial robot arm. A push button, a toggle switch, a ball-bearing, and a smooth side provide mindless distraction on this piece.

Two plates of 1.5mm aluminium — also cut using the robot arm — are used to attach the button and toggle to the tetrahedron, while the ball bearing is pushed onto a cylindrical protrusion left during the cutting process for the purpose. The build video makes it look easy.

Continue reading “Fidget Pyramid With Help From A 2500 Pound Robot”

Friday Hack Chat: Mechanical Manufacturing

Join [Sylvia Wu], a Senior Manufacturing Engineer at Fictiv, for this week’s Hack Chat. [Sylvia’s] work at Fictiv gives her a unique viewpoint for modern manufacturing. The company connects engineers with rapid manufacturing by taking in a design and routing it to a shop that has the tools and time to fabricate the part quickly. This means seeing the same silly mistakes over and over again, but also catching the coolest new tricks as they pass by. She also spends time tearing apart consumer products to see how they have been manufactured, adding to their arsenal of available processes, both time-tested and newfangled.

Anyone interested manufacturing needs to get in on this Hack Chat. Mark your calendar for this Friday, 3/10 at noon PST (20:00 UTC)

Here’s How To Take Part:

join-hack-chatOur Hack Chats are live community events on the Hackaday.io Hack Chat group messaging.

Log into Hackaday.io, visit that page, and look for the ‘Join this Project’ Button. Once you’re part of the project, the button will change to ‘Team Messaging’, which takes you directly to the Hack Chat.

You don’t have to wait until Friday; join whenever you want and you can see what the community is talking about.

Upcoming Hack Chats

On Friday March 17th the Hack Chat features chip design for oscilloscopes with engineers from Keysight.

Pint-Sized, Low-Cost CNC Machine

A little MDF, a little plywood, some bits of threaded rod – put it all together and you’ve got this low-cost desktop CNC build using very few parts you’d need to go farther afield than the local home center to procure.

We’ve seen lots of e-waste and dumpster diving CNC builds here before; what’s appealing here is not only the low price tag of the build but also its approachability. As the short videos below show, [Thimo Voorwinden] does an admirable job of using the tools and materials he has on hand. We also appreciate the modularity of the build – the X- and Y-axis carriages are nearly identical and could be interchanged to alter the dimensions of the work area, or even replaced with a larger carriage if needed. The Z-axis is a little different from the usual low-end CNC build in that it doesn’t use a Dremel or other small rotary tool but rather mounts the handpiece of a flexible shaft rotary tool. Keeping the motor off the machine allows for more torque, less vibration, and reduced dead load.

The end result is a desktop CNC for about €200 with a work area large enough to fabricate small wooden and plastic parts, or to mill foam blocks for use as casting molds. It looks like [Thimo] has more in store for his little CNC machine, and we’re looking forward to seeing what improvements he can come up with.

Continue reading “Pint-Sized, Low-Cost CNC Machine”

Wood And Rubber Band Pinball

As pinball has evolved, it has gone from a simple gravity based game to an electromechanical one.  As the 20th century came to a close, pinball games added digital elements as well, matrix displays replaced electromechanical scoreboards, and LEDs replaced incandescent bulbs. While the game got more creative as new technologies became available, the basics of the pinball never changed – keep the ball alive using your skill with the flippers (and the occasional nudge.) [Garagem Fab Lab] has taken the basics of the pinball machine and, with some wood and elastic bands, has created a very nice desktop pinball machine.

The plans for the game require getting the wood cut by a CNC mill, but they could probably be easily created using a jigsaw. Instead of electrical buttons and solenoids, pieces of wood push the flippers out and elastics reset them when released. The bumpers, too, are simple dowels with rubber bands wrapped around them. The launching mechanism is a bit of bungee cord tied onto a piece of wood and used like a flipper to speed the ball into the play area.

The build is a throwback to the earliest pinball machines. Sure, there’s no reaction from the bumpers when they’re hit, they’re just passive, but the game looks fun. It would be a great base to add in some sensors, a microcontroller, and a display to keep track of scores if one was so inclined. Other DIY pinball machines we’ve seen are this pinball game built with Meccano and lasers, as well as this completely 3D-printed machine.

Add Broken Tool Detection To Your CNC Mill

A tool breaking in the midst of a CNC machining operation is always a disaster. Not only do you have a broken tool (no small expense), but if the program continues to run there is a good chance it’ll end up ruining your part too. In particularly bad cases, it’s even possible to for this to damage the machine itself. However, if the breakage is detected soon enough, the program can be stopped in time to salvage the part and avoid damage to your machine.

Many new machining centers have the ability to automatically detect tool breaks, but this is a feature missing from older machines (and inexpensive modern machines). To address this issue, [Wiley Davis] came up with a process for adding broken tool detection to an older Haas mill. The physical modifications are relatively minor: he simply added a limit switch wired to the existing (but unused) M-Function port on the Haas control board. This port is used to expand the functionality of the machine, but [Wiley] didn’t need it anyway.

Continue reading “Add Broken Tool Detection To Your CNC Mill”

CNC telescope, semi-Nasmyth mount

CNC-Telescope With Semi-Nasmyth Mount

[GregO29] had a 10″ GoTo telescope but at 70lbs, it wasn’t really portable. And so he did what any self-respecting CNC enthusiast would do, he put his CNC skills to work to make an 8″ Newtonian reflector, semi-Nasmyth mount telescope of his own design. It also gave him a chance to try out his new Chinese 6040 router/engraver with 800W water-cooled spindle.

What’s all that fancy terminology, you say? “Newtonian reflector” simply means that there’s a large concave mirror at one end that reflects a correspondingly large amount of light from the sky to a smaller mirror which then reflects it toward your eye, preferably along with some means of focusing that light. “Semi-Nasmyth mount” means that the whole thing pivots around the eyepiece so that you can keep your head relatively still (the “semi” is because the eyepiece can also be pivoted, in which case you would have to move your head a bit).

We really like the mechanism he came up with for rotating the telescope in the vertical plane. Look closely at the photo and you’ll see that the telescope is mounted to a pie-shaped piece of wood. The curved outer circumference of that pie-shape has gear teeth on it which he routed out. The mechanism that moves these teeth is a worm screw made from a 1″ spring found at the hardware store that’s on a 3/4″ dowel. Turn the worm screw’s crank and the telescope rotates.

Continue reading “CNC-Telescope With Semi-Nasmyth Mount”

Convert That Cheap Laser Engraver To 100% Open-Source Toolchain

laserweb-on-cheap-laser-squareLaserWeb is open-source laser cutter and engraver software, and [JordsWoodShop] made a video tutorial (embedded below) on how to convert a cheap laser engraver to use it. The laser engraver used in the video is one of those economical acrylic-and-extruded-rail setups with a solid state laser emitter available from a variety of Chinese sellers (protective eyewear and any sort of ventilation or shielding conspicuously not included) but LaserWeb can work with just about any hardware, larger CO2 lasers included.

LaserWeb is important because most laser engravers and cutters have proprietary software. The smaller engravers like the one pictured above use a variety of things, and people experienced with larger CO2 laser cutters may be familiar with a piece of software called LaserCut — a combination CAD program and laser control that is serviceable, but closed (my copy even requires a USB security dongle, eww.)

LaserWeb allows laser engravers and cutters to be more like what most of us expect from our tools: a fully open-source toolchain. For example, to start using LaserWeb on one of those affordable 40 W blue-box Chinese laser cutters the only real hardware change needed is to replace the motion controller with an open source controller like a SmoothieBoard. The rest is just setting up the software and enjoying the added features.

Continue reading “Convert That Cheap Laser Engraver To 100% Open-Source Toolchain”