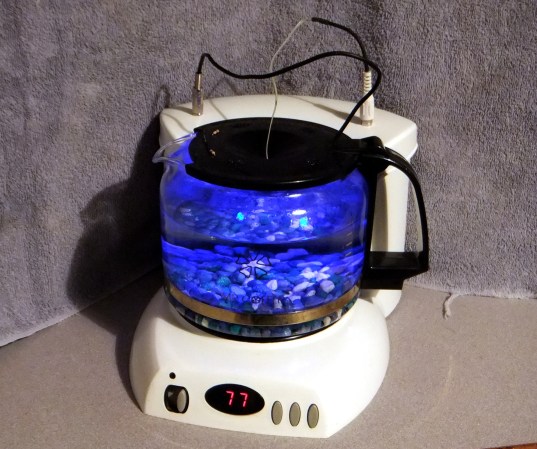
Oreo Separators Episode 2 Chucks Food At Your Face

Here’s a portable, well-built Oreo separator that still manages to border on ridiculous. Instead of just ditching the creme filling, it dispenses the cookie and the creme separately. Ostensibly the two creators like different things. One enjoys the cookies while the other only likes the creme. Of this division was born the professional-looking snack divider.

Unlike the hatchet-based system shown off in the first episode this machine has a hopper into which several Oreos may be loaded. The demo cookie is like none we’ve seen before because the top portion is pushed off as if it took no effort at all. The creme is then softened with a stream of hot air before the gooey creme is blasted into the other creators face. Some of it may even have entered his mouth. The final step ejects the remaining chocolate cookie by launching it straight up into the air.

Our favorite part of the video after the break is the “DO NOT ATTEMPT” subtitle that flashes on the screen whenever the apparatus is launching food into the guys’ mouths.

Continue reading “Oreo Separators Episode 2 Chucks Food At Your Face”

Sous Vadar

[Craig] pulled off a beautiful build with his Sous Vader project. The name is a geeky spin on sous vide, a method of cooking foods in water held at a precise temperature. Building your own setup at home saves a ton of money, but it’s also a lot of fun. This explains the frequency with which we see these builds here at Hackaday.

So this one has a flashy name, a fine-looking case, but the beauty continues on the internals. [Craig] posted an image with the cover off of the control unit and it’s absolutely gorgeous inside. Part of the reason for this is the circuit board he spun for the project which hosts the ATmega328 and interfaces with the LCD, buttons, temperature sensor, and mains-switching triac. But most of the credit is due to his attention to detail. The image on the right shows him prototyping the hardware. Since some of his meals take 20 hours to prepare it’s no wonder he found an out-of-the-way closet in which to do the testing.

Make sure to read all the way to the bottom of the post for some cooking tips. For instance, since he doesn’t have a vacuum sealer he uses zipper bags — lowering them into water to push out the air as they are sealed.

Laminated Wooden Case Brings A Dropped Coffee Grinder Back From The Junk Heap

coffee-grinder-fix

Instead of giving it up for dead, [Suprise Pink Mist] fabricated a replacement case for the motor and blade of his broken coffee grinder. The original enclosure was made of plastic, which didn’t survive being dropped. There isn’t an image of what those plastic parts looked like, but we have to think they were nowhere near as neat as the replacement.

The first step was to cut a set of plywood discs to the approximate outside dimensions. Since the base of the motor has several different diameters each disc had a void cut out of its center to match. The image to the right shows the motor sitting upside down next to the stacked plywood. The black electrical tape seals around the mason jar ring which was a perfect friction fit with the original bowl of the grinder. Once everything was glued together the outside edges were flattened on a belt sander and the mason jar was screwed in place to house the beans during grinding.

[via Reddit]

Kitchen Scale Key Transplant

kitchen-scale-key-transplant

[Markus] is quite happy with his kitchen scale. It’s one of the tools he uses most frequently when cooking. But recently the button has begun to give him problems. He figures the years of spilling a little bit of this and that has mucked up the contacts. His solution was to bypass the button using a Cherry MX switch.

Really any replacement should do since the switch merely completes an electrical connection. But there’s a subset of hackers who swear by the Cherry MX switches that come in some keyboards. [Markus] had just such a keyboard on hand, which he was already using for parts, so he pulled out the switch and cut a hole in the scale’s case where he could mount it. After temporarily super gluing the switch in place he completed the task by filling the gap on the outside with hot glue, then running another bead of it along the inside. The addition of the ‘T’ key finishes the hack. The plastic key is easy to clean and will help shed flour, oil, or anything else he might spill during his culinary adventures.

This hack was fast and easy and may have convinced [Markus] to roll his own controller board for the device. We’ll keep a lookout for a follow-up post detailing those alterations.

Satellite Dish Solar Cooker Bakes Potatoes And More

baked-potatoes-in-a-dish-solar-cooker

Hone your survival skills by harnessing the sun’s rays to cook your meals. [Robert] and his daughter turned an old satellite dish into a solar cooker. The image above shows them baking some potatoes, but the temperatures inside the cast iron vessel are high enough to let you cook most foods.

The dish was originally used for satellite television but has been collecting dust in the shed for quite some time. When [Robert] came across a roll of foil tape in his workshop he decided to give the project a whirl. His daughter helped out by peeling away the tape backing (this can be much harder than it sounds) while he applied the reflective material trying to keep it free of wrinkles. After a close call [Robert] donned a pair of welding goggles when positioning the dish. If the light intensity can get the pot up as high as 428 degree Fahrenheit we’re sure it can cause flash blindness.

Unlike other dish cookers we’ve seen, [Robert] didn’t use the original mount for holding the dish in place. He just set it on three bricks and directed it by hand. To keep the intensity focused on the kettle he had to reposition it every 15 minutes.

We wonder if the heat is too much for building a sun tracking solar power harvester?

An Amplifier Circuit Good Enough To Eat

Gingerbread-Amplifier-009

[Dino’s] kitchen skills match his hardware hacking prowess. Look really close at the image above and you’ll realize this collection of transistors and passive components is edible. Rather than decorating cookies for the holidays he built this audio amplifier from gingerbread, icing, and candy.

The thing is, [Dino] almost always has that extra touch to his presentations. If you watch the video after the break you’ll notice that the sound is not the crystal clear quality we’re used to hearing in his video. That’s because he used the hardware from which the edible offering was modeled to do the audio for the presentation clip.

After laying out the design using Express PCB he gets down to business. The base, which is gingerbread, looks just like a square of Radio Shack protoboard. To make the diodes he rolled up some tin foil around a screw driver to use as a mold for sugar and water which had been boiled long enough to give a dark color. A similar technique was used to cast the other parts. Everything was tied together using frosting and pieces of red and black licorice.

Continue reading “An Amplifier Circuit Good Enough To Eat”

More Details About Laser Cut Gingerbread Houses

Members of Sector67 tried their hands at laser cut gingerbread houses. The Madison, Wisconsin based hackerspace is using the tabbed box method of assembly for the corners of the structure. They’ve also put up a bunch of information about laser settings and published the recipe used to mix up a sheet of gingerbread. This quite a bit more info than was provided with the project we saw a couple of weeks back.

The initial designs were made in Inkscape and then transferred to Corel Draw before heading to the cutter. They’ve got a 150W machine and found that a speed of 15 worked well when the speed was set to 100, with a corner speed of 60. The raw dough was rolled out to 1/8″ thickness. Possibly the best tip coming out of Sector67 is to lay 1/8″ dowels on either side of the dough. This way the rolling pin will stop when it hits the dowels resulting in the best possible uniform thickness. As reported in the previous project the odor generated while cutting is not the most pleasant. But we love the fusion of lasers with the age old process of building with cookies and decorating with candy.