This excellent content from the Hackaday writing crew highlights recurring topics and popular series like Linux-Fu, 3D-Printering, Hackaday Links, This Week in Security, Inputs of Interest, Profiles in Science, Retrotechtacular, Ask Hackaday, Teardowns, Reviews, and many more.
We all know and love OpenSCAD for its sweet sweet parametrical goodness. However, it’s possible to get some of that same goodness out of Fusion 360. To do this we will be making a mathematical model of our object and then we’ll change variables to get different geometry. It’s simpler than it sounds.
Even if you don’t use Fusion 360 it’s good to have an idea of how different design tools work. This is web-based 3D Modeling software produced by Autodesk. One of the nice features is that it lets me share my models with others. I’ll do that in just a minute as I walk you through modeling a simple object. Another way to describe what we’re going to learn is: How to think when modeling in Fusion 360.
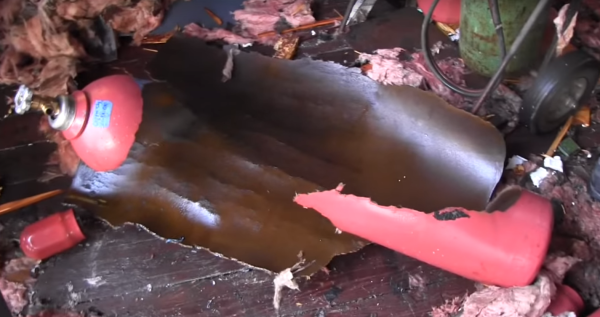
On the morning of September 26th, 2013 the city of Orlando was rocked by an explosion. Buildings shook, windows rattled, and Amtrak service on a nearby track was halted. TV stations broke in with special reports. The dispatched helicopters didn’t find fire and brimstone, but they did find a building with one wall blown out. The building was located at 47 West Jefferson Street. For most this was just another news day, but a few die-hard fans recognized the building as Creative Engineering, home to a different kind of explosion: The Rock-afire Explosion.
The Inventor and His Band of Robots
Many of us have heard of the Rock-afire Explosion, the animatronic band which graced the stage of ShowBiz pizza from 1980 through 1990. For those not in the know, the band was created by the inventor of Whac-A-Mole, [Aaron Fechter], engineer, entrepreneur and owner of Creative Engineering. When ShowBiz pizza sold to Chuck E. Cheese, the Rock-afire Explosion characters were replaced with Chuck E. and friends. Creative Engineering lost its biggest customer. Once over 300 employees, the company was again reduced to just [Aaron]. He owned the building which housed the company, a 38,000 square foot shop and warehouse. Rather than sell the shop and remaining hardware, [Aaron] kept working there alone. Most of the building remained as it had in the 1980’s. Tools placed down by artisans on their last day of work remained, slowly gathering dust.
Hackaday and Adafruit are teaming up to bring you the Pi Zero Contest. Unless you’ve been hiding out in your workshop for the past month or so, you probably already know The Pi Zero is the $5 Linux-based computer which has been taking the world by storm. Think you have the next great project for this single-board computer? Enter it for a chance to take home one of three $100 gift certificates to the Hackaday Store. We know Zeros have been hard to find, so we’ll be giving away 10 of them before the contest is over. Even if you don’t have a Pi Zero, read on!
This is all about documenting quality projects to Hackaday.io. We’re looking for well thought out, well documented builds intended for the Pi Zero. Any project submitted to this contest can also be rolled over to the 2016 Hackaday Prize. Think of it as getting a head start.
Here are the details:
From February 2nd, to February 20th, Lady Ada will make 10 ‘From the Desk of Lady Ada’ broadcasts focusing on this contest. During each broadcast she will present an idea for a Pi Zero Project. You don’t have to build Lady Ada’s projects, they’re starter ideas to get your wheels turning. If you don’t have a Raspberry Pi Zero, don’t worry! You can prototype with a Raspberry Pi Model B, or a Pi 2. There are also 10 Pi Zero boards up for grabs before the contest is over.
The deadline for winning a Pi Zero is 12:00am PST February 25th, 2016. The judges will pick the 10 most well thought out and well documented projects.
On February 29th, the judges will announce the winners of 10 Raspberry Pi Zero boards.
The grand prize for this contest is one of three $100 gift cards to the Hackaday store. The deadline to enter is 12:00 am PST March 14th, 2016.
Entering is easy. All you have to do is submit your project. Just click the “Submit to” drop down list on your project page. Then select Adafruit Pi Zero Contest.
So fire up your soldering irons, warm up your 3D printers, and load up your favorite code editor. It’s time to start hacking!
The companies that design and build the chips we all use – Atmel, Texas Instruments, Microchip, NXP, Freescale, Intel, Altera, Avago, Broadcom, and On Semi are all buying each other, merging, and slowly becoming two or three gigantic semiconductor companies. The question on everyone’s mind is, ‘which company will be next?’ The answer might be Xilinx, inventors of the FPGA and designers of some really cool parts.
The Wall Street Journal and Barron’s reported a few regulatory filings from Xilinx last week. This could signal an acquisition or merger of the company When this could happen is anyone’s guess, but rumors are flooding the Internet over who would buy Xilinx.
Until recently, Xilinx’s largest competitor in the FPGA market was Altera. That is, until Intel came by with a check for $16.7 Billion. The revenue, size, and market cap of both Xilinx and Altera aren’t too different, leading the question of who would have the money to buy Xilinx and isn’t Intel. Aren’t rumors fun?
Xilinx’s portfolio include high performance, mid-range and low-cost FPGAs as well as interesting hybrid devices. One such hybrid is Zynq, an FPGA and fast ARM Cortex A9 processor in the same package. All these chips will be made for years to come in one form or another. The only question is if Xilinx will make these chips, or will the company continue on under some new branding.
We have lost a great inventor. [Artur Fischer], inventor of the plastic drywall plug, fischertechnik, the plastic wall plug, photo flash light, and holder of over 1100 patents (more than the great Edison), passed away this week.
Who remembers Glider? That old Macintosh game where you fly a paper airplane around a house is now available on GitHub. The creator of Glider, [John Calhoun] put all the code up a few days ago. If you have Metrowerks Code Warrior sitting around on an old box, feel free to dig around.
In the ‘this guy totally won’t get sued’ column is MagSafe for iPhones. The MagSafe power adapter is Apple’s largest contribution to humanity, but they are a little protective about it.
We have two calls for the community: [jimie] had a go at programming the latest, coolest, open source radio. Programming it is hard. Has anyone found an improved guide? Second, I now have a Tadpole Computer that was former property of Quallcom. I can’t find any info on getting *nix or *BSD on it. Anyone have any experience?
You never know where a hack will take you. Sometimes a simple project will take on a life of its own and become a huge software framework. Other times, a reading blog can turn into a weekend project. Hackaday.io is the place to upload every project, big, small, or somewhere in between. This week on the Hacklet, we’re taking a look at two projects – one big, one small.
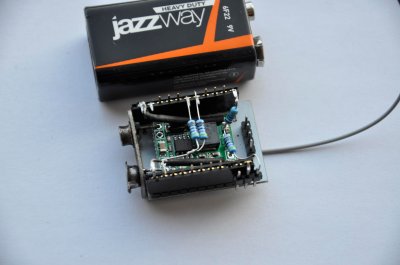
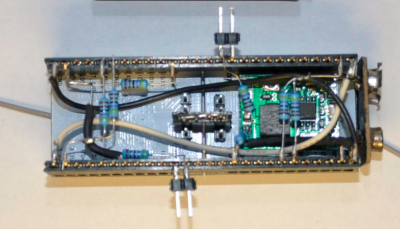
[Rand Druid] recently spent a Weekend on the Dark Side, creating an ESP8266 packet injector. The project started when [Rand] read about [Kripthor’s] deauth packet injection attacks right here on Hackaday. He initially created the WiFi denial of service throwie mentioned in the article. The basic Bill of Materials (BOM) for this device is an ESP8266 module, a DC/DC converter, a 9V battery, connectors, and a few resistors. This worked well, but some devices (most notably [Rand’s] son’s Android Phone) would disconnect and reconnect so quickly the attack had no practical impact.
[Rand] fixed the problem by adding a second ESP8266 module. The first is the listener. It listens for WiFi access points. Once an AP is found, it sends this information to the second jammer” module via a unidirectional single line serial link. The jammer module pumps out deauth packets at full speed. He even managed to create a single executable which performs as both listener and jammer. At boot, the software sends out a series 0xFF bytes through the serial port. The listener has its serial transmit pin directly connected to the jammer’s serial receive line. When the jammer receives the 0xFF bytes, it jumps into the correct function. This was more than enough to kick that pesky Android phone off the network. As with the original article, we have to stress that you should only use modules like these for testing on your own equipment. Be careful out there folks!
[Kevin Harrington] loves robots, but hates reinventing the wheel every time he creates a new machine. He’s built BowlerStudio: A robotics development platform to combat this problem. BowlerStudio was a semifinalist in the 2015 Hackaday Prize. BowlerStudio is a soup-to-nuts platform for creating all sorts of robots. [Kevin] has integrated Computer Aided Design (CAD), 3D modeling, kinematics, machine vision, and a simulation engine complete with physics modeling into one whopper of a software package. To prove how versatile the system is, he designed a hexapod robot in the CAD portion of the program. The robot then taught itself to walk in the simulation. Once the design was 3D printed, the real robot walked right off the bread board. [Kevin] linked the hardware and software with DyIO, another of his projects.
BowlerStudio is a huge boon for just about any robotics hacker, as well as educators. An entire curriculum could be created around the system. Thanks to its Java roots, BowlerStudio is also a multi-platform. [Kevin] has binaries ready to go for Windows, Mac, and Ubuntu.
The newest feature in BowlerStudio is JBullet. JBullet is a Java port of the Bullet physics library. Physics means that important real world effects like gravity and surface friction can now be added to simulations. In [Kevin’s] own words “This project is starting to feel more and more like a game engine targeted towards designing robotics and engineering tools.”
That’s it for this week’s Hacklet. As always, see you next week. Same hack time, same hack channel, bringing you the best of Hackaday.io!
Despite tuning my extruder steps perfectly, and getting good results instantly on larger prints. I was still having a ton of trouble with smaller parts. PLA is the favored printing material for its low odor, low warping, and decent material properties. It also has many downside, but it’s biggest, for the end user, lies in its large glass transition temperature range. Like all thermoplastics, it shrinks when it cools, but because of this large range, it stays expanded and, getting deep into my reserve of technical terms, bendy for a long time. If you don’t cool it, the plastic will pile up in its expanded state and deform.
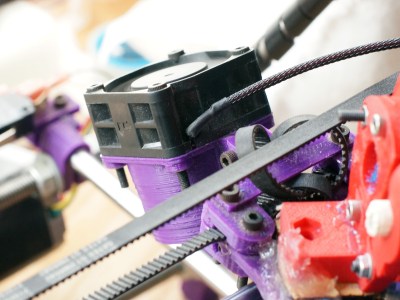
The old cooling fan on my trusty and thoroughly battered Prusa i2.
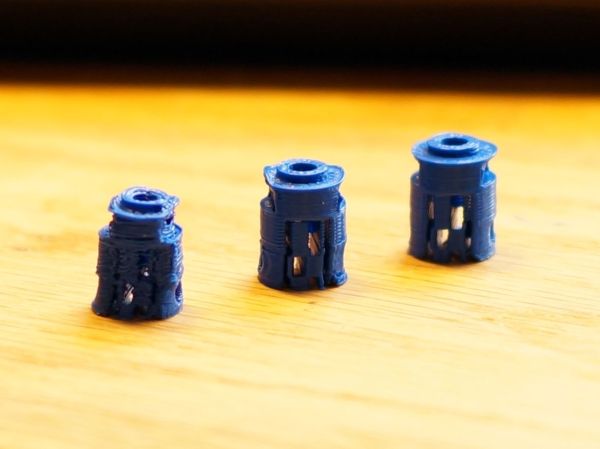
I am working on a project that needs a tiny part, pictured above. The part on the left is what I was getting with my current cooling set-up and temperature settings. It had very little semblance with the CAD file that brought it into this world.
The bond between layers in a 3d print occurs when the plastic has freshly left the nozzle at its melting point. Almost immediately after that, the plastic crosses from the liquid state into a glass state, and like pressing two pieces of glass together, no further bonding occurs. This means that in order to get a strong bond between the print layers, the plastic has to have enough thermal mass to melt the plastic below it. Allowing the polymer chains to get cozy and hold hands. Nozzle geometry can help some, by providing a heat source to press and melt the two layer together, but for the most part, the fusing is done by the liquid plastic. This is why large diameter nozzles produce stronger parts.
What I’m getting at is that I like to run my nozzle temperature a little hotter than is exactly needed or even sensible. This tends to produce a better bond and sometimes helps prevent jamming (with a good extruder design). It also reduces accuracy and adds gloopiness. So, my first attempt to fix the problem was to perhaps consider the possibility that I was not 100% right in running my nozzle so hot, and I dropped the temperature as low as I could push it. This produced a more dimensionally accurate part, but a extraordinarily weak one. I experimented with a range of temperatures, but found that all but the lowest produced goopy parts.
After confirming that I could not get a significant return on quality by fine tuning my temperature, I reduced the speed of the nozzle by a large percentage. By reducing the speed I was able to produce the middle of the three printed parts shown in the opening image. Moving the nozzle very slowly gave the ambient air and my old cooling fan plenty of time to cool the part. However, what was previously a five minute part now took twenty minutes to print. A larger part would be a nightmare.
This will do.
So, if I can’t adjust the temperature to get what I want, and I can adjust the speed; this tells me I just need to cool the part better. The glass state of the plastic is useless to me for two reasons. One, as stated before, no bonding occurs. Two, while the plastic remains expanded and bendy, the new layer being put down is being put down in the wrong place. When the plastic shrinks to its final dimension is when I want to place the next layer. Time to solve this the traditional way: overkill.
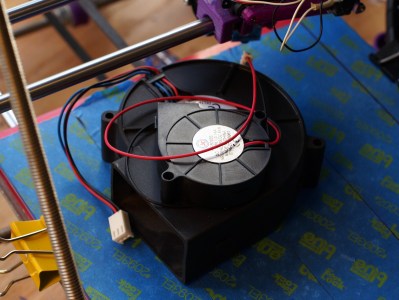
A while back my friend gifted me a little squirrel cage fan he had used with success on his 3d printer. Inspired by this, I had also scrounged a 12v, 1.7A fan from a broken Power Mac G5 power supply. When it spins up I have to be careful that it doesn’t throw itself off the table.
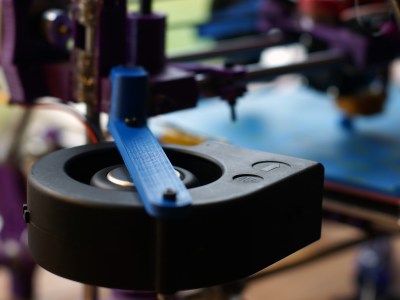
I should have added a rib to this bracket, this fan is heavy!
I printed out mounts for the fans. The big one got attached to the Z axis, and the little one rides behind the extruder. I fired up the gcode from before and started to print, only to find that my nozzle stopped extruding mid way. What? I soon discovered I had so much cooling that my nozzle was dropping below the 160C cold extrusion cut-off point and the firmware was stopping it from damaging itself. My heated bed also could no longer maintain a temperature higher than 59C. At this point I felt I was onto something.
I wrapped my extruder in fiberglass insulation and kapton tape, confidently turned the nozzle temperature up, set the speed to full, and clicked print. With the addition of the overkill cooling I was able to get the part shown to the right in my three example prints. This was full speed and achieved full bond. Not bad! Thus concludes this chapter in my adventures with cooling. I was really impressed by the results. Next I want to try cooling ABS as it prints. Some have reported horrible results, others pretty good ones, I’m interested. I also wonder about cooling the plastic with a liquid at a temperature just below the glass state as it is deposited. Thoughts?
 On the morning of September 26th, 2013 the city of Orlando was rocked by an explosion. Buildings shook, windows rattled, and Amtrak service on a nearby track was halted. TV stations broke in with special reports. The dispatched helicopters didn’t find fire and brimstone, but they did find a building with one wall blown out. The building was located at 47 West Jefferson Street. For most this was just another news day, but a few die-hard fans recognized the building as Creative Engineering, home to a different kind of explosion: The Rock-afire Explosion.
 Many of us have heard of the Rock-afire Explosion, the animatronic band which graced the stage of ShowBiz pizza from 1980 through 1990. For those not in the know, the band was created by the inventor of Whac-A-Mole, [Aaron Fechter], engineer, entrepreneur and owner of Creative Engineering. When ShowBiz pizza sold to Chuck E. Cheese, the Rock-afire Explosion characters were replaced with Chuck E. and friends. Creative Engineering lost its biggest customer. Once over 300 employees, the company was again reduced to just [Aaron]. He owned the building which housed the company, a 38,000 square foot shop and warehouse. Rather than sell the shop and remaining hardware, [Aaron] kept working there alone. Most of the building remained as it had in the 1980’s. Tools placed down by artisans on their last day of work remained, slowly gathering dust.


 [Rand] fixed the problem by adding a second ESP8266 module. The first is the listener. It listens for WiFi access points. Once an AP is found, it sends this information to the second jammer” module via a unidirectional single line serial link. The jammer module pumps out deauth packets at full speed. He even managed to create a single executable which performs as both listener and jammer. At boot, the software sends out a series 0xFF bytes through the serial port. The listener has its serial transmit pin directly connected to the jammer’s serial receive line. When the jammer receives the 0xFF bytes, it jumps into the correct function. This was more than enough to kick that pesky Android phone off the network. As with the original article, we have to stress that you should only use modules like these for testing on your own equipment. Be careful out there folks!