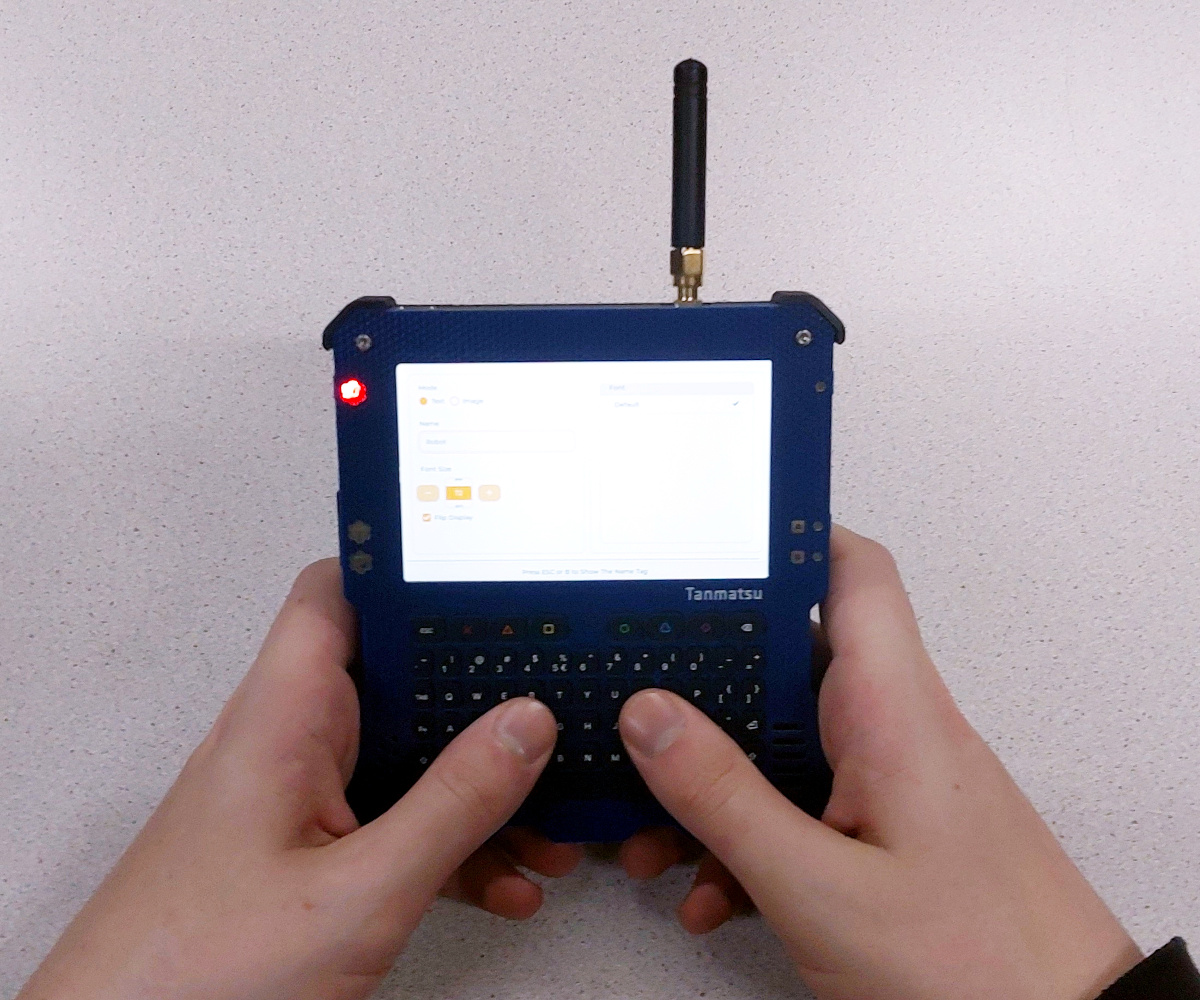
Screenshot of Microsoft Flight Simulator with the Dune expansion, and in the top right corner, the mod's author is shown using their phone with an attached gamepad for controlling a Dune ornithopter.

Take Control Of MS Flight Sim With Your Smartphone

Anyone with more than a passing interest in flight simulators will eventually want to upgrade their experience with a HOTAS (Hands On Throttle-And-Stick) setup that has buttons and switches for controlling your virtual aircraft’s assorted systems, which are well supported by games such as Microsoft Flight Simulator (MSFS). But a traditional HOTAS system can be a bit of an investment, so you might want to thank [Vaibhav Sharma] for the virtualHOTAS project that brings a configurable HOTAS interface to your phone — just in time to try out that Dune expansion for MSFS.

The phone’s orientation sensors are used as a joystick, and on the screen, there’s both sliders and buttons you can use as in-game controls. On the back-end there’s a Python program on the computer which exposes a webserver that the phone connects to, translating sensor and press data without the need for an app. This works wonderfully in MSFS, as [Vaibhav] shows us in the video below. What’s more, if you get tired of the touchscreen-and-accelerometer controls, you can even connect a generic smartphone-designed game controller platform, to have its commands and movements be translated to your PC too!

All the code is open source, and with the way this project operates, it will likely work as a general-purpose interface for other projects of yours. Whether you might want to build an accessibility controller from its codebase, use it for your robot platform, maybe simply repurpose this project for any other game, [Vaibhav]’s creation is yet another reminder that we’re carrying a sensor-packed platform, and it might just help you build a peripheral you didn’t know you needed.

Don’t have a phone handy? Perhaps an Xbox controller could work with just a few 3D printed upgrades, or you could stock up on buttons and build your own joystick from scratch. Oh, and keeping HOTAS principles in mind can be pretty helpful — you might get to redesign the venerable computer mouse, for instance!

Continue reading “Take Control Of MS Flight Sim With Your Smartphone”

An amber on black interface on a green reproduction Game Boy screen. It has the FM station 88.9 in large letters in the middle of the display and "Ice Cream (Pay Phone) by Black Pumas" displayed in a box below. A volume indicator is on the left side of the tuner numbers and various status icons are along the top of the screen. A paper cutout of an orange is next to the Game Boy on a piece of paper with the words "Orange FM Prototype" written underneath.

Orange FM Brings Radio To The GameBoy

We’ve all been there. You left your Walkman at home and only have your trusty Game Boy. You want to take a break and just listen to some tunes. What to do? [orangeglo] has the answer now with the Orange FM cartridge.

This prototype cart features an onboard antenna or can also use the 3.5 mm headphone/antenna port on the cartridge to boost reception with either a dedicated antenna or a set of headphones. Frequencies supported are 64 – 108 Mhz, and spacing can be set for 100 or 200 kHz to accomodate most FM broadcasts setups around the world.

Older Game Boys can support audio through the device itself, but Advances will need to use the audio port on the cartridge. The Super Game Boy can pipe audio to your TV though, which seems like a delightfully Rube Goldberg-ian way to listen to the radio. Did we mention it also supports RDS, so you’ll know what that catchy tune is? Try that FM Walkman!

Can’t decide between this and your other carts? Try this revolving multi-cart solution. Have a Game Boy that needs some restoration? If it’s due to electrolyte damage, maybe start here?

Continue reading “Orange FM Brings Radio To The GameBoy”

the PTC fuse to blame for the fault described, on the ROG Ally board, with a wire soldered across the fuse

ROG Ally SD Card Slot Fix Shines Light On PTC Fuse Failure Modes

The Asus ROG Ally is a handheld that, to our pleasant surprise, has attracted a decently sized modding community. Recently, we’ve stumbled upon a Reddit post investigating a somewhat common failure mode of this handheld — the microSD card slot going out of order, where an inserted card fails to be recognized, pretty irritating to encounter. Now, it turns out, this is down to a certain model of PTC fuses being failure-prone.

It makes sense to fuse the SD card slot. The cards are dense pieces of technology that are subject to some wear and tear in daily use. As such, it’s not unheard of that a microSD card can short-circuit internally — heating up to the point of melting plastic and giving people severe burns. Given that such a card is typically connected to a beefy 3.3 V rail, any mass-manufactured device designer could want to put a fuse between the 3.3 V rail and the card. However, on some ROG Ally batches, a certain make of the fuse is used, that appears to be likely to develop faults: the fuse’s resistance increasing dramatically during the card’s normal operation, with the SD card being supplied subpar power as a result.

There’s a fair bit of investigating happening in the comment section, with people posting oscilloscope captures, using breakouts to tap the SD card, and figuring out the fuse part numbers for the affected models. As for Reddit’s solution, it’s short-circuiting the fuse with a piece of thin wire — we would probably source a suitable fuse and solder it on top of the faulty one.

This isn’t the first ROG Ally modification we’ve covered so far, and given the activity we’re seeing, it’s unlikely to be our last.

The ROG Ally with the second screen mod installed

Dual-Screen Mod For The ROG Ally Handheld

In our continuing coverage of the ROG Ally modding community, we would be amiss to not mention a seriously impressive mod — a dual screen project for the x86 gaming handheld by [YesItsKira]! Single screen devices can feel cramped, and this mod is a prime example of a dedicated hacker taking things into her own hands. In particular, the mechanics of this mod are done wonderfully, thanks to a custom-designed 3D printed Ally back cover.

The second screen connects through a USB-C port, held above the main screen by a sturdy printed hinge at whatever angle you want it. As a pleasant surprise, it’s also touch-enabled! The mod is fully open source and well documented — everything you need to print is published on Thingiverse, a detailed assembly guide with pictures is on GitHub, and the BOM is at the bottom of the guide.

Apart from printed parts, you only need a few things off Amazon, it’s that easy to source. Electronics-wise, this mod uses a Raspberry Pi-suited HDMI screen, wiring it up through an integrated USB-C dock; which means you can still charge your handheld while using the dual-screen solution!

Interested in modifications for your ROG Ally, but not quite ready to bolt on a second display? Check out this phenomenally documented battery upgrade from an iFixit staffer that we recently covered.

Screenshot of the YouTube channel videos list, showing a number of videos like the ones described in this article.

[DiyOtaku] Gives Old Devices A New Life

Sometimes we get sent a tip that isn’t just a single article or video, but an entire blog or YouTube channel. Today’s channel, [Diy Otaku], is absolutely worth a watch if you want someone see giving a second life to legendary handheld devices, and our creator has been going at it for a while. A common theme in most of the videos so far – taking an old phone or a weathered gaming console, and improving upon them in a meaningful way, whether it’s lovingly restoring them, turning them into a gaming console for your off days, upgrading the battery, or repairing a common fault.

The hacks here are as detailed as they are respectful to the technology they work on. The recent video about putting a laptop touchpad into a game controller, for instance, has the creator caringly replace the controller’s epoxy blob heart with a Pro Micro while preserving the original board for all its graphite-covered pads. The touchpad is the same used in an earlier video to restore a GPD Micro PC with a broken touchpad, a device that you can see our hacker use in a later video running FreeCAD, helping them design a 18650 battery shell for a PSP about to receive a 6000 mAh battery upgrade.

Continue reading “[DiyOtaku] Gives Old Devices A New Life”

The mod as installed into the handheld, complete with the custom 3D-printed back, with a screwdriver being used to install one of the screws

A ROG Ally Battery Mod You Ought To Try

Today’s hack is an unexpected but appreciated contribution from members of the iFixit crew, published by [Shahram Mokhtari]. This is an ROG Ally Asus-produced handheld gaming console mod that has you upgrade the battery to an aftermarket battery from an Asus laptop to double your battery life (40 Wh to 88 Wh).

There are two main things you need to do: replace the back cover with a 3D printed version that accommodates the new battery, and move the battery wires into the shell of an old connector. No soldering or crimping needed — just take the wires out of the old connector, one by one, and put them into a new connector. Once that is done and you reassemble your handheld, everything just works; the battery is recognized by the OS, can be charged, runs the handheld wonderfully all the same, and the only downside is that your ROG Ally becomes a bit thicker.

Continue reading “A ROG Ally Battery Mod You Ought To Try”

How Do You Make A Repairable E-Reader

Mobile devices have become notorious for their unrepairability, with glued-together parts and impossible-to-reach connectors. So it’s refreshing to see something new in that field from the e-book reader brand Kobo in the form of a partnership with iFixit to ensure that their new reader line can be fixed.

Naturally, we welcome any such move, not least because it disproves the notion that portable devices are impossible to make with repairability in mind. However, the linked article is especially interesting because it includes a picture of a reader, and its cover has been removed. We’re unsure whether or not this is one of the new ones, but it’s still worth looking at it with reparability eyes. Just what have they done to make it easier to repair?

Continue reading “How Do You Make A Repairable E-Reader”