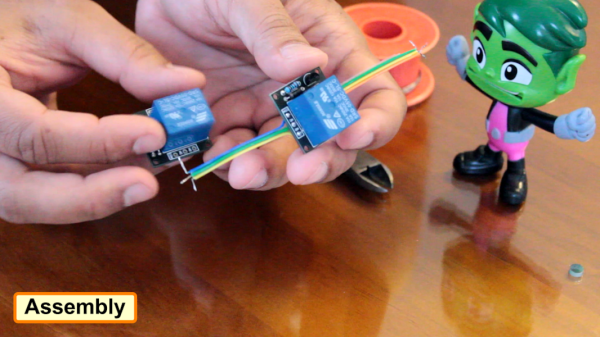
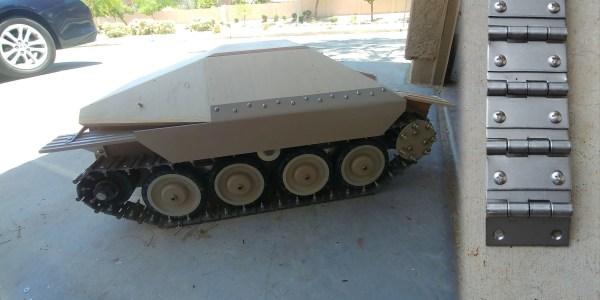
New Part Day: The Twenty Five Cent USB Microcontroller (With A Toolchain!)

Last year, Jiangsu Yuheng Co., Ltd introduced a new microcontroller. The CH554 is a microcontroller with an E8051 core with a 24 MHz clock, a little more than 1 kB of RAM, and a bit more than 14 kB split between the code and data Flash. In short, it’s nothing too spectacular, but it makes up for that with peripherals. It’s got SPI and ADCs and PWM, UARTs, and even a few capacitive touch channels. It’s also a USB device, with some chips in the series able to function as a USB host. You can buy this chip for a quarter through the usual retailers.

Normally, this isn’t huge news. The 8051 is the most copied microcontroller on the planet, and there are probably billions produced each year. Cheap parts are only cheap if your time is free; you’ll usually spend ages trying to digest the datasheet and get a toolchain up and running. That’s where this chip is a little different. There are multiple efforts to bring an Open Source toolchain to this chip. And they’re doing it in Windows and Linux. Someone really cares about this chip.

The current best option for an SDK for this chip comes from Blinkinlabs, with a port of the CH554 SDK from Keil to SDCC. There are real, working code examples for this chip using an Open Source toolchain. Sure, it might just blink a LED, but it’s there. If you can blink a LED, you can do just about anything from there. Programming the chip happens over USB with the ‘official’ WCHISPTool (Windows) or LibreCH551 (command line). The end result is a completely Open Source toolchain to program and upload a hex file to a cheap chip.

There are a few more chips in the CH554 series, ranging from the CH551 in an SOP-16 package to the CH559 in an LQFP48 package, with more features available as the chips get bigger. It’s an interesting chip, with some somehow implementing a USB hub, and could be a very cool chip for some low-level USB hacking.

Wonderful Sculptural Circuits Hide Interactive Synthesizers

When it rains, it pours (wonderful electronic sculpture!). The last time we posted about freeform circuit sculptures there were a few eye-catching comments mentioning other fine examples of the craft. One such artist is [Eirik Brandal], who has a large selection of electronic sculptures. Frankly, we’re in love.

A common theme of [Eirik]’s work is that each piece is a functional synthesizer or a component piece of a larger one. For instance, when installed the ihscale series uses PIR sensors to react together to motion in different quadrants of a room. And the es #17 – #19 pieces use ESP8266’s to feed the output of their individual signal generators into each other to generate one connected sound.

Even when a single sculpture is part of a series there is still striking variety in [Eirik]’s work. Some pieces are neat and rectilinear and obviously functional, while others almost looks like a jumble of components. Whatever the style we’ve really enjoyed pouring through the pages of [Eirik]’s portfolio. Most pieces have demo videos, so give them a listen!

If you missed the last set of sculptural circuits we covered this month, head on over and take a look at the flywire circuits of Mohit Bhoite.

Thanks [james] for the tip!

Sniffing RFID Readers With A Piece Of Paper

We feature plenty of printed projects here on Hackaday, though they tend to be of the three dimensional type thanks to the proliferation of affordable 3D printers. But in this case, [Milosch Meriac] has managed to put together a printable design that’s not only a very cool hack, but is made up of a scant two dimensions. His creation, which could perhaps be considered something of an interactive circuit diagram, allows anyone with a paper printer and a few passive components to make a functional low-frequency RFID sniffer.

[Milosch] tells us the goal of the project is to lower the barrier for experimenting with the RFID technology that’s increasingly part of our everyday lives. Rather than having to use something expensive and complicated such as an oscilloscope, experimenters can simply plug their DIY RFID sniffer into their computer’s line-in jack and explore the produced waveform with open source tools.

To create a paper RFID sniffer, you start by printing the image out on a thick piece of paper, like card stock. You then apply foil tape where indicated to serve as traces in this makeshift PCB, and start soldering on the components as described in the text. [Milosch] says the assembly procedure is so simple even a kid can do it, and the total cost of each assembled sniffer is literally pennies; making this an excellent project for schools or really any large group.

If you want to play it safe the sniffer can be connected to a USB sound card rather than your machine’s primary sound hardware, and still come in dirt cheap. [Milosch] stops short of explaining the software side of things in this particular project, but any tool which can use input from the sound card as a makeshift oscilloscope should be a good start.

In the past we’ve seen [Milosch] perform low frequency RFID sniffing through the sound card with the powerful baudline tool, but if you want a little more capable hardware, we can point you in the right direction.

Advances In Flat-Pack PCBs

Right now, we’ve got artistic PCBs, we’ve got #badgelife, and we have reverse-mounted LEDs that shine through the fiberglass substrate. All of this is great for PCBs that are functional works of art. Artists, though, need to keep pushing boundaries and the next step is obviously a PCB that doesn’t look like it has any components at all. We’re not quite there yet, but [Stephan] sent in a project that’s the closest we’ve seen yet. It’s a PCB where all the components are contained within the board itself. A 2D PCB, if you will.

[Stephen]’s project is somewhat simple as far as a #badgelife project goes. It’s a Christmas ornament, powered by two coin cells, hosting an ATTiny25 and blinking two dozen LEDs via Charlieplexing. The PCB was made in KiCAD, with some help from Inkscape and Gimp. So far, so good.

Castellated edges, containing a part

The trick is mounting all the components in this project so they don’t poke out above the surface of the board. This is done by milling a rectangular hole where every part should go and adding castellated pads to one side of the hole. The parts are then soldered in one at a time against these castellated pads, so the thickness of the completed, populated board is just the thickness of the PCB.

The parts used in this project are standard jellybean parts, but there are a few ways to improve the implementation of this project. The LEDs are standard 0805s, but side-emitting LEDs do exist. If you’d like to take this idea further, it could be possible to create a sandwich of PCBs, with the middle layer full of holes for components. These layers of PCBs can then be soldered or epoxied together to make a PCB that actually does something, but doesn’t look like it does. This technique is done in extremely high-end PCBs, but it’s expensive as all get out.

Still, this is a great example of what can be done with standard PCB processes and boards ordered from a random fab house. It also makes for a great Christmas ornament and pushes the boundaries of what can be done with PCB art.

A Sub-$1000, Non-X86 Motherboard

If you’re building a computer, your options are nearly limitless. You can get a motherboard with red LEDs, with blue LEDs, green LEDs, or if you’re feeling spendy, RGB LEDs. You can get custom-milled heat spreaders in any shape you want, as long as it’s angular and screams ‘gamer’. If you want a motherboard that doesn’t use x86 — either AMD or Intel — you’re kind of out of luck. Either it doesn’t exist, or it’s going to cost a small fortune.

Raptor Engineering have just released a motherboard that isn’t x86 and doesn’t cost as much as a cheap car. The Blackbird mainboard is designed for an IBM Power9 CPU and it only costs $800. Add in a four-core CPU and the total cost comes out to about $1200. Add in some ECC RAM and you’re still under two grand. Building with a non-x86 CPU has never been cheaper. This is a significant change from earlier releases from Raptor Engineering, where just the motherboard cost $3700.

The Blackbird mainboard features dual DDR4 ECC DIMM slots, one PCI Express 4.0 x16 slot, one PCI Express 4.0 x8 slot, dual Gigabit Ethernet ports, 4 x SATA 3.0 ports, 4 x USB 3.0 ports, 1 x USB 2.0 port, and an HDMI display output.

The only reason you would build a Power9-based computer is simply to get around the black box that has become Intel and AMD CPUs. No one is really sure what’s going on in the Intel Management Engine, AMD has similar black boxes littered around. However, using a Power9 CPU has a secure boot mode and provided your computer is physically secure, you’re more or less assured you’re running your firmware and your kernel and your userspace apps. It’s security for the security-minded. RISC architecture is going to change everything.

Applied Science Rolls An Electroluminescent Controller

After LEDs and TFTs and OLEDs and liquid crystals, there’s another display technology that doesn’t get a lot of attention. Electroluminescent displays have been around for ages, and there still aren’t a whole lot of applications for them. That might change soon, because Applied Science a.k.a. [Ben Krasnow] figured out an easy way to build EL displays on anything, and created a simple circuit that’s capable of driving video on a remarkable blue phosphor EL display.

For this build, [Ben] is using a specialty product from Lumilor consisting of a copper-ish conductive base layer, a clear dielectric, the ‘lumicolor’ phosphor, and a clear conductive top coat. All of these layers are applied with an airbrush, and the patterns are made with a desktop vinyl cutter.  This is an entire system designed to put electroluminescent displays on motorcycle gas tanks and to have doors that go like *this* and glow. That said, the system isn’t very dependent on the substrate, and [Ben] has had successful experiments in creating EL displays on plastic sheets, 3D printed parts, and even paper.

Compared to previous (and ongoing) efforts to create EL displays such as [Fran]’s recreation of the Apollo DSKY, the Lumilor system seems extraordinarily easy and clean. Current efforts as with [Fran]’s example are using a silkscreen process, which is a mess no matter how you look at it and can’t be applied to non-flat surfaces.

But EL displays are more than just putting a few layers of chemicals on a substrate — you need to drive these displays with high-frequency, high-voltage AC. For this, [Ben] designed a multi-channel electroluminescent driver based on the Adafruit Trinket M0, two LT3468 ICs to generate a high voltage, and either a an HV507 or HV513 to drive 8 or 64 channels.

With the ability to create EL displays and drive 64 channels, there really was only one thing to do: a 32×32 display. Even seeing a few lines scan across a 32×32 EL display is magical, but it’s got another trick up its sleeve: it also plays a low-resolution video of Never Gonna Give You Up.

This isn’t a video to be missed, check it out below.

Continue reading “Applied Science Rolls An Electroluminescent Controller”

Watch The Low-Cost Mechatronics Lab Dispense Candy, Sort Cups

A lot can be done with simple motors and linear motion when they are mated to the right mechanical design and control systems. Teaching these principles is the goal behind the LCMT (Low Cost Mechatronics Trainer) which is intended primarily as an educational tool. The LCMT takes a “learn by doing” approach to teach a variety of principles by creating a system that takes a cup from a hopper, fills it with candy from a dispenser, then sorts the cups based on color, all done by using the proper combinations of relatively simple systems.

The Low Cost Mechatronics Trainer can be built for under $1,000 and is the wonderful work of a team from the Anne Arundel Community College in Maryland, USA. The LCMT is clearly no one-off project; there are complete CAD files and build documentation on the site, as well as a complete lab guide for educators.

A demo video of the assembled system is embedded below, with a walkthrough done by [Tim Callinan]. It’s worth a watch to see how cleanly designed the system is, and the visual learners among you may learn a thing or two just by watching the system go through its motions.

Continue reading “Watch The Low-Cost Mechatronics Lab Dispense Candy, Sort Cups”