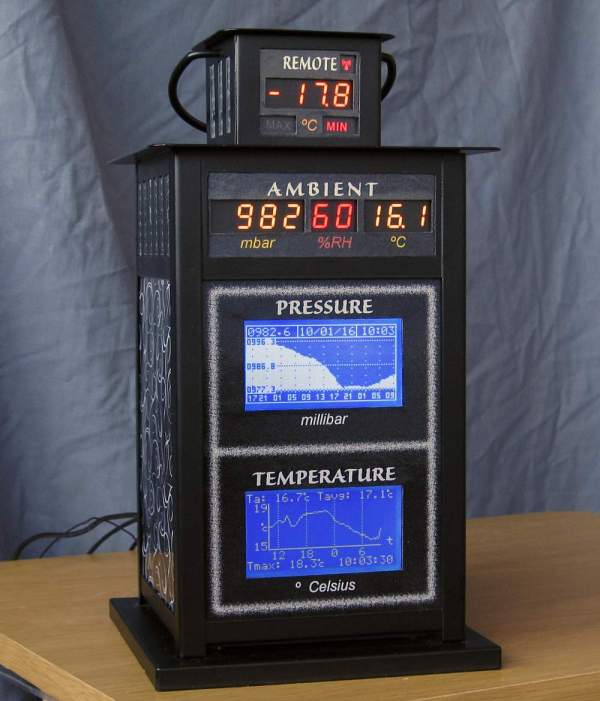
Portable 120V To 240V Converter; Or How To Fast Charge At Your In-Law’s House

[Nick Sayer] falls into the “would rather build it than buy it” category. This particular project is a clone of a fast electric vehicle charger. There are commercially available versions sold under the Quick 220 brand name. The idea is that for fast charging, some electric vehicles call for a 240V outlet and Americans without electric cars often don’t have one. If they do it’s for an appliance like a stove or clothes dryer and probably not found in the garage.

The device uses two hot and one ground to supply the 240V output which is, in some business where there is three phase power this will be closer to 208V but should still work. Obviously you shouldn’t be doing this unless you know exactly how it works, and we applaud [Nick] for airing these hazards while at the same time supplying the knowledge behind the concerns.

Two inputs for the beefy converter are supplied from outlets not just on separate circuits, but on two circuits whose hot lines are 180 degrees out of phase. That means identifying where there are two plugs, not protected by GFCI outlets or breakers, which are on two separate hot lines of split phase power. To protect the user, [Nick] designed in a set of relays which kill the circuit when one of the two supplies is unplugged. A system that didn’t have these protections would have mains voltage on the prongs of the disconnected plug.

We’ve seen very few car charging hacks. If you know of one, or have been working on your own, let us know!

image of control curcuit

Brighten Your Day With Motion Controlled Cabinet Light

[Thomas Snow] found himself in a bit of a pickle. His kitchen lights didn’t adequately light his counter-tops. So instead of inventing a light bending device that could warp space-time enough to get the light where it needs to go, he decided to take the easy road and installed a motion controlled LED strip under the cabinets.

Now, these aren’t just any ‘ol motion control lights. Not only is [Thomas] able to turn the lights on and off with a wave of his hand, he can control the brightness as well. He’s doing the magic with an ultrasonic range sensor and PIR sensor. An ATTiny85 ties everything together to form the completed system.

The PIR sensor was incorporated because [Thomas] didn’t want to bug his pets with the 40kHz chirp from the ultrasonic sensor. So it only comes on when the PIR sensor sees your hand. Be sure to check out [Thomas’s] project for full source and schematics.

Continue reading “Brighten Your Day With Motion Controlled Cabinet Light”

USB Powered CD Lamp

[Artificial Intelligence] has made a desk lamp out of parts he had kicking around in his parts bin. Most recognizable are the 4 CDs that make up the base and the shade. To start this project, [Artificial Intelligence] sketched out a circular pattern on one of the CDs and marked 7 locations where the LEDs will be. Holes were drilled at those marked locations, the LEDs inserted and hot glued into place. Each LED has its own current limiting resistor soldered in a series configuration.

[Artificial Intelligence] mentions the resistor value was determined by a nice LED resistor calculator he found online, ledcalc.com. Then each LED/resistor combo was wired together in a parallel configuration and covered up by another CD to clean up the look and protect the wiring.

The base, like the top, is also made from 2 CDs, but this time there are 5 AA batteries underneath the CDs. These batteries don’t power the lamp, they are only used as a counterweight to prevent the lamp from tipping over. A USB cord runs to the lamp base, goes through an on/off switch and then up a pair of large-gauge solid core wire before connecting to the LED’s in the top of the lamp. The thick solid core wire acts as the only support for the lamp shade and LEDs. Since it is still just wire, the lamp can be bent to shine light in the most convenient position, as any good desk lamp would be capable of.

Motion Light In Dark Stairwell Brightens Trips To The Basement

WARNNG: Walking around in the dark could be dangerous to your health! You may bump into something or worse, take a tumble down the stairs. Safety conscious [Ganesh] has come up with a solution for us folks too lazy to manually turn on a light. It’s a simple light controlled by a motion sensor that anyone can put together.

The meat and potatoes of the build is an off-the-shelf motion sensor, the same kind that is used in a home security system. We humans emit infrared energy and that is just what this sensor ‘sees’. The motion sensor is powered by 12 VDC and has a pair of DC output leads that are used to control a relay. [Ganesh] used an standard hobby relay board with built in power spike protection diode and transistor to supply the current required to trip the relay. Closing the relay sends mains power to the AC light bulb. Both the triggering threshold and the ‘on’ time are controlled by potentiometers integrated with the motion sensor.

Check the video out after the break of the device working its magic and lighting the way to [Ganesh’s] basement dungeon…

Continue reading “Motion Light In Dark Stairwell Brightens Trips To The Basement”

A Secret Door To The Mines Of Moria

What home movie theater is complete without a secret entrance? [Eclipse_007] had the brilliant idea to make this Lord of The Rings themed hidden door, akin to the entrance way to the Mines of Moria.

It’s a custom door panel filled to the brim with LED lights on the underside. The front panel is a large piece of plexi-glass with a vinyl coating on one side. [Eclipse_007] painstakingly cut the design out of the vinyl coating, all by hand. Once installed the door just looks like another part of the wall. But when touched, the door lights up and then swings open, revealing the movie theater. Plans are already in the works to make it voice controlled to open when the password is spoken.

As one reddit user puts it:

That is probably the coolest thing I have ever seen.

I’m trying to imagine an estate agent introducing your house… two bathrooms, double glazing, five bedrooms, the Westgate of Moria which opens into a basement movie theater when you say Mellon, and a stylish modern kitchen…

Continue reading “A Secret Door To The Mines Of Moria”

Reverse Engineering Wireless Temperature Probes

[bhunting] lives right up against the Rockies, and for a while he’s wanted to measure the temperature variations against the inside of his house against the temperature swings outside. The sensible way to do this would be to put a few wireless temperature-logging probes around the house, and log all that data with a computer. A temperature sensor, microcontroller, wireless module, battery, case, and miscellaneous parts meant each node in the sensor grid would cost about $10. The other day, [bhunting] came across the exact same thing in the clearance bin of Walmart – $10 for a wireless temperature sensor, and the only thing he would have to do is reverse engineer the protocol.

These wireless temperature sensors are exactly what you would expect for a cheap piece of Chinese electronics found in the clearance bin at Walmart. There’s a small radio operating at 433MHz, a temperature sensor, and a microcontroller under a blob of epoxy. The microcontroller and transmitter board in the temperature sensor were only attached by a ribbon cable, and each of the lines were labeled. After finding power and ground, [bhunting] took a scope to the wires that provided the data to the radio and took a look at it with a logic analyzer.

After a bit of work, [bhunting] was able to figure out how the temperature sensor sent data back to the base station, and with a bit of surgery to one of these base stations, he had a way to read the temperature data with an Arduino. From there, it’s just a data logging problem that’s easily solved with Excel, and [bhunting] has exactly what he originally wanted, thanks to a find in the Walmart clearance bin.

Control board for a Wi-Fi enabled thermostat

Controlling Central Heating Via Wi-Fi

If you’ve ever lived in a building with manually controlled central heating, you’ll probably understand [Martin]’s motivation for this hack. These heating systems often have old fashioned valves to control the radiator. No Nest support, no thermostat, just a knob you turn.

To solve this problem, [Martin] built a Wi-Fi enabled thermostat. This impressive build brings together a custom PCB based on the ESP8266 Wi-Fi microcontroller and a mobile-friendly web UI based on the Open Thermostat Scheduler. The project’s web server is fully self-contained on the ESP8266.

To replace that manual value, [Martin] used a thermoelectric actuator from a Swiss company called HERZ. This is driven by a relay, which is controlled by the ESP8266 microcontroller. Based on the schedule and the measured temperature, the actuator lets fluid flow through the radiator and heat the room.

As a bonus, the device supports NTP for getting the time, MQTT for publishing real-time data, and ThingSpeak for logging and graphing historic data. The source code and design files are available under a Creative Commons license.