USB Powered CD Lamp

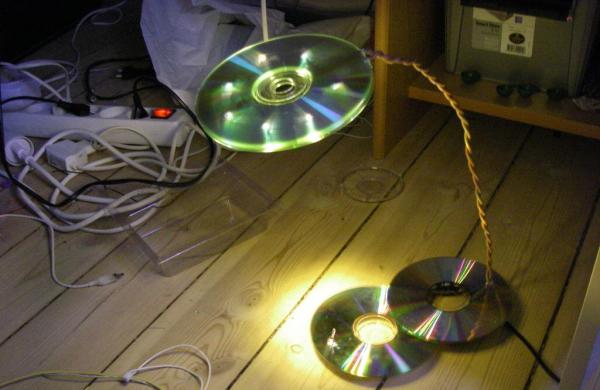
[Artificial Intelligence] has made a desk lamp out of parts he had kicking around in his parts bin. Most recognizable are the 4 CDs that make up the base and the shade. To start this project, [Artificial Intelligence] sketched out a circular pattern on one of the CDs and marked 7 locations where the LEDs will be. Holes were drilled at those marked locations, the LEDs inserted and hot glued into place. Each LED has its own current limiting resistor soldered in a series configuration.

[Artificial Intelligence] mentions the resistor value was determined by a nice LED resistor calculator he found online, ledcalc.com. Then each LED/resistor combo was wired together in a parallel configuration and covered up by another CD to clean up the look and protect the wiring.

The base, like the top, is also made from 2 CDs, but this time there are 5 AA batteries underneath the CDs. These batteries don’t power the lamp, they are only used as a counterweight to prevent the lamp from tipping over. A USB cord runs to the lamp base, goes through an on/off switch and then up a pair of large-gauge solid core wire before connecting to the LED’s in the top of the lamp. The thick solid core wire acts as the only support for the lamp shade and LEDs. Since it is still just wire, the lamp can be bent to shine light in the most convenient position, as any good desk lamp would be capable of.

Combination Lock Made Out Of Paper

Most projects we feature are of the metal/wire/wood variety, but there is an entire community devoting to making very interesting and intricate things out of paper. Imgur user [Criand] has been hard at work on his own project made entirely out of paper, a combination lock that can hold a secret message (reddit post).

The motivation for the project was as a present for a significant other, wherein a message is hidden within a cryptex-like device and secured with a combination that is of significance to both of them. This is similar to how a combination bike lock works as well, where a series of tumblers lines up to allow a notched shaft to pass through. The only difference here is that the tiny parts that make up the lock are made out of paper instead of steel.

This project could also be used to gain a greater understanding of lock design and locksport, if you’ve ever been curious as to how this particular type of lock works, although this particular one could easily be defeated by a pair of scissors (but it could easily cover rock). If papercraft is more of your style though, we’ve also seen entire gyroscopes and strandbeests made of paper!

Hackaday Links Column Banner

Hackaday Links: March 8, 2015

Nintendo is well known for… odd… hardware integration, but this video takes it to a new level. It’s a Gamecube playing Zelda: Four Swords Adventure, a game that can use a Game Boy Advance as a controller. [fibbef] is taking it further by using the Gamecube Game Boy Advance player to play the game, and using another GBA to control the second Gamecube. There’s also a GBA TV tuner, making this entire setup a Gamecube game played across two Gamecubes, controlled with a Game Boy Advance and displayed on a GBA with a TV tuner. The mind reels.

TI just released a great resource for analog design. It’s the Analog Engineer’s Pocket Reference, free for download, if you can navigate TI’s site. There are print copies of this book – I picked one up at Electronica – and it’s a great benchtop reference.

A few months ago, a life-size elephant (baby elephants are pretty small…) was 3D printed at the Amsterdam airport. A model of the elephant was broken up into columns about two meters tall. How did they print something two meters tall? With this add-on for a Ultimaker. It flips an Ultimaker upside down, giving the printer unlimited build height. The guy behind this – [Joris van Tubergen] – is crazy creative.

And you thought TV was bad now. Here’s the pitch: take a show like Storage Wars or American Pickers – you know, the shows that have people go around, lowball collectors, and sell stuff on the Internet – and put a “Tech” spin on it. This is happening. That’s a post from a casting producer on the classic cmp message boards. Here’s the vintage computer forums reaction. To refresh your memory, this is what happens when you get ‘tech’ on Storage Wars. Other examples from Storage Wars that include vastly overpriced video terminals cannot be found on YouTube. Here’s a reminder: just because it’s listed on eBay for $1000 doesn’t mean it’ll sell on eBay for $1000.

Motion Light In Dark Stairwell Brightens Trips To The Basement

WARNNG: Walking around in the dark could be dangerous to your health! You may bump into something or worse, take a tumble down the stairs. Safety conscious [Ganesh] has come up with a solution for us folks too lazy to manually turn on a light. It’s a simple light controlled by a motion sensor that anyone can put together.

The meat and potatoes of the build is an off-the-shelf motion sensor, the same kind that is used in a home security system. We humans emit infrared energy and that is just what this sensor ‘sees’. The motion sensor is powered by 12 VDC and has a pair of DC output leads that are used to control a relay. [Ganesh] used an standard hobby relay board with built in power spike protection diode and transistor to supply the current required to trip the relay. Closing the relay sends mains power to the AC light bulb. Both the triggering threshold and the ‘on’ time are controlled by potentiometers integrated with the motion sensor.

Check the video out after the break of the device working its magic and lighting the way to [Ganesh’s] basement dungeon…

Continue reading “Motion Light In Dark Stairwell Brightens Trips To The Basement”

Simple Superheterodyne SW Receiver Harks Back Almost 100 Years

Early radio receivers worked on a principle called Tuned Radio frequency (TRF), patented in 1916. They weren’t very easy to use, requiring each stage to be tuned to the same frequency (until ganged capacitors made that a bit easy). The Superheterodyne design, devised in 1918, was superior, but more expensive at that time. Cost considerations led adoption of the Superhet design to lag behind TRF until almost 1930. Since then, until quite recently, the Superhet design has been at the heart of a majority of commercial radio receivers. Direct Conversion Receivers were devised around 1930, but required elaborate phase locked loops which restricted their use in commercial receivers. The point of all this background is that the Superhet design has served very well for more than 90 years, but will soon be rendered redundant once Software defined Radio (SDR) becomes ubiquitous. Which is why this study of the simple Superheterodyne shortwave receiver deserves closer study.

[Dilshan] built this two transistor and two IF transformer based superheterodyne radio designed to receive 13m to 41m bands. The whole build is assembled on a breadboard, making it easy to teach others to experiment. [Dilshan] offers very useful insights into antenna, rod coil and IF transformer parameters. To dive in to Radio architecture, check this post on Amateur Radio. And if you would like to get a closer look at Antique Radios, check this post on Restoring Antique Radios.

Binary Wristwatch

Open Source Binary Wristwatch Is Professional Quality

If you want to proclaim to the world that you’re a geek, one good way to go about it is to wear a wristwatch that displays the time in binary. [Jordan] designs embedded systems, and he figured that by building this watch he could not only build up his geek cred but also learn a thing or two about working with PIC microcontrollers for low power applications. It seems he was able to accomplish both of these goals.

The wristwatch runs off of a PIC18F24J11 microcontroller. This chip seemed ideal because it included a built in real-time clock and calendar source. It also included enough pins to drive the LEDs without the need of a shift register. The icing on the cake was a deep sleep mode that would decrease the overall power consumption.

The watch contains three sets of LEDs to display the information. Two green LEDs get toggled back and forth to indicate to the user whether the time or date is being displayed. When the time is being displayed, the green LED toggles on or off each second. The top row of red LEDs displays either the current hour or month. The bottom row of blue LEDs displays the minutes or the day of the month. The PCB silk screen has labels that help the user identify what each LED is for.

The unit is controlled via two push buttons. The three primary modes are time, date, and seconds. “Seconds” mode changes the bottom row of LEDs so they update to show how many seconds have passed in the current minute. [Jordan] went so far as to include a sort of animation in between modes. Whenever the mode is changed, the LED values shift in from the left. Small things like that really take this project a step further than most.

The board includes a header to make it easy to reprogram the PIC. [Jordan] seized an opportunity to make extra use out of this header. By placing the header at the top of the board, and an extra header at the bottom, he was able to use a ribbon cable as the watch band. The cable is not used in normal operation, but it adds that extra bit of geekiness to an already geeky project.

[Jordan] got such a big response from the Internet community about this project that he started selling them online. The only problem is he sold out immediately. Luckily for us, he released all of the source code and schematics on GitHub so we can make our own.

Penny And Paper Clip Heat Sinks

A bunch of audio heads over at the Head-Fi forum were discussing handy and quick heat sinking methods, leading to much speculation and conjecture. This finally prompted [tangentsoft] to take matters in his own hands and run some tests on DIY Heat Sinks.

The question that sparked this debate was if a paper clip is a good enough heat sink to be used for a TO220 package. Some folks suggested copper pennies (old ones minted 1981 and earlier – the new ones are zinc with copper plating and won’t help much). [tangentsoft] built a jig to test six LM317 regulators in constant current mode set to 0.125A and 2w dissipation. The six configurations were a paper clip, a single penny bolted to the regulator, a regular Aavid TO220 heat sink, a set of 4 pennies bolted, a single penny epoxy glued and finally a single penny soldered directly to the regulator.

The results were pretty interesting. The paper clip scored better than any of the single pennies! The quad-penny and the Aavid heat sink fared above all the other configurations, and almost at par with each other. [tangentsoft] posts his review of each configurations performance and also provides details of his test method, in case someone else wants to replicate his tests to corroborate the results. He tested each configuration independently for one hour, gathering just over 10000 readings for each setup. Other nearby heat sources were turned off, and he placed strategic barriers around the test circuit to isolate it from the effects of other cooling / heating sources. He even removed himself from the test area and monitored his data logging remotely from another room. When he noticed a couple of suspect deviations, he restarted the test.

[tangentsoft] put all the data through Mathematica and plotted his results for analysis, available at this link [pdf, 2.8MB]. So the next time you want to heat sink a regulator for cheap, just hunt for Clippy in your box of office supplies. Do remember that these methods will work for only a couple of watts dissipation. If you would like to cast and build your own heat sinks out of aluminum, check out this post about DIY Aluminum heat sink casting. And if you need help calculating heat sink parameters, jump to 12:00 minutes in this video from [Dave]’s EEVBlog episode on Dummy loads and heat sinks.

Thanks to [Greg] for sending in this tip.