LED necklace

IBling Is An LED Display Necklace

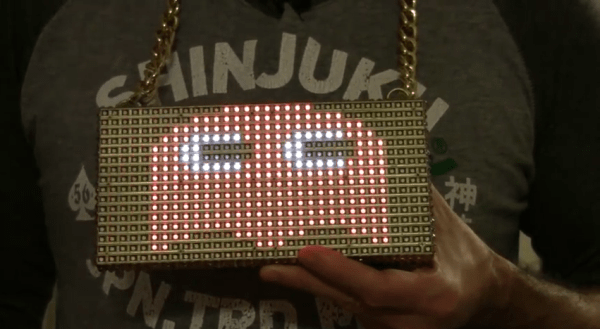
Are you tired of being ignored? Do you want a fashion accessory that says, “Pay attention to me!” If so, you should check out [Al’s] recent instructable. He’s built himself a necklace that includes a display made up of 512 individual LEDs.

This project was built from mostly off-the-shelf components, making it an easy beginner project. The LED display is actually a product that you can purchase for just $25. It includes 512 LEDs aligned in a 16 x 32 grid. The module is easily controlled with a Pixel maker’s kit. This board comes with built-in functionality to control one of these LED modules and can accept input from a variety of sources including Android or PC. The unit is powered from a 2000 mAH LiPo battery.

[Al] had to re-flash the firmware of the Pixel to set it to a low power mode. This mode allows him to get about seven hours of battery life with the 2000 mAH battery. Once the hardware was tested and confirmed to work correctly, [Al] had to pretty things up a bit. Some metallic gold spray paint and rhinestones transformed the project’s cyberpunk look into something you might see in a hip hop video, or at least maybe a Weird Al hip hop video.

The Pixel comes with several Android apps to control the display via Bluetooth. [Al] can choose one of several modes. The first mode allows for pushing animated gif’s to the display. Another will allow the user to specify text to scroll on the display. The user can even specify the text using voice recognition. The final mode allows the user to specify a twitter search string. The phone will push any new tweets matching the terms to the display as scrolling text.

RGB LED Matrices With The STM32 And DMA

A few years ago, [Frans-Willem] bought a few RGB LED panels. Ten 32×16 panels is a lot of LEDs, and to drive all of these panels requires some sufficiently powerful hardware. He tried working with an FPGA development board, but that didn’t have enough memory for 24-bit color. The microcontroller du jour – a TI Stellaris – couldn’t get more than 16 bits of color without flickering. With a bunch of LEDs but no way to drive them, [Frans-Willem] put the panels in a box somewhere, waiting for the day they could be used to their fullest capacity.

This day came when [Frans-Willem] was introduced to the STM32 series of chips with the F1 Discovery board. While looking for some electronic playthings to use with this board, he stumbled upon the LED panels and gave them one more try. The results are spectacular, with 33 bits of color, with animations streamed over a router over WiFi.

The panels in question are HUB75 LED panels. In the 32×8 panels, there are six data pins – two each for each color – four row select pins, and three control pins. The row select pins select which row of pixels is active at any one time. Cycle through them fast enough, and it will seem like they’re all on at once. The control pins work pretty much like the control pins of a shift register, with the data pins filling in the obvious role.

The code that actually drives the LEDs all happens on an STM32F4 with the help of DMA and FSMC, or the Flexible Static Memory Controller found on the chip. This peripheral takes care of the control lines found in memory, so when you toggle the write strobe the chip will dump whatever is on the data lines to a specific address in memory. It’s a great way to take care of generating a clock signal.

For sending pixels to this display driver, [Frans-Willem] is using the ever-popular TP-Link WR703N. He had originally planned to send all the pixel data over the USB port, but there was too much overhead, a USB 1.1 isn’t fast enough. That was fixed by using the UART on the router with a new driver and a recompiled version of OpenWRT.

All the software to replicate this project is available on Github, and there’s a great video showing what the completed project can do. You can check that out below.

Continue reading “RGB LED Matrices With The STM32 And DMA”

LED Desk Lamp

One Way To Get Rid Of That Fluorescent Buzzing Sound

Tired of the persistent hum his fluorescent desk lamp made, [Andres Lorvi] decided he had to fix it. And by fix, we mean get rid of altogether. He liked the lamp though so he decided to convert it to LED — that way he’d save some money on electricity too!

Besides wanting to get rid of the hum, [Andres] had also been reading up on the effect of light temperature at night — bluish light is typically bad for your eyes when you’re trying to go to sleep. So he also took this opportunity to change the color temperature of the light in his room. Unfortunately it wasn’t as simple as just replacing the fluorescent with the LEDs — no, that would be far too easy…

Continue reading “One Way To Get Rid Of That Fluorescent Buzzing Sound”

Sound Reactive Drums Of Trailing Light

If you’re going to be the drummer in a band for a Back to the Future themed New Years Eve party, you really need to add something to your gig that captures that kitschy futuristic ambiance as seen by the 80s. Rainbow LEDs will do the trick.

For his drum set’s reactive trailing light display, [Alec Smecher] was inspired by a similar project he’d seen in the past where Neopixels were added to a regular drum kit and activated with several individual microphones. Since the microphones ultimately heard all of the thundering noise from every drum and cymbal at once, there was a lot of bleed over in the response of the LEDs. To remedy this, [Alec] used piezo pickups which listen to discrete surface vibrations rather than sound in order to clean up the effect produced by the lights. Each of the five LED strips lining the stands of his cymbal and inside of his drums were programmed to react with a burst of light equal in brightness to the intensity of the vibration sensed by the piezo.

To insure everything kept together amidst all the constant motion and shaking during performance, [Alec] soldered his connections directly onto his Trinket’s pins as well as the fragile pickup of the piezo. The pickup of the sensors were taped directly against the skin of his drums and along the inside of each cymbal to maximize responsiveness. After ringing in the new year appropriately as the ‘band from the future’, [Alec] reports that his colorful addition worked fantastic the whole night.

Those interested in building their own can find a nice schematic on [Alec’s] blog as well as the code he used on github. Difficulty level taken into account, this is a great first project for a musician who has yet to dabble in electronics… and seeing that it’s a brand new year, there’s no better time to have a go at something new.

Continue reading “Sound Reactive Drums Of Trailing Light”

3D Printable LED Diffusors

While you can get an LED matrix in any size or shape, the really cool looking ones that are perfect for low-res displays all have diffusors. When they come from a nameless Chinese factory, these diffusors are thin sheets of plastic set into an extruded plastic frame. Since [Jana] has a 3D printer, she figured a custom diffusor was just a few bits of filament and a SCAD file away.

The basis for this custom LED diffusor was a LoL Shield given to [Jana] by the creator at the recent 31C3 conference. This shield is really only just 126 LEDs, multiplexed and in an Arduino form factor, and that many LEDs were just too bright and indistinct next to each other. The plan for a 3D printed diffusor was hatched.

After taking a few measurements, a pair of OpenSCAD files were whipped up and printed out. Assembly consisted of pressing 126 tiny little white diffusors into a frame, but once everything was attached to the matrix, the results were worth it.

Check out the video below for the before and after, demonstrating what a few bits of plastic can do to a LED matrix.

Continue reading “3D Printable LED Diffusors”

This Cake Is Not A Lie

Introducing the world’s first(?) edible and interactive RGB matrix cake — the ArCake.

[Treibair], one of our readers from Germany was inspired a few years ago with the LED cake we made here at Hackaday. Ours used angel food cake squares that allowed LED lights to shine through the squares from underneath the cake, where the LEDs are housed in the technologically advanced cake tray. It worked pretty well but we didn’t exactly recommend people to follow in our foodsteps.

That didn’t stop [Treibair] though, and he came up with his own unique twist on the cake! Instead of bothering with various cubes of angel food cake, he had a much more direct method.

It’s easy to do, just follow these steps:

  • Drill some holes in a cake
  • Put your jello in that cake
  • Make her open the box

And that’s the way you do it.

The resultant LED diffusers let lots of light through, while retaining their most important quality — tastiness. All in all, he made 30 jello filled holes which allowed him to place a 5 x 6 LED matrix underneath the cake. Now when he gives the cake to his wife, it will read her a Happy Birthday message, and then allow her to play a Jump’n’Run game using a Wii nunchuck controller!

Continue reading “This Cake Is Not A Lie”

Bike Rim Lighting Lets The Night Crowd Know When You’re Rollin’

There comes a wonderful “MacGyver moment” in many hackers’ lives when we find ourselves with just the right microcosm of scrap parts to build something awesome. That’s exactly what [dragonator] did with his gifted tech box from Instructables. He’s combined RGB LEDs, a Trinket, and a hall effect sensor to add a semicircular rainbow pattern to his night ride while he rides it.

The theory behind the hack is well-known: given the time between pings from a hall-effect sensor responding to the magnet on a bike wheel, an embedded system can estimate the wheel rpm and predict the time to display a particular color on the LEDs. [dragonator] uses the known wheel speed to determine the LED pattern currently on display: either a slow breathing pulse to a half-circle rainbow that displays on the lower bike rim. He drops in the needed equations and required components to follow his trail in a well-documented instructable.

Persistence of Vision (POV) is a nice extension from blinking your first (or first hundred) LED(s). It’s just enough math to get the casual onlooker to cry “magic” and just enough embedded electronics to get those seasoned double-Es to nod their heads. If you’re new to the POV crowd, [dragonator’s] Instructable may be a great start.

Continue reading “Bike Rim Lighting Lets The Night Crowd Know When You’re Rollin’”