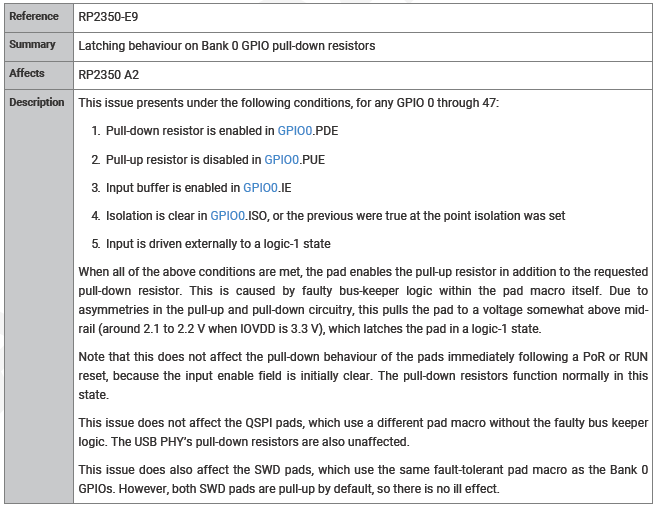
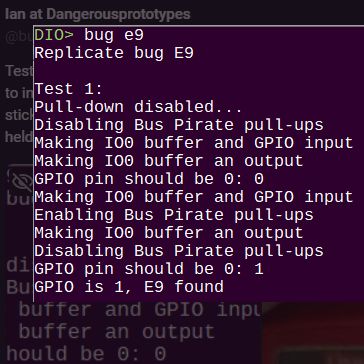
Two assembled 1 dollar TinyML boards

$1 TinyML Board For Your “AI” Sensor Swarm

You might be under the impression that machine learning costs thousands of dollars to work with. That might be true in many cases, but there’s more to machine learning than you might think. For instance, what if you could shower anything with a network of cheap machine-learning-enabled sensors? The 1 dollar TinyML project by [Jon Nordby] allows you to do just that. These tiny boards host an STM32-like MCU, a BLE module, lithium ion power circuitry, and some nice sensor options — an accelerometer, a pair of microphones, and a light sensor.

What could you do with these sensors? [Jon] has talked a bit about a few commercial and non-commercial applications he’s worked on in his ML career, and tells us that the accelerometer alone lets you do human presence detection, sleep tracking, personal activity monitoring, or vibration pattern sensing, for a start. As for the sound input, there’s tasks ranging from gunshot or clapping detection, to coffee roasting process tracking, voice and speech detection, and surely much more. Just a few years ago, we’ve seen machine learning used to comfort a barking dog while its owner is away.

Bottom line is, you ought to get a few of these in your hands and start playing with ML. You still might need a bit of beefier hardware to train your code, but it gets that much easier once you have a network of sensors waiting for your command. Plus, since it’s an open source project, you’ll have a much easier time adding on any additional capabilities your particular application might need.

These boards are pretty cost-optimized, which makes it possible for you to order a couple dozen without breaking the bank. The $1 target is BOM cost, especially if you opt to not include one of the pricier sensors. You can assemble these boards yourself, or get them assembled at a fab of your choice for barely a cost increase. As for software, they will work with the emlearn framework.

Everything is on GitHub — from KiCad sources to Jupyter notebooks. As for Hackaday.io, there are five worklogs of impressive insight — the microphone worklog alone will teach you about microphone amplification in low-power conditions while keeping the cost low. Not as price-constrained and want to try on some image processing tasks? Here’s a beautiful Pi Pico ArduCam board with a camera and a TFT screen.

A render of the USB Blaster, showing all the major parts

The Cheapest USB Blaster Ever, Thanks To CH552

Here’s a CH552G-based USB Blaster project from [nickchen] in case you needed more CH552G in your life, which you absolutely do. It gives you the expected IDC-10 header ready for JTAG, AS, and PS modes. What’s cool, it fits into the plastic shell of a typical USB Blaster, too!

The PCB is flexible enough, and has all the features you’d expect – a fully-featured side-mounted IDC-10 header, two LEDs, a button for CH552 programming mode, and even a UART header inside the case. There’s an option to add level shifter buffers, too – but you don’t have to populate them if you don’t want to do that for whatever reason! The Hackaday.io page outlines all the features you are getting, though you might have to ask your browser to translate from Chinese.

Sadly, there’s no firmware or PCB sources – just schematics, .hex, BOM, and Gerber .zip, so you can’t fix firmware bugs, or add the missing USB-C pulldowns. Nevertheless, it’s a cool project and having the PCB for it is lovely, because you never know when you might want to poke at a FPGA on a short notice. Which is to say, it’s yet another CH552 PCB you ought to put in your PCB fab’s shopping cart! This is not the only CH552G-based programming dongle that we’ve covered – here’s a recent Arduino programmer that does debugWire, and here’s like a dozen more different CH552G boards, programmers and otherwise.

Singleboard: Alpha Is A Very Stylish Computer On A Single PCB

When we think single-board computers, we normally envision things like the Raspberry Pi. But Arduboy creator [Kevin Bates] has recently come up with his own take on the SBC that’s a bit like a modernized take on the early computers of the 1980s. Introducing Singleboard: Alpha.

The build has an incredibly pleasing form factor — it’s a single PCB with a capacitive keyboard etched right into the copper. The brains of the Singleboard is an ESP32, which provides plenty of grunt as well as wireless connectivity. Display is via a small LCD, currently configured with a green-on-black terminal that looks fantastic.

You’re not gonna run a fully-fledged GUI operating system on this thing, but that doesn’t mean it can’t be useful. We could imagine a device like this being a flexible wireless terminal for working with headless systems, for example, and it would be a charming one at that.

Continue reading “Singleboard: Alpha Is A Very Stylish Computer On A Single PCB”

The board shown in real life, top and bottom, showing the pinout and alternate functions silkscreened.

A CH552G Devboard In Case You Missed It

We might just never get tired of covering cool small cheap MCUs, and CH552G sure fits this description. Just so you know, here’s a Hackaday.io project you should check out – a CH552G devboard that’s as simple as it sufficient, in case you needed a tangible reminder that this chip exists, has a lively community, and is very much an option for your projects.

The devboard design by [Dylan Turner] is so straightforward, it’s almost inspiring – a square of PCB with the chip in the center and plenty of empty space for your mods. Everything is open-source with KiCad sources stored on GitHub. The most lovely aspect of this board, no doubt, is having the pin mapping written on the bottom, with all the alternate pin functions – you won’t have to constantly glance at the datasheet while wiring this one up. Plus, of course, there’s the microUSB port for programming, and the programming mode button that a few CH552 projects tend to lack.

It’s simple, it’s self-documenting, it’s breadboardable, and it’s definitely worth putting into the shopping cart at your PCB fab of choice. Oh, and there are bringup instructions on GitHub, in case you need them. Whether you want to prototype the cheapest macropad or keyboard ever, or perhaps a reflow hotplate, the CH552 delivers. If these CH552 projects aren’t enough to light your fire, here are a dozen more.

Chip Mystery: The Case Of The Purloined Pin

Let’s face it — electronics are hard. Difficult concepts, tiny parts, inscrutable datasheets, and a hundred other factors make it easy to screw up in new and exciting ways. Sometimes the Magic Smoke is released, but more often things just don’t work even though they absolutely should, and no amount of banging your head on the bench seems to change things.

It’s at times like this that one questions their sanity, as [Gili Yankovitch] probably did when he discovered that not all CH32V003s are created equal. In an attempt to recreate the Linux-on-a-microcontroller project, [Gili] decided to go with the A4M6 variant of the dirt-cheap RISC-V microcontroller. This variant lives in a SOP16 package, which makes soldering a bit easier than either of the 20-pin versions, which come in either QFN or TSSOP packages.

Wisely checking the datasheet before proceeding, [Gili] was surprised and alarmed that the clock line for the SPI interface didn’t appear to be bonded out to a pin. Not believing his eyes, he turned to the ultimate source of truth and knowledge, where pretty much everyone came to the same conclusion: the vendor done screwed up.

Now, is this a bug, or is this a feature? Opinions will vary, of course. We assume that the company will claim it’s intentional to provide only two of the three pins needed to support a critical interface, while every end user who gets tripped up by this will certainly consider it a mistake. But forewarned is forearmed, as they say, and hats off to [Gili] for taking one for the team and letting the community know.

IKEA BEKANT sit/stand desk with a new controller attached

LYFT: Standing Up For Better IKEA BEKANT Control

The IKEA BEKANT sit/stand desk is kind of a lifesaver — even if you don’t personally go between sit and stand much, the adjustability makes sharing the desk a breeze. Sharing was the case in [Matthias]’ house during the pandemic, as he and his wife took turns using the desk. Switching between their two preferred heights quickly became annoying, so [Matthias] engineered LYFT, a replacement controller that stores up to four settings.

In addition, the new SAMD21-based controller allows them to raise and lower the desk without having to hold the button down. And finally, having a digital readout showing the position is just plain cool. As you’ll see in the manual (PDF), LYFT is as easy to set up and use as the average flat-packed product.

In order to make this work, [Matthias] had to figure out how the desk’s motors communicate out of the box, and he did so with the help of a BEKANT controller project by [Greg Cormier]. You won’t find LYFT at the blue and yellow, at least not yet; for now, you’ll have to shop Tindie or build it yourself.

HDMI DDC Keypad Controls Monitor From Rack

Sometime last year, [Jon Petter Skagmo] bought a Dell U3421WE monitor. It’s really quite cool, with a KVM switch and picture-by-picture support for two inputs at the same time. The only downside is that control is limited to a tiny joystick hiding behind the bezel. It’s such a pain to use that [Jon] doesn’t even use all of the features available.

[Jon] tried ddcutil, but ultimately it didn’t work out. Enter the rack-mounted custom controller keyboard, a solution which gives [Jon] single keypress control of adjusting the brightness up and down, toggling picture-by-picture mode, changing source, and more.

How does it work? It uses the display data channel (DDC), which is an I²C bus on the monitor’s HDMI connector. More specifically, it has a PIC18 microcontroller sending those commands via eight Cherry MX-style blues.

Check this out — [Jon] isn’t even wasting one of the four monitor inputs because this build uses an HDMI through port. The finished build looks exquisite and fits right into the rack with its CNC-routed aluminium front panel. Be sure to check it out in action after the break.

Ever wonder how given keyboard registers the key you’re pressing? Here’s a brief history of keyboard encoding.

Continue reading “HDMI DDC Keypad Controls Monitor From Rack”