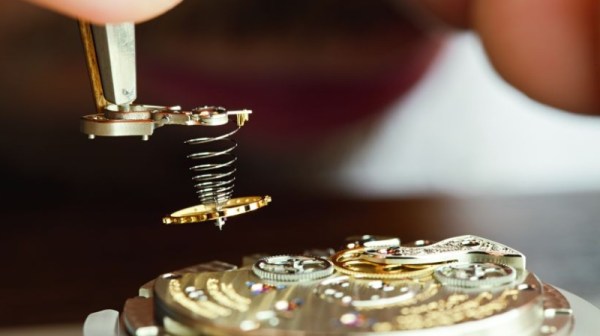
Supercapacitors Propel Rocket To The Skies

OK, so this isn’t really a rocket. In the strictest definition, rockets are vehicles or projectiles that propel themselves through jettisoning mass, usually through the combustion of fuel. But with electric motors getting stronger and stronger, folks are building craft that look a lot more like rockets than airplanes. [Tom Stanton] is one such person (Youtube link, embedded below).

We’ve seen “electric rocket” builds before, but where others have used lithium batteries, [Tom] has used supercapacitors instead. Six supercaps are installed in a 3D printed mount, and supply power to a 500 W brushless outrunner motor which gives the rocket the thrust to climb into the sky.

In testing, [Tom] estimates the rocket was able to reach an altitude of approximately 60 m, or 200 ft. That’s not particularly astounding, but it does prove that supercaps can run a high current load in a real world situation. Additionally, their fast recharge rate allows [Tom] to make a repeat flights in just about the time it takes to repack the parachute. Video after the break.

Continue reading “Supercapacitors Propel Rocket To The Skies”

Cold Plasma Torch Produces A Cleansing Flame That Never Consumes

It’s basically a lightsaber. Except smaller. And with an invisible blade. And cold to the touch. But other than that, this homebrew cold plasma torch (YouTube, embedded below) is just like the Jedi’s choice in elegant weaponry.

Perhaps we shouldn’t kid [Justin] given how hard he worked on this project – seventeen prototypes before hitting on the version seen in the video below – but he himself notes the underwhelming appearance of the torch without the benefit of long-exposure photography. That doesn’t detract from how cool this build is, pun intended. As [Justin] explains, cold plasma or non-equilibrium plasma is an ionized stream of gas where the electron temperature is much hotter than the temperature of the heavier, more thermally conductive species in the stream. It’s pretty common stuff, seen commercially in everything from mercury vapor lamps to microbial sterilization.

It’s the latter use that piqued [Justin]’s interest and resulted in a solid year of prototyping before dialing in a design using a flyback transformer to delivery the high voltage to a stream of argon flowing inside a capillary tube. The quartz tube acts as a dielectric that keeps electrons from escaping and allows argon to be ionized and wafted gently from the tube before it can reach thermal equilibrium. The result is a faint blue glowing flame that’s barely above room temperature but still has all the reactive properties of a plasma. The video shows all the details of construction and shows the torch in action.

Hats off to [Justin] for sticking with a difficult build and coming through it with an interesting and useful device. We’ve no doubt he’ll put it to good use in his DIY biohacking lab in the coming months.

Continue reading “Cold Plasma Torch Produces A Cleansing Flame That Never Consumes”

Electromechanical YouTube Sub Counter Trades Clicks For Clacks

Acquiring a new YouTube subscriber is a blessed event that deserves far more fanfare than a phone notification. But maybe blinkenlights don’t really do it for you anymore, or you simply prefer to be soothed sonically rather than visually. Well, what could be more satisfying than the crisp clack of an electromechanical 7-segment display? Six of them, of course. These things look great, they sound great, and once they’re set, they don’t need power to stay that way.

These displays switch between black and white by reversing current flow through their electromagnets, so [Zack] turned to the H-bridge in order to use them with DC. One H-bridge for each segment of six displays adds up fast, though. To get around this, [Zack] tied one pole of each electromagnet together for a common signal input, and used the other pole to control each segment individually. Then, he was able to tie all the A segments together, all the B segments, and so on, and only needs 13 H-bridges to do it all.

There was just one thing [Zack] didn’t count on. Once he got the board soldered up and running, the displays started acting funny. The low impedance of the coils was causing them to influence each other over the common path, so he added diode arrays to keep them in line.

[Zack]’s using an ESP32 to get the 411 through the Google API, and four octal serial switches to drive the displays. Even more satisfying than all those clacks is the displays’ operational economy baked into [Zack]’s code—as they count up, any segments common to the first digit and the next digit remain on. Increment your way past the break to check out the build video.

Not focused on numbers, but still want to celebrate each new sub? Try a dancing robot or a Tetris twist.

Continue reading “Electromechanical YouTube Sub Counter Trades Clicks For Clacks”

Making Microfluidics Simpler With Shrinky Dinks

It’s as if the go-to analogy these days for anything technical is, “It’s like a series of tubes.” Explanations thus based work better for some things than others, and even when the comparison is apt from a physics standpoint it often breaks down in the details. With microfluidics, the analogy is perfect because it literally is a series of tubes, which properly arranged and filled with liquids or gasses can perform some of the same control functions that electronics can, and some that it can’t.

But exploring microfluidics can be tough, what with the need to machine tiny passages for fluids to flow. Luckily, [Justin] has turned the process into child’s play with these microfluidic elements made from Shrinky Dinks. For those unfamiliar with this product, which was advertised incessantly on Saturday morning cartoon shows, Shrinky Dinks are just sheets of polystyrene film that can be decorated with markers. When placed in a low oven, the film shrinks about three times in length and width while expanding to about nine times its pre-shrunk thickness. [Justin] capitalized on this by CNC machining fine grooves into the film which become deeper after shrinking. Microfluidics circuits can be built up from multiple layers. The video below shows a mixer and a simple cell sorter, as well as a Tesla valve, which is a little like a diode.

We find [Justin]’s Shrinky Dink microfluidics intriguing and can’t wait to see what kind of useful devices he comes up with. He’s got a lot going on, though, from spider-powered beer to desktop radio telescopes. And we wonder how this technique might help with his CNC-machined microstrip bandpass filters.

Continue reading “Making Microfluidics Simpler With Shrinky Dinks”

A Year-Long Experiment In OLED Burn-In

If you need to add a small display to your project, you’re not going to do much better than a tiny OLED display. These tiny display are black and white, usually found in resolutions of 128×64 or some other divisible-by-two value, they’re driven over I2C, the libraries are readily available, and they’re cheap. You can’t do much better for displaying a few numbers and text than an I2C OLED. There’s a problem, though: OLEDs burn out, or burn in, depending on how you define it. What’s the lifetime of these OLEDs? That’s exactly what [Electronics In Focus] is testing (YouTube, in Russian, so click the closed captioning button).

The experimental setup for this is eleven OLED displays with 128×64 pixels with an SSD1306 controller, all driven by an STM32 over I2C. Everything’s on a breadboard, and the actual display is sixteen blocks, each lit one after another with a one-second display in between. This is to test gradually increasing levels of burnout, and from a surface-level analysis, this is a pretty good way to see if OLED pixels burn out.

After 378 days of testing, this test was stopped after there were no failed displays. This comes with a caveat: after a year of endurance testing, there were a few burnt out pixels. correlating with how often these pixels were on. The solution to this problem would be to occasionally ‘jiggle’ the displayed text around the screen, turn the display off when no one is looking at it, or alternatively write a screen saver for OLEDs. That last bit has already been done, and here are the flying toasters to prove it. This is an interesting experiment, and although that weird project you’re working on probably won’t ping an OLED for a year of continuous operation, it’s still something to think about. Video below.

Continue reading “A Year-Long Experiment In OLED Burn-In”

Making A Flying Wing With Expanding Foam

Many radio control aircraft modelers will be familiar with the process of cutting wings out of foam with the hot wire method. The tools are simple enough to build at home, and it’s an easy way of producing a lightweight set of wings without too much hassle. [IkyAlvin] walks a different path, however (YouTube link, embedded below).

Expanding foam is the key here – that wonderful sticky material in a can that never quite goes where you want it to. MDF and foam is used to create a mold to produce the wing forms. It’s then a simple matter of loading floor underlay into the mold to act as the outer skin, and then filling the mold with expanding foam and waiting for it to cure.

The final parts are assembled into a flying wing, and the first test flight is remarkably successful. Using foam overlay as a skin also has the added benefit of providing a sleek silver finish to the aircraft. It goes to show that there’s always room to explore alternative techniques outside of the mainstream. If you’d like to get more familiar with the classic hot wire technique, though, we can help there too. Video after the break.

Continue reading “Making A Flying Wing With Expanding Foam”

Pocket Watch Becomes Pinhole Camera

A pinhole camera is essentially the combination of the camera obscura with photographic film. The pinhole acts as the lens, focusing the scene onto the film, and after exposure, the film can then be developed and you’ve got your picture. They’re a fun way to learn about photography, and easy to make, too. [Brooklyntonia] decided to undertake just such a build, secreted away inside a pocket watch.

The build starts with with the disassembly of the watch, which acts as the main cavity of the camera. A bellows is then constructed from leather and a toilet paper roll to allow the camera to still fold up inside the original watch case. A pinhole is then installed at the end of the bellows, and a plug is used as a shutter to allow the bellows to be properly unfolded prior to exposure.

It’s a fun build, and one that comes complete with instructions for the proper processing of film in your own darkroom – or bathroom. Pinhole cameras can be useful tools, too – particularly for things such as capturing an eclipse.