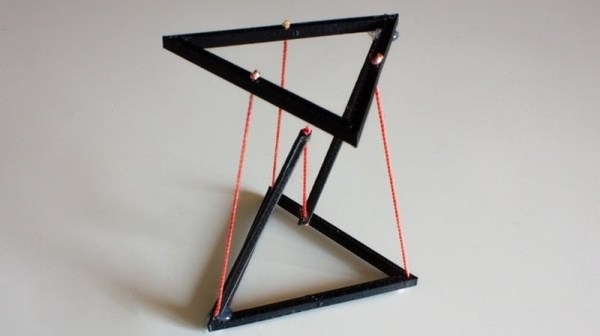
Remote ADS-B Install Listens In On All The Aircraft Transmissions With RTL-SDR Trio, Phones Home On Cellular

When installing almost any kind of radio gear, the three factors that matter most are the same as in real estate: location, location, location. An unobstructed location at the highest possible elevation gives the antenna the furthest radio horizon as well as the biggest bang for the installation buck. But remote installations create problems, too, particularly with maintenance, which can be a chore.

So when [tsimota] got a chance to relocate one of his Automatic Dependent Surveillance-Broadcast (ADS-B) receivers to a remote site, he made sure the remote gear was as bulletproof as possible. In a detailed write up with a ton of pictures, [tsimota] shows the impressive amount of effort he put into the build.

The system has a Raspberry Pi 3 with solid-state drive running the ADS-B software, a powered USB hub for three separate RTL-SDR dongles for various aircraft monitoring channels, a remote FlightAware dongle to monitor ADS-B, and both internal and external temperature sensors. Everything is snuggled into a weatherproof case that has filtered ventilation fans to keep things cool, and even sports a magnetic reed tamper switch to let him know if the box is opened. An LTE modem pipes the data back to the Inter, a GSM-controlled outlet allows remote reboots, and a UPS keeps the whole thing running if the power blips atop the 15-m building the system now lives on.

Nobody appreciates a quality remote installation as much as we do, and this is a great example of doing it right. Our only quibble would be the use of a breadboard for the sensors, but in a low-vibration location, it should work fine. If you’ve got the itch to build an ADS-B ground station but don’t want to jump in with both feet quite yet, this beginner’s guide from a few years back is a great place to start.

Mix And Match Parts To Build A Better Mountain Bike Derailleur

Mountain bikers take their sport seriously, and put their bikes through all manner of punishment in the course of a ride. This has given rise to a wide range of specialist equipment, such as suspension, disc brakes and even clutch derailleurs, which help reduce chain slap when riding over rough terrain. However, these specialist derailleurs aren’t available for all applications, so sometimes you’ve gotta hack together your own.

Shimano clutch derailleurs are only really available for 10-speed rear cassettes and up, due to a change in derailleur ratio compared to the earlier 6 to 9 speed cassettes. Using a derailleur designed for 10-speed operation on a rear cassette with fewer gears won’t shift properly.

[SzurkeEg] was inspired by earlier work, and realised that by combining parts from several generations of Shimano hardware, it was possible to build a working clutch derailleur for 6 to 9 speed rear cassettes. The main parallelogram is what handles the positioning of the derailleur, and is sourced from a 9-speed part to get the gear indexes correct.The rest of the parts are sourced from later models with the clutch feature built in.

It’s a smart mechanical hack, and one that isn’t necessarily the most intuitive. But by having a go, and seeing what’s possible, now a whole generation of mountain bikes can tear up the trail like never before. We’ve seen Shimano gear hacked before, too. Video below the break. Continue reading “Mix And Match Parts To Build A Better Mountain Bike Derailleur”

Locating Targets With Charm Courtesy Of A Life Size Portal Turret

What better way to count down the last 7 weeks to a big hacker camp like SHA2017 than by embarking on a last-minute, frantic build? That was [Yvo]’s thought when he decided to make a life-sized version of the adorably lethal turrets from the Valve’s Portal video games. Since that build made it to the finish line back then with not all features added, he finished it up for the CCC camp 2019 event, including the ability to close, open, target and shoot Nerf darts.

Originally based on the miniature 2014 turret (covered on Hackaday as well), [Yvo] details this new project in a first and second work log, along with a detailed explanation of how it all goes together and works. While the 2017 version took a mere 50 days to put together, the whole project took about 300 hours of 3D printing. It also comes with four Nerf guns which use flywheels to launch the darts.  The wheels are powered using quadcopter outrunner motors that spin at 25,000 RPM. The theoretical speed of a launched dart is over 100km/h, with 18 darts per gun and a fire rate of 2 darts per second.

The basic movement control for the system is handled by an Arduino Mega, while the talking and vision aspects are taken care of by a Raspberry Pi 3+, which ultimately also makes the decisions about how to move the system. As one can see in the video after the link, the system seems to work pretty well, with a negligible number of fatalities among company employees.

Though decidedly not a project for the inexperienced tinkerer, [Yvo] has made all of the design files available along with the software. We’re still dubious about the claims about the promised cake for completing one of these turrets, however.

Continue reading “Locating Targets With Charm Courtesy Of A Life Size Portal Turret”

Bearing-reinforced Stepper Tackles Hefty Axial Loads

These days, it’s common among us hackers to load a stepper motor with forces in-line with their shaft–especially when we couple them to leadscrews or worm gears. Unfortunately, steppers aren’t really intended for this sort of loading, and doing so with high forces can destroy the motor. Fear not, though. If you find yourself in this situation, [Voind Robot] has the solution for you with a dead-simple-yet-dead-effective upgrade to get your steppers tackling axial loads without issue.

In [Voind Robot’s] case, they started with a worm-gear-drive on a robot arm. In their circumstances, moving the arm could put tremendous axial loads onto the stepper shaft through the worm–as much as 30 Newtons. Such loads could easily destroy the internal stepper motor bearings in a short time, so they opted for some double-sided reinforcement. To alleviate the problem, the introduced two thrust bearings, one on either side of the shaft. These thrust bearings do the work of redirecting the force off the shaft and directly onto the motor casing, a much more rigid place to apply such loads.

This trick is dead simple, and it’s actually over five years old. Nevertheless, it’s still incredibly relevant today for any 3D printer builder who’s considering coupling a leadscrew to a stepper motor for their Z-axis. There, a single thrust bearing could take out any axial play and lead to an overall rigid build. We love simple machine-design nuggets of wisdom like these. If you’re looking for more printer-design tricks, look no further than [Moritz’s] Workhorse Printer article.

Kitty Litter And Broken Light Bulbs Power This Homebrew Gas Chromatograph

We’re always on the lookout for unexpected budget builds here at Hackaday, and stumbling across a low-cost, DIY version of an instrument that sells for tens of thousands of dollars is always a treat. And so when we saw a tip for a homebrew gas chromatograph in the tips line this morning, we jumped on it. (Video embedded below.)

For those who haven’t had the pleasure, gas chromatography is a chemical analytical method that’s capable of breaking a volatile sample up into its component parts. Like all chromatographic methods, it uses an immobile matrix to differentially retard the flow of a mobile phase containing the sample under study, such that measurement of the transit time through the system can be made and information about the physical properties of the sample inferred.

The gas chromatograph that [Chromatogiraffery] built uses a long stainless steel tube filled with finely ground bentonite clay, commonly known as kitty litter, as the immobile phase. A volatile sample is injected along with an inert carrier gas – helium from a party balloon tank, in this case – and transported along the kitty litter column by gas pressure. The sample interacts with the column as it moves along, with larger species held back while smaller ones speed along. Detection is performed with thermal conductivity cells that use old incandescent pilot lamps that have been cracked open to expose their filaments to the stream of gas; using a Wheatstone bridge and a differential amp, thermal differences between the pure carrier gas and the eluate from the column are read and plotted by an Arduino.

The homebrew GC works surprisingly well, and we can’t wait for [Chromatogiraffery] to put out more details of his build.

Continue reading “Kitty Litter And Broken Light Bulbs Power This Homebrew Gas Chromatograph”

Fail Of The Week: Spinning The Pripyat Ferris Wheel

This multifaceted fail comes to us straight from the Chernobyl Exclusion Zone, where a group of friends apparently decided that a fun weekend project would be trying to turn over the iconic ferris wheel in the Pripyat Amusement Park. The [Kreosan] crew documented their admittedly very creative attempt at suicide in the video after the break, but we can save you some time by telling you right up front that the decades-old ferris wheel never actually rotates more than a few degrees. Though that’s hardly the key failure of this endeavour.

Even if you don’t understand anything they’re saying (we certainly don’t), it’s not too hard to follow along with this harebrained scheme.

Under cover of darkness, the troupe gains access to the mechanisms below the towering Soviet-era ride, and removes the brake unit mounted next to the motor. With the wheel now free spinning, the team is elated to see the mechanical advantage is such that spinning the shaft by hand is enough to cause a very slight rotation of the pulley and cables attached to the wheel.

Realizing they need more speed, the group then spends the rest of the night and apparently a good deal of the following day attempting to spin the mechanism using the rear wheel of one of their electric bicycles. But a rubber wheel held by hand against a rusty shaft, rather unsurprisingly, turns out to be a fairly poor mechanical linkage. They get a couple partial rotations on the pulleys, but still no serious movement.

One of the guys was working on the next phase of the inexplicably misguided plan, removing some heavy counterweights hanging under the ferris wheel, when a young woman shows up with a dosimeter and starts taking some measurements. Eventually, one of these moonlighting ferris wheel engineers uses the meter to observe the elevated radiation levels of the dirt and rust accumulated on his bare hands. This swiftly brings the operation to a close, and they all ride off on their bikes.

This was, without question, a monumentally stupid thing to do. Even if this was just a run-of-the-mill ferris wheel that had been abandoned and exposed to the elements for over thirty years, climbing on the thing and trying to get it to spin would be dangerous. But when you combine that with the fact it’s common knowledge to those who explore the Exclusion Zone that there are parts of the ferris wheel still emitting radiation at hundreds of times the normal background dose, this misadventure is a strong contender for the 2019 Darwin Award.

We’re lucky the remnants of Chernobyl’s number four reactor are locked away inside the Chernobyl New Safe Confinement, or else some up-and-coming Internet celebrity might try to get in there and spin up the turbines for a laugh. We’ve seen some pretty crazy stunts from [Kreosan], and we’d like to see more. So please, stay safe(r) guys!

Continue reading “Fail Of The Week: Spinning The Pripyat Ferris Wheel”

Quilting Desk Is An Absolute Unit

Most hobbies come with a lot of tools, and thread injecting is no different. Quilting itself may be Queen Hobby when it comes to the sheer volume of things you can buy: specialized templates, clips, thimbles, disappearing ink pens, and so on. And of course, you want it all within arm’s reach while sitting at the machine.

Ruler rack via Amazon.

Years ago, [KevsWoodworks] built an impressive custom quilting desk for his wife. He’d added on to it over the years, but it was time for a bigger one. This beautiful beast has 21 drawers and 6 large cubbyholes for plastic bins. At the wife’s request, one of the drawers is vertical. [Kev] doesn’t say what she put in there, but if it were our desk, that’s where we’d stash all our large plastic rulers that need to be kept flat (or vertical). There’s also a lift, so any sewing machine can be brought up flush with the enormous top.

Fortunately for us, [Kev] likes to teach. He documented the build in a series of videos that go nicely with his CAD drawings, which are available for download. Thread your way past the break to see those videos.

Want to do some thread injecting, but don’t want to spend hundreds on a machine? We got lucky with our entry-level injector. If yours is a piece of scrap or has limited stitch options, replace the motor, or add an Arduino.

Continue reading “Quilting Desk Is An Absolute Unit”