Massive 3D-Printed Ridable Tank Boggles The Mind

Anyone who has used an FDM 3D printer knows just how long the process can take, especially when you really start filling up the available print volume. Apparently [Ivan Miranda] has absolutely zero fear of insanely long print times, and is in the process of building a massive ridable tank (YouTube playlist of the whole build) that is almost completely 3D printed.

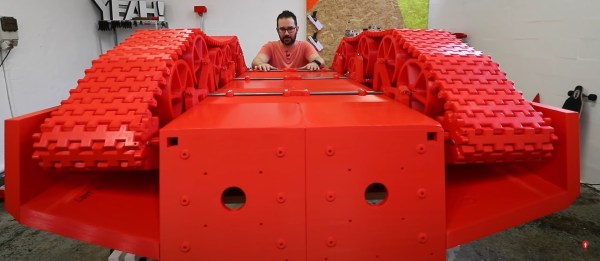
[Ivan] is no stranger to large prints, but this tank is on a different level altogether. The chassis, which is reinforced with aluminium and steel square tubing, took around 1200 hours to print and each of the wheels took 6 days! The rolling chassis with wheels and track weighs close to a 100 kg.  Having built a few smaller 3D printed tracked vehicles before, [Ivan] used a lot of that knowledge to design the latest monster.

Connecting the tracked section together has always proven challenging for [Ivan]. This time he used plastic fish tape (wire puller) for the pins, and blocked off the end holes with screws. The bogies (wheel sets) are also interesting, with 3D printed springs that sit parallel to the ground. Almost all the parts are printed in PLA, which can be quite brittle, so it would be interesting to see how it holds up.

[Ivan] has been working on this project since the start of 2019, and we can’t wait to see it completed. We’ve featured his signature red prints a few times, including a RC car that drives on the ceiling and a water jet drive. If you’re keen to build your own tank on the opposite side of the size spectrum, check out this tiny tank for your crawl space. Watch [Ivan] finish the rolling chassis after the break. Continue reading “Massive 3D-Printed Ridable Tank Boggles The Mind”

Rarely Adjusted Slicer Setting Makes A Difference

When you 3D print something, you probably adjust the layer height based on your desired print quality. Speed is another parameter that many people adjust. But what about extrusion width? The parameter is there, but most people leave it at the defaults. [Stephan] wondered about it, and after running some tests, made a video you can see below trying to determine if it affected strength and print quality.

The tests were pretty straightforward. Some Benchys and other test pieces at each setting were observed and — in some cases — destroyed. He ranged the width from 90% to 250% of a 0.4mm nozzle. Important to note, his results are from a nozzle that has a flat lip around the aperture. If yours doesn’t look like that, you will see different results.

Continue reading “Rarely Adjusted Slicer Setting Makes A Difference”

A New Method For Growing Watch Springs

Scientists at the Swiss Federal Laboratories for Materials Science and Technology (Empa) recently developed a new technique for growing watch springs to tiny specifications. As it turns out, the creation of watch springs is ripe with opportunity for new materials research.

The technique involves using photo-etching and electrochemical deposition into cold, aqueous solutions. Compared to drawing and winding Nivarox wires, this is a fairly unconventional method for manufacturing. For as long as watchmaking has been around, creating the balance springs has been one of the most difficult parts of the job. The wires must be drawn to a thickness in the hundredths of millimeters and wound and tempered to the exact hardness, ductility, and elasticity while compensating for environmental factors. Many substances change their properties during fabrication, so the Empa team decided to look to pure materials research as a way to find a means for fabricating balance springs that would remain stable.

They took silicon wafers (the same kind used for solar panels and computer chips), covered them in gold and a thin layer of light sensitive paint, and etched the shape of a spring into the wafer. The wafer was then dipped into a galvanic bath containing a salt solution from a metallic alloy — the spring acts as a cathode so that when an electric current passes through the bath, metal is deposited at the base of the spring. Once the spring is built up, it is dissolved from the mold and examined. After a bit of smoothing, the final spring is washed and sent to a lab for prototype production.

The electroplated springs are currently on display at the Laboratory for Mechanics of Materials and Nanostructures at the Empa campus in Thun, Switzerland. In the meantime, the first pilot tests are being wrapped up, and the team is beginning to work with Swiss watchmakers to see if their springs can hold up inside watch mechanisms.

[Thanks to Qes for the tip!]

Forget Printing Labels For Your Bathtub Hooch, Why Not Engrave The Bottle?

[BlueFlower] sends in this cool wine bottle engraver. It’s a simple machine that reminds us of the infamous EggBot. One axis can move in x and z while the other axis rotates the work piece. The EggBot works in spherical coordinates while this one lives in a cylindrical world.

The base of the device appears to be an older project of [BlueFlower]’s an XY-Plotter/Cutter. The plotter itself is a very standard twin-motor gantry design. In fact, it looks like when the machine is converted to bottle engraving, the drivers which previously moved the Y-axis are re-purposed to move two rollers. The rollers themselves are suspiciously similar to those found inside 2D printers. We all have them kicking around our junk drawers, but it’s rare to see them actually being used. The spindled is just a DC motor with a ball grinder coupled to the end.

As for the final result, we have to admit that the engraved bottles are quite fetching. Catch a video of the engraving process after the break.

Continue reading “Forget Printing Labels For Your Bathtub Hooch, Why Not Engrave The Bottle?”

The 3D Printers, Scanners, And Art Robots Of Maker Faire Rome

How is it possible that a robot can sketch both better and worse than I can at the same time, and yet turn out an incredible work of art? Has 3D-scanning really come so far that a simple camera and motorized jig can have insane resolution? These are the kinds of questions that were running through my mind, and being answered by the creators of these brilliant machines, at Maker Faire Rome.

There was a high concentration of robots creating art and 3D printing on display and the Faire, so I saved the best examples just for this article. But you’ll also find hacks from a few groups of clever students, and hardware that made me realize industrial controllers can be anything but boring. Let’s take a look!

Continue reading “The 3D Printers, Scanners, And Art Robots Of Maker Faire Rome”

IR Hack Turns Kid’s Lamp Into Temp Display

Sometimes a clever hack of an off-the-shelf product can come courtesy of its dismantling and hardware modification, but at other times the most elegant of hacks can be made without ever turning a screwdriver. [Brian Lough] was given the request by a friend to replicate a commercial child’s night light that changed colour with temperature, and his response was to use an off-the-shelf colour changing kids light unmodified, sending it temperature-related colour commands via its infra-red control.

His device is a spectacularly simple one hardware-wise using an off-the-shelf Wemos D2 Mini ESP8266 board running an Arduino bootloader, coupled with a BME280 temperature sensor, IR receiver, and transmitter. His video which we’ve placed below the break is a handy primer to anyone with an interest in infra-red reverse engineering, and we can see that there will be other projects that could be seeded by it. For those curious enough to look, it can be found on GitHub.

[Brian] has appeared here so many times, and is definitely worth a follow. One of his more recent builds featured another child’s toy augmented to make it something really special.

Continue reading “IR Hack Turns Kid’s Lamp Into Temp Display”

Router Rebooter Without The Effort

It’s one of the rituals of our age, rebooting the family router when the bandwidth falters. Flip the power, and after half a minute or so your YouTube video starts up again. Consumer-grade router hardware is not the most reliable computing equipment you will own, as [Nick Sayer] found out when the router at his vacation home wasn’t reliable enough to support his remote monitoring equipment. His solution is an auto-reboot device, that power-cycles the offending device on command.

An obvious method might be to switch the mains supply, but instead he’s taken the simpler option of switching the DC from the router’s wall wart power supply with a cunning arrangement of three MOSFETs to keep the router defaulting to on under all conditions except when it is commanded to power down by the ATtiny microcontroller overseeing it. This chip provides extra fail-safe and debouncing functions to ensure no accidental rebooting.

Driving the circuit is a Raspberry Pi that handles the house monitoring, on which a Python script checks for Internet access and asks for a reboot if there is none. For extra safety it requires access to be down for a sustained period before doing so in case of a router firmware upgrade.

This isn’t the first router rebooter, for a mains-switching ESP8266 take a look at this one.

Router picture: Asim18 [CC BY-SA 3.0]