Beautiful Sidewalk Graffiti Machine

Our hero [Alex] just built a sidewalk graffiti machine, and it’s a beauty to behold, so make sure you check out the video below the break. But don’t neglect [Alex]’s blog, and the build videos throughout. (Nice t-shirt in the wheel-making video, BTW.)

The machine itself is basically a two-meter wide printer where the roller is replaced with drive wheels. The frame, made of plywood, looks great and helps keep the machine light weight. Everything is done with DC motors and timing belts, which means motor encoders and closed-loop control in the firmware. It connects via a WiFi serial bridge, made with an ESP8266, to [Alex]’s cell phone.

Everything, from plans to software, is available on [Alex]’s GitHub for the project.

Continue reading “Beautiful Sidewalk Graffiti Machine”

Graphene Super Caps: Coming Soon?

If you read Hackaday regularly, you’ve probably heard that you can use a LASER to create graphene. There’s been a bit of research on how to make practical graphene supercapacitors using the technique (known as LIG or LASER-induced graphene). Researchers at Rice University have been working on this, and apparently they’ve had significant success inducing graphene capacitors on a Kapton substrate. The team has published a paper in Advanced Materials (which is behind a paywall) about their work.

In particular, Rice claims that they have easily produced supercapacitors with an energy density of 3.2 mW/cubic centimeter (that’s what the University’s website reports; they probably mean mW-hours/cubic centimeter) with capacitances near one millifarad per square centimeter. A key benefit of the construction method is that the capacitors continued to work after researchers bent them 10,000 times. A flexible capacitor is useful in wearable devices that would often flex, or in a device like a cell phone that could bend in your back pocket as you sit.

Continue reading “Graphene Super Caps: Coming Soon?”

Echo Of The Bunnymen: How AMD Won, Then Lost

In 2003, nothing could stop AMD. This was a company that moved from a semiconductor company based around second-sourcing Intel designs in the 1980s to a Fortune 500 company a mere fifteen years later. AMD was on fire, and with almost a 50% market share of desktop CPUs, it was a true challenger to Intel’s throne.

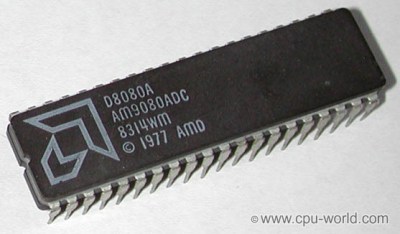
An AMD 8080A. source
An AMD 8080A. source.

AMD began its corporate history like dozens of other semiconductor companies: second sourcing dozens of other designs from dozens of other companies. The first AMD chip, sold in 1970, was just a four-bit shift register. From there, AMD began producing 1024-bit static RAMs, ever more complex integrated circuits, and in 1974 released the Am9080, a reverse-engineered version of the Intel 8080.

AMD had the beginnings of something great. The company was founded by [Jerry Sanders], electrical engineer at Fairchild Semiconductor. At the time [Sanders] left Fairchild in 1969,  [Gordon Moore] and [Robert Noyce], also former Fairchild employees, had formed Intel a year before.

While AMD and Intel shared a common heritage, history bears that only one company would become the king of semiconductors. Twenty years after these companies were founded they would find themselves in a bitter rivalry, and thirty years after their beginnings, they would each see their fortunes change. For a short time, AMD would overtake Intel as the king of CPUs, only to stumble again and again to a market share of ten to twenty percent. It only takes excellent engineering to succeed, but how did AMD fail? The answer is Intel. Through illegal practices and ethically questionable engineering decisions, Intel would succeed to be the current leader of the semiconductor world.

Continue reading “Echo Of The Bunnymen: How AMD Won, Then Lost”

A Structural PVC Cyr Wheel

PVC is a great building material that can be used for everything from yurts and geodesic domes to pressure vessels. One thing we haven’t seen a lot of is bending PVC pipe. [Lou] wanted to build a Cyr wheel for his daughter, and instead of shelling out five hundred big ones for an aluminum version, he build one out of PVC using techniques usually reserved for woodworking.

A Cyr Wheel is usually a large aluminum hoop built for acrobatic performances. These performances are pretty impressive and look like a lot of fun, but the wheels themselves are rather expensive. Figuring PVC was a good enough solution, [Lou] built his own Cyr wheel for $50 in materials.

The build started off by laying out a jig on the floor. Two sheets of plywood were laid out, a radius for the wheel traced, and a bunch of blocks were glued to the perimeter of this mold. With the mold in place, a few pieces of PVC were flexed into position, clamped, heated with a hair dryer to relieve stress, and glued to a second course of PVC.

The process [Lou] used to build his Cyr wheel isn’t that different from extremely common woodworking techniques. In fact, it wouldn’t be unreasonable for [Lou] to build a wooden Cyr wheel with the same jig. We’re wondering how well this project will stand up to abuse, so if you have any insight to the uses of structural PVC drop a note in the comments.

Old School Analog Meters Tell You The Weather

A home weather station is great geek street cred. Buying a commercially available station will get you all the bells and whistles, but the look tends to the utilitarian. And then there’s the trouble of placing the sensor array somewhere. To solve both problems, [GradyHillhouse] built this unique weather station with analog meters.

Based on a Particle Photon pulling weather data from the forecast.io API, values for temperature, pressure and the like are sent to analog IO pins. Each pin has a meter with a trimmer pot for calibration and a custom printed label. There’s also a digital output that goes high when a severe weather alert is posted; that drives an LED behind the bezel of one of the meters. Everything is mounted in a walnut plaque which makes for a nice presentation. The video after the break details the build.

As you can imagine, we’ve featured lots of weather stations before. Some display their data on a screen, some in more unique ways. But we really like the old school look and simplicity of this project.

Continue reading “Old School Analog Meters Tell You The Weather”

El Cheapo Phased-Array Sonar

Sonar is a great sensor to add to any small-scale robot project. And for a couple bucks, the ubiquitous HC-SR04 modules make it easy to do. If you’ve ever used these simple sonar units, though, you’ve doubtless noticed that you get back one piece of information only — the range to the closest object that the speaker is pointing at. It doesn’t have to be that way. [Graham Chow] built a simple phased-array using two SR04 modules, and it looks like he’s getting decent results.

PB211200The hack starts out by pulling off the microcontroller and driving the board directly, a hack inspired by [Emil]’s work on reverse engineering the SR04s. Once [Graham] can control the sonar pings and read the results back, the fun begins.

[Graham] uses TI’s Cortex M4F LaunchPad eval kit to generate a ping and receive the reflections. With normal sonar, the time between the ping being sent and its reception is determined by the range to the target. In a phased array, in this case just the two modules, the difference in the times it takes for the ping to return to each module is used to determine the angle to the target.

phased_array_sonar_tableau

If you’re DSP-savvy, [Graham] is using a phase-shifted square wave signal so that the correlations of the sent and returned signals have better peaks. This also helps the peaks in correlation across the two SR04s in the array. We think it’s pretty awesome that [Graham] is resolving a couple of degrees in angular separation when he moved his wine bottle. With a couple more SR04 units, [Graham] could start to get height information back as well.

For not much scratch, [Graham] has himself an experimental setup that lets him play with some pretty heavy signal processing. We’re impressed, and can’t wait to see what’s next. Special thanks to [Graham] for posting up the code.

And thanks [João] for the tip!

3 Nerds + 2 Days = Little Big Pixel

Two days at a company sponsored hackathon? Sounds like fun to us! And productive too – the end result for [GuuzG] and two of his workmates from their company’s annual “w00tcamp” was this festive and versatile 16×16 pixel mega display.

From the sound of it, [GuuzG] and his mates at q42.com are not exactly hardware types, but they came up with a nice build nonetheless. Their design was based on 16 WS2812 LED strips for a 256 pixel display. An MDF frame was whipped up with cross-lap joints to form a square cell for each pixel. Painted white and topped with a frosted Plexiglass sheet, each RGB pixel has a soft, diffuse glow yet sharply defined borders. Powered by a pair of 5A DIN rail DC supplies and controlled by a Raspberry Pi, the finished display is very versatile – users can draw random pixel art, play the Game of Life, or just upload an image. [GuuzG] and company are planning to add Tetris, naturally, and maybe a webcam for fun.

We’ve seen lots of uses for the ubiquitous WS2812 LEDs, from clocks to Ambilight clones to ground-effect lighting for an electric skateboard. But if you’re in the mood for a display that doesn’t use LEDs, there’s always this multithreading display.

[via Reddit]