How Store Anti-Theft Alarms Work: Magnetostriction

Now that’s uncanny. Two days before [Ben Krasnow] of the Applied Science YouTube blog posted this video on anti-theft tags that use magnetostriction, we wrote a blog post about a firm that’s using inverse-magnetostriction to generate electricity. Strange synchronicity!

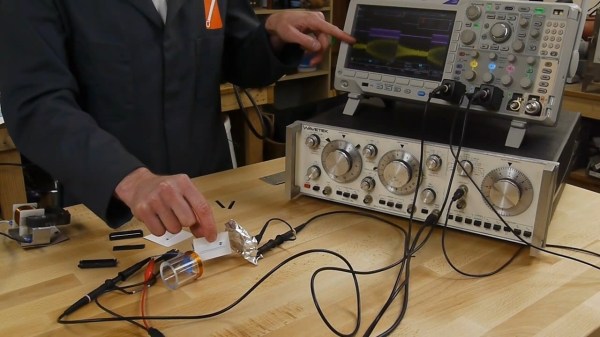
[Ben] takes apart those rectangular plastic security tags that end up embarrassing everyone when the sales people forget to demagnetize them before you leave the store. Inside are two metal strips. One strip gets magnetized and demagnetized, and the other is magnetostrictive — meaning it changes length ever so slightly in the presence of a magnetic field.

A sender coil hits the magnetostrictive strip with a pulsed signal at the strip’s resonant frequency, around 58kHz. The strip expands and contracts along with the sender’s magnetic field. When the sender’s pulse stops, the strip keeps vibrating for a tiny bit of time, emitting an AC magnetic field that’s picked up by the detector. You’re busted.

The final wrinkle is the magnetizable metal strip inside the tag. When it’s not magnetized at all, or magnetized too strongly, the magnetostrictive strip doesn’t respond as much to the sender’s field. When the bias magnet is magnetized just right, the other strip rings like it’s supposed to. Which is why they “demagnetize” the strips at checkout.

We haven’t even spoiled [Ben]’s explanation. He does an amazing job of investigating all of this. He even measures these small strips changing their length by ten parts per million. It’s a great bit of low-tech measurement that ends up being right on the money and deserves the top spot in your “to watch” list.

And now that magenetostriction is in our collective unconscious, what’s the next place we’ll see it pop up?

Continue reading “How Store Anti-Theft Alarms Work: Magnetostriction”

The LED Roundsystem

Gavin Morris has been working on his awesome sound responsive LED sculptures for a while. Technically the sculpture is an interesting application of WS2812 RGB LEDs, Raspberry Pis and a load of styrofoam cups and flower pots. However the artistic development, and inspiration for this project is equally interesting. Gavin shares his thoughts and a brief technical description of the project below.

Continue reading “The LED Roundsystem”

Listening To The Sounds Of The Earth

A geophone is a specially built microphone for listening to the Earth. [JTAdams] found them at a reasonable price so bought some to play with. A geophone is used to detect vibrations from earthquakes, explosions, rumbling trucks, and vibroseis vehicles. To be useful it needs an amplifier and a recording device to capture the signals.

24

[JTAdams] used a standard amplifier design for an LT1677 op-amp, fed the signal to an MCP3008 A/D converter, and read the output using a Raspberry Pi. A Python script records the data to a CSV file for processing. The Pi worked well because the entire setup needs to be portable to take into the field. Another Python script plots the data which is made available from a web page. A neat simple way of presenting the raw data. [JTAdams] promises more information in the future on post-processing the data. You don’t need a geophone to detect seismic waves if you build your own, but a real ‘phone will be more rugged.

Oh, what’s a vibroseis? It’s a truck with a big flat plate underneath it. The plate is hydraulically lowered to the ground until the weight of the truck is on it. The truck then causes the plate to vibrate, usually sweeping from around 10 hz to 100 hz. This infrasound pass through the ground until it is reflected back by underlying rock layers. A long string of geophones, think 1,000s of feet, detects the waves, which are recorded. In practice, many trucks are used to generate a synchronized signal of sufficient strength. Or, you can set off an explosion which is the technique used in water. Typically the information is used for oil and gas exploration.  A video of one of the trucks in action after the break.

Continue reading “Listening To The Sounds Of The Earth”

Conjuring Capacitive Touch Sensors From Paper And Aluminum Foil

Stumbling around YouTube, we found what has to be the lowest-tech method of producing a touchpad to make a capacitive touch keyboard, and we just had to share it with you. If you’re afraid of spoilers, skip down to the video below the break now.

[James Eckert] got his hands on a Freescale MPR121 capacitive touch sensor. The chip in question speaks I2C and senses up to twelve simultaneous capacitive sense electrodes; break-out boards are available in all of the usual places. It’s a sweet little part.

So [James] had to make a twelve-key capacitive keyboard on the quick. He printed out a key template on paper — something that he does often in his woodwork — and spray-glued aluminum foil on the back side. The video doesn’t say how many hours he spent with the razor blade tracing it all out, but the result is a paper, foil, and packing tape keyboard that seems to work just fine.

A pin-header was affixed to the foil with conductive paint and more tape. If you’ve ever tried soldering directly to aluminum foil, you’d know why. (And if you’ve got any other good tips for connecting electrically to aluminum foil, we’d love to hear them.)

Continue reading “Conjuring Capacitive Touch Sensors From Paper And Aluminum Foil”

Building Custom Integrated Circuits

The first integrated circuits weren’t tiny flecks of silicon mounted to metal carriers and embedded in epoxy or ceramic. The first integrated circuits, albeit a looser definition of such, were just a few transistors, resistors, and diodes mashed together in the same package. With this in mind, [Rupert] created his own custom IC. It’s an IR receiver transmitter constructed out of a transistor, resistor, and an LED.

The attentive reader should be asking, “wait, can’t you just buy an IR receiver transmitter?” Yes, yes you can. But that’s not a hack™, and would otherwise be very uninteresting.

[Rupert]’s IC is just three parts, a 2n2222 transistor, a 220Ω resistor and an IR LED. With a good bit of deadbug soldering, these three parts were melded into something that resembled, and had the same pinout of, a Vishay TSOP4838 IR receiver. The epoxy used to encapsulate this integrated circuit is a standard 2-part epoxy and laser printer toner. Once everything is mixed up into a gooey slurry, it’s dripped over the IC producing a blob of an integrated circuit. It’s functionally identical to the standard commercial version, and looks good enough for a really cool project [Rupert]’s been working on.

Thanks [foehammer] for the tip.

An Introduction To Casting With Nuka Cola

There’s less than a month until the next Star Wars is released, and consequently a few weeks until amateur propmakers and cosplayers go insane fabricating their own lightsabers with lightsaber cross guards and rolling robots. Until then, Fallout is pretty cool and [Bill] is here to give us an introduction to prop making with one of the defining objects of this post-apocalyptic universe. He created a real life copy of a Nuka Cola bottle and created a great introduction to resin casting in the process.

As with all proper part making endeavours, this project began with getting reasonably accurate models of the object to be copied. In Fallout, we’re lucky enough to have a way to look at a specific object while zooming and spinning around it, giving [Bill] the basic shape. The size was rather easy as well: all bottlecaps are the same size, so [Bill] just scaled the model to that.

With the model created and the part printed out, assembled, and finished, it was time to create the mold. [Bill] used a two-part silicone mold for the basic shape. The actual casting was done by rolling around a little resin on the inside of the mold. There’s no need for a solid, bottle-shaped block of resin; bottles are hollow anyway.

There are a few neat tricks [Bill] has up his sleeve, including coating the inside of the mold with aluminum powder and using a vinyl cutter to get the labels and logos exactly right. The finished product turns out great, perfect for leaving in the Wasteland for 200 years until the Sole Survivor stumbles upon it.

Video below.

Continue reading “An Introduction To Casting With Nuka Cola”

Basic Toolkit For The Basement Biohacker

Laying hands on the supplies for most hacks we cover is getting easier by the day. A few pecks at the keyboard and half a dozen boards or chips are on an ePacket from China to your doorstep for next to nothing. But if hacking life is what you’re into, you’ll spend a lot of time and money gathering the necessary instrumentation. Unless you roll your own mini genetic engineering lab from scratch, that is.

arduino-based-biolab-data-logger-thumbTaking the form of an Arduino mega-shield that supports a pH meter, a spectrophotometer, and a PID-controlled hot plate, [M. Bindhammer]’s design has a nice cross-section of the instruments needed to start biohacking in your basement. Since the shield piggybacks on an Arduino, all the data can be logged, and decisions can be made based on the data as it is collected. One example is changing the temperature of the hot plate when a certain pH is reached. Not having to babysit your experiments could be a huge boon to the basement biohacker.

Biohacking is poised to be the next big thing in the hacking movement, and [M. Bindhammer]’s design is far from the only player in the space. From incubators to peristaltic pumps to complete labs in a box, the tools to tweak life are starting to reach critical mass. We can’t wait to see where these tools lead.