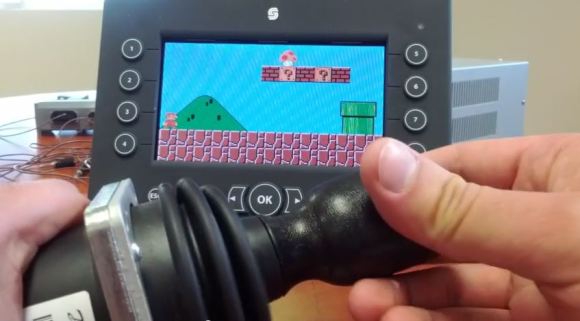
LavaAMP Spectrum Analzyer

lavaamp

Is your dusty Lava Lamp just not cool enough anymore? What if you could make it bubble to the music? [Christian] and [Eric] managed to do just that.

No, they aren’t regular Lava Lamps. In fact, they look like oversize jam jars, but the video of them in action is pretty cool! They designed and built this system for the UIST 2013 Student Innovation Contest, and while there isn’t too much information on the actual build, the contest required everyone to use the exact same kit. The kit consists of 8 aquarium pumps, a PumpSpark controller board, assorted tubing and fittings and an optically-isolated serial interface for use with an Arduino or another kind of microcontroller. From there, it’s pretty easy to guess the rest — analyzing the audio, and timing the pumps according to the various levels.

Other competition entries of note include an awesome game of WaterPong, a Water Bottle Bagpipe, and even an Xbox H2O!

Stick around after the break to see the LavaAMP bubble to the bass.

Continue reading “LavaAMP Spectrum Analzyer”

Easy Capacitive Touch Sensors In Eagle

board

Capacitive sensing libraries for the Arduino and just about every other microcontroller platform have been around for ages now, but if you’d like to put a slightly complex cap sense pad in a PCB without a lot of work, you’re kind of out of luck. Not only do you need a proper education in how capacitors work, but a custom cap sense pad also requires some advanced knowledge of your preferred PCB layout program.

The folks over at PatternAgents have just the solution for this problem. They created an Eagle library of touch widgets that includes everything from buttons, linear and radial sliders, touchpads, and a whole lot more.

The simplest cap sense pad is just a filled polygon on the top layer of a board, but this simple setup isn’t ideal if you want to use Eagle’s autorouter. By playing with the restrict layers in Eagle, PatternAgents were able to create easy cap sense buttons that will work perfectly, without the problems of the autorouter placing traces willy-nilly.

There are more than enough parts to replicate a whole lot of touch interfaces – buttons can easily be made into a smallish keyboard, and the radial touch sensor will emulate the ‘wheel’ interface on an iPod. Very cool stuff, and we can’t wait to see these in a few more boards.

An Engineer’s Emergency Business Card

breakout_3

We’ve seen lots of circuit board business cards before, but none quite like this. [Saar] calls it the Engineer’s Emergency Business Card.

Since he actually makes a living from making circuit boards, it made sense for him to make a truly functional card. But unlike some of the fancier cards we’ve seen, you can’t plug it into your computer, or even open a beer with it! In fact, all it does is light up when a voltage is applied across the main pins.

But wait — why are all the components in through holes? Well, according to [Saar], that’s because it’s designed to be the electrical engineers emergency kit!

When all hope is lost, the MacGuyver engineer could snap out one of the components and save the day. Recall the countless times you desperately needed a 1 KOhm resistor to fix an amplifier at a party, only to see the girl you were trying to impress slip away with an OCaml programmer? Never again with this little kit. You even have 2 cm of solder in there to make sure the connection’s electrically solid!

We love it. Whether or not anyone will ever successfully use it in an emergency situation such as [Saar’s] hypothetical one is another question altogether. But we do have to give him creativity points for it, the artistic traces look awesome!

Levitating Wireless LED Ring

magnetic levitation

Here’s an impressive example of a completely home built magnetic levitation setup… with wireless power transmission to boot!

[Samer] built this from scratch and it features two main sub-systems, a electromagnet with feedback electronics and a wireless power transfer setup.

The ring of LEDs has a stack of neodymium magnets which are levitated in place by a varying magnetic field. This levitation is achieved by using a Hall effect sensor and a PID controller using a KA7500 SMPS controller.

The wireless power transmission uses a Class E DC/AC inverter that operates at 800KHz. Two coils of wire pass the current between the stand and the LEDs.

It’s very similar to a build we featured last year, but it’s a great hack, so we had to share it! Check out the video after the break.

Continue reading “Levitating Wireless LED Ring”

Quadcopters Go Inverted By Reversing Their Motors

Inverted Quadcopter? That generally means a crash is soon to follow. Not so for a new crop of quadcopter fliers. These new quadcopters are capable of sustained inverted flight. We’ve seen inverted quadcopters before here on hackaday. However, previous inverted quadcopters always used collective pitch to control the thrust produced by the blades. Collective pitch on a quadcopter is much simpler than it is on the main rotor of a traditional helicopter. R/C and full-scale helicopters mix collective and cyclic pitch to articulate the main rotor blades. A quadcopter only needs the collective portion, which is similar to a traditional helicopters tail rotor mechanism, or a variable pitch prop on an airplane.

These new quadcopters are using a much simpler method of flying inverted: Spin the motors backwards. Quadcopters control their flight by quickly varying the speed of rotation of each motor. Why not completely reverse the motor then? Today’s brushless outrunner motors have more than enough power to quickly reverse direction. The problem becomes one of propellers. Standard propellers are designed to create thrust in one direction only. Every quadcopter uses two clockwise rotation and two counterclockwise rotation propellers. Propellers will generate reverse thrust if they are spun backwards, however they will not be as efficient as they would when spinning the direction they were designed for. The quad fliers have found a partial solution to this problem: Remove the curve from the blade. R/C propeller blades are sold by diameter and blade pitch. The pitch is a measure of the angle of attack of the blades. R/C blades also have an airfoil style curve molded into them. Removing this curve (but not changing the pitch) has helped the problem.

This final problem is control systems. Since quadcopters already are relying on computer control for basic flight, it’s simply a matter of loading custom firmware onto your flight board to support motor rotation reversal. Speed controls also have to be capable of reverse rotation, which means new firmware as well. We’re curious to see how the quadcopter community settles on the control systems for inverted flight. The R/C helicopter community went through several iterations of control systems over the years. At one point they were using “Invert switches” which reversed controls as well as handled the collective pitch changes. As time went on, these switches fell out of favor and are now known as “Crash switches” due to the result of accidentally hitting one while flying, or before engine start.

Continue reading “Quadcopters Go Inverted By Reversing Their Motors”

Mini Supergun PCB

A few decades ago, Japanese manufacturers of arcade games realized they should make a connector for all their boards that provides the power, controller, video, and audio I/O. This became the JAMMA standard and it make arcade owner’s lives awesome. Because you can buy arcade boards off the Internet, arcade enthusiasts figured out they could build their own console with an ATX power supply, AV connectors, and a few controllers. These ‘superguns’ as they’re called are big devices with wires all over the place. [Charlie] wanted to condense the size of his supergun and ended up creating a single PCB solution (link dead, try the Internet Archive version).

The JAMMA compatable boards require a few power connections; +5 V, +12 V, and -5 V. Of all the boards [Charlie] has collected so far, he realized only one used the negative supply. This, along with a big 12V laptop power supply, means the only power connection for this mini supergun is a single barrel connector.

For the controls and A/V, DSub and SCART connectors are commonplace. Laying these parts out in Eagle resulted in a single-sided board that is easily fabbed by etching with a toner transfer at home.

There are a few problems with the build, as [Charlie] admits. Some of the pins on the JAMMA connector aren’t on the board. These are only ground pins on the pinout, and so far everything works okay. It’s still a great project, though, that turns old arcade boards into a playable device with a minimal amount of hardware.

Pedaling At 128km/h

[Donhou] had a dream. To create a road bike capable of reaching 100mph (160km/h).

He damn well near did it too. The goal of this project wasn’t to set a land speed record, but more of an experiment in design, and building a really fast bike that still looks like a bicycle. In case you’re wondering though, the land speed record is currently set at 167mph by [Fred Rompelberg] who was drafting behind a dragster on the Salt Flats of Bonneville.

The bike features custom everything; a welded lightweight frame using Columbus Max tubing (to help with speed wobbles), super low handlebars for aerodynamics, and a massive 104 tooth chainring which almost scrapes the ground as you pedal. Even the rims and tires are unique — regular bicycle wheels just aren’t designed to go that fast.

We aren’t even bike nuts, but we thoroughly enjoyed the awesome 9-minute documentary on this project. Check it out after the break.

Continue reading “Pedaling At 128km/h”