Read My Lips, Under This No-Sew Mask

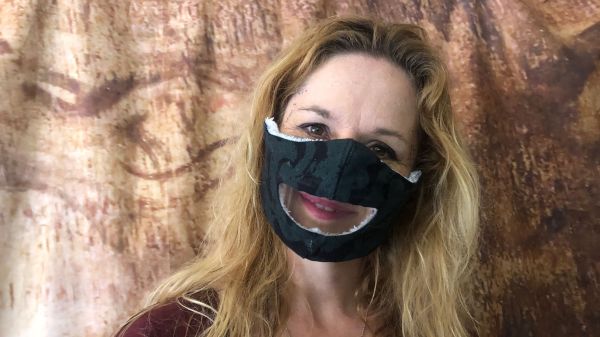
Humans continuously communicate with our bodies, and face masks cover one of the most expressive parts. For some, this is a muffler on strangers, but devastating for people who rely on lip-reading. Several masks exist that have a clear window for precisely this purpose, but they’re specialty and high-demand. [Erin St Blaine] over at Adafruit shows how she makes windowed masks with stuff you may already have in your house. Even if your sewing machine is locked up the local maker-space, you are in luck, because you don’t need a single stitch. For the thread-inclined, it is easy to tweak the recipe.

The part of the mask that touches your face is terry cloth, but any breathable cotton towel should work. There is a PDF in the instructions where you can print templates in four sizes. You will also find a cutout for the plastic window salvaged from your cold soft drink cup. A water bottle should work too. Flexible glue holds the fabric together, but to attach the ear-loops, we fall back on our old friend, the red Swingline. If you don’t have that color and brand, any stapler will do in a pinch. Don’t forget to add some defogger and keep smiling.

Wear your homemade mask proudly and fasten it well, but not too fast.

Continue reading “Read My Lips, Under This No-Sew Mask”

From The MacGyver Files: Using A Stepper Motor As An Encoder

It isn’t hard to imagine a scenario where you are stuck at home all day with nothing to do and certain items are in short supply. Sure, bathroom tissue gets all the press, but try buying some flour or a freezer and see how far you get. Plus online shopping has given up on next day delivery for the duration. Not hard to imagine at all. Now suppose your latest self-quarantine project needs a rotary shaft encoder. Not having one, what do you do? If you are [Tech Build] you go all MacGyver on an old printer and pull out a stepper motor.

How does a stepper motor turn into an encoder? Well, that’s the MacGyver part. We are not big fans of the physical circuit diagrams, but it looks like [Tech Build] borrowed (with credit) from an earlier post and that one has a proper schematic.

Continue reading “From The MacGyver Files: Using A Stepper Motor As An Encoder”

Build A Baby Plasma Cutter–Right Now!

What hacker doesn’t want a plasma cutter? Even if you aren’t MacGyver, you can probably build this one in a few minutes using things you have on hand. The catch? You probably can’t cut anything more than tin foil with it, and it is probably more a carbon-air arc gouger (which uses plasma) than a true plasma cutter. Still, as [Little Shop of Physics] shows on the video, it does a fine job of slicing right through foil.

If you are like us, you are back now after getting four 9V batteries, some tin foil, a pencil lead, and some clip leads and trying it. If you have more self-restraint than we do, you might want to think about what you are going to put the tin foil over. In the video, they used a laundry basket and a rubber band, but anything that keeps the foil suspended would do the trick.

Although it isn’t really a practical plasma cutter, we were thinking about strapping something like this to a 3D printer and cutting foil stencils. The jagged edges on the video are, hopefully, more from being operated by hand and less from the jagged mini-lightning bolt vaporizing the foil.

Continue reading “Build A Baby Plasma Cutter–Right Now!”

Kitchen Timer

A Kitchen Timer Fit For MacGyver

Here’s a project that you don’t want to bring into an airport, ship through the mail, or probably even remove from your home. [ProjectGeek] has built himself a simple kitchen timer masquerading as a bomb. The build is actually pretty simple, but the end result is something that would look at home in a Hollywood action flick.

The timer circuit is built from four simple components. An 8051 microcontroller board is used as the primary controller and timer. The code is available on GitHub. This board is attached to a another board containing four momentary push buttons. These are used to program the timer and to stop the buzzing. Another board containing four 7-segment displays is used to show the remaining time on the timer. A simple piezo buzzer is used to actually alert you when the timer has run out. All of these components are connected with colorful jumper wires.

The physical part of this build is made from easily available components. Old newspapers are rolled up to form the “explosive” sticks. These are then covered in plain brown paper ordinarily used to cover text books. The rolls are bundled together and fixed with electrical tape. The electronics can then be attached to the base with some hot glue or double-sided tape.

An Engineer’s Emergency Business Card

breakout_3

We’ve seen lots of circuit board business cards before, but none quite like this. [Saar] calls it the Engineer’s Emergency Business Card.

Since he actually makes a living from making circuit boards, it made sense for him to make a truly functional card. But unlike some of the fancier cards we’ve seen, you can’t plug it into your computer, or even open a beer with it! In fact, all it does is light up when a voltage is applied across the main pins.

But wait — why are all the components in through holes? Well, according to [Saar], that’s because it’s designed to be the electrical engineers emergency kit!

When all hope is lost, the MacGuyver engineer could snap out one of the components and save the day. Recall the countless times you desperately needed a 1 KOhm resistor to fix an amplifier at a party, only to see the girl you were trying to impress slip away with an OCaml programmer? Never again with this little kit. You even have 2 cm of solder in there to make sure the connection’s electrically solid!

We love it. Whether or not anyone will ever successfully use it in an emergency situation such as [Saar’s] hypothetical one is another question altogether. But we do have to give him creativity points for it, the artistic traces look awesome!

Jump Start Your Car With Sega Parts

sega_jump_start

[Jenn’s] family is a single-car household. Because of this, it’s a little more difficult to get a jump start when the headlights run down the battery. Not wanting to ask the neighbors for help, her husband [Richard] decided to come up with his own solution.

Rummaging through the parts on hand, [Richard] went with his old friend Sonic the Hedgehog. He used two 12-volt, 1 amp Sega Genesis power adapters in parallel hooked up to a 12 volt, 3 amp  power supply. The end result is a 12-volt 5 amp source hooked to the car’s electrical system and used to get their road machine started.

We have enjoyed some of [Richard’s] offerings in the past, such as Super Nintoaster and the Super Genintari but this is a bit less… eloquent. A few questions do come to mind. First of all, is this the best way to use parts of your 20-year-old gaming system?  How many amps does your average car starter pull down?  And finally, what kind of issues are we looking at with the lead acid battery under these conditions?  Weigh in on the conversation in the comments.

Build Your Own Joystick

macgyver_joystick

What can you build with a ballpoint pen and some extra parts? [gzip] found himself with a bonus box of right angle switches and other miscellaneous parts and set out to build a joystick. Simple arcade joysticks use switches that are actuated by the movement of the stick and this design embraces the concept. The four tactile switches are mounted on protoboard facing each other with part of a ballpoint pen in the middle. When the pen is moved it presses against one or more switches to close, completing a circuit. For good measure he even incorporated a fire button into the top of the “stick”. Now we just need someone to make this work with a tiny Ms. Pac-Man emulator.