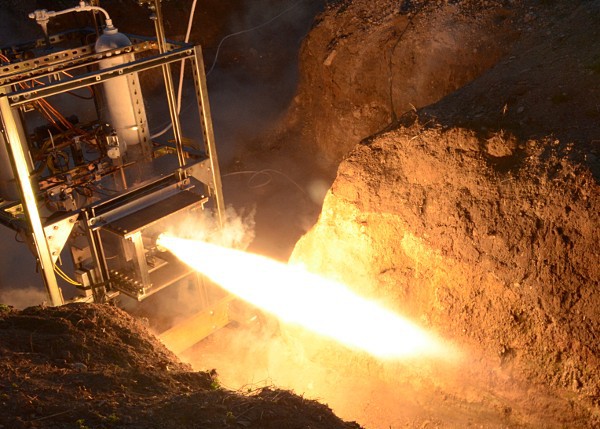
The Tiniest Arcade Cabinets You’ve Ever Seen

After perusing Amazon one day, [Dave] found a very interesting piece of kit: a small, 1.5″ digital picture frame. They’re not very complex, just an LCD, a few buttons to cycle the picture, and a battery to keep everything portable. He decided the best use of this tech would be a tiny arcade cabinet, featuring screen shots of the best games a darkly neon lit arcade of the late 80s had to offer.

After sourcing a few of these digital picture frames on eBay, [Dave] set to work disassembling the frames and designing a custom enclosure. He wanted a few specific features: controls in the right place, replaceable sides, and the glowing red eyes of a coin acceptor slot. [Dave] whipped a model up in OpenSCAD and sent the parts over to his printer.

The controls for the digital picture frame were connected to a quartet of tact switches on the control panel, and a red LED provides the glow from the coin acceptor. With a USB plug and the frame’s memory loaded up with screen shots, [Dave] has a fabulous desk toy.

All the relevant files are up on Thingiverse if you’d like to build your own.

Best Practices To Include In Your Final Projects

electronic-best-practices

Making that final push to button up your projects can be a bit daunting. It’s kind of like the punch list on a construction project — add switch plates, fill nail holes in baseboards, screw in light bulbs, clean windows — that stuff adds up quickly. But having a set of best practices in mind throughout the development phase will cut down on that burden. [Caleb P.] just published a quick guide using a recent project as an example.

First and foremost is the label seen on the project box lid. How many times have you pulled out a circuit board from a year or two earlier and not been able to figure out the pinout? As with ancient televisions and radios, including the service schematic will save you big time! He also mentions that the size and orientation of the components in the case was in the back of his mind the whole time. That paid off because everything fits like a glove. [Caleb] makes sure the battery is easy to get to, and the each component has some type of connector so that it may be removed and serviced/replace without soldering. There’s certainly nothing groundbreaking in this guide. But ask yourself: have I been following all of these guidelines in my own work?

DIP Switch Adjusted Voltage Regulator

dip-settable-variable-supply

It couldn’t be simpler but you have to admit that a small adjustable portable power supply like this one will be really handy.

The main part of the PSU is an LM317 linear voltage regulator which we’re already familiar with. The output voltage is adjustable based on a voltage divider between two of the pins. The set of eight DIP switches allows you to tweak that voltage divider. Switch number one connects the 9-volt battery connector to the regulator, serving as a power switch. Each of the other seven switches adjusts the output voltage by 1.5 volts. The output of the regulator connects to your target device using alligator clips which are not in frame above.

[Jason] says he takes this with him when thrift store hunting for cheap electronics. It can mimic most combinations of Alkaline cells letting you power up electronic toys to ensure they work. But we would find it equally useful for getting that early prototype away from the bench supply for testing before finalizing a dedicated portable supply.

Continue reading “DIP Switch Adjusted Voltage Regulator”

Family Pulls Together To Build Dad’s Casket

build-your-own-casket

In these modern times we don’t often hear about families building their own caskets. But this project log documenting the deceased’s brother and sons fabricating a top of the line casket is really heartwarming. You may be thinking that they wouldn’t be able to include all the features you’d find on a commercially produced model. However, we remember seeing an episode of How It’s Made about caskets and there’s not much more than carpentry and simple upholstery involved.

The build starts with a plywood box lined with thin wooden ribs for added strength. The group then wrapped it with thin strips of dimensional lumber (maybe flooring?) which look great after a coat of stain. We’re not sure where the metal brackets for the two side rails came from. If you recognize them we’d love to hear about it in the comments.

The bottom line here is that for families used to working with their hands this is a great tribute and a way to commune with each other after the recent loss.

[via Reddit]


Signmaking In Glass And Gold

Signmaking today isn’t what it once was. Where today a few vinyl letters stuck to a piece of plate glass is good enough for any storefront, there was a time when the signs in front of businesses were works of art involving many skills and dozens of tradesmen to create. [David Smith] is one of the last remaining old-school signmakers, and his creations are just as beautiful as the finely crafted signs of a century ago.

The techniques [David] uses to create his signs are as varied as the finished products are elegant. He cuts patterned grooves into glass with wheels made of diamond or ceramic and bends shaped glass over forms in a very large kiln.

Aside from cutting, shaping, and grinding glass, [David] also paints his signs – on the back side in reverse, building up his design layer by layer. The very first layer in some of his designs are gold leaf, a difficult material but [David] invented his own leaf applicator that makes the job much easier.

Truly amazing works of art, and certainly much more elegant than whatever plastic nonsense goes as proper signmaking these days.

Continue reading “Signmaking In Glass And Gold”

Wherein Books Are Judged By Their Cover

Yes, Kindles are wonderful, a computer full of PDFs are awesome, and [Tim Berners-Lee] will probably go down in history as more important than [Gutenberg]. That doesn’t mean there’s not something intangible about books that brings out the affections of so many bibliophiles. Even a book filled with blank pages can be a work of art unto itself, and most of the time these volumes are handmade.

 This video of a hardbound volume made by Smith Settle bookbinders covers the entire process from words on a page to a finished book. No, they’re not using movable type; the folios are created using lithography, but sorting, gluing, sewing and binding the folios is done in much the same way as it was done in the middle ages.

Next up is a wonderful film from 1968 by Iowa state university on creating the gold tooling on fine leather-bound volumes. You’ll be hard pressed to find a book with gold tooling nowadays, but it’s still a technique accessible to the industrious amateur bookbinder.

First, gold leaf is applied to the leather spine of a book. Then, custom-made tools are heated to a few hundred degrees  and pressed into the leaf. The heat bonds the gold with the leather, and with custom-designed tools designs are burnt into the leather. After that, the excess leaf is simply wiped off, and a fine tooled leather book is born.

What’s really cool about bookbinding is the fact that just about anyone can do it. Go to a craft store, pick up some hardboard and paper, and bind yourself a book. You could make a blank journal, or for the nerds out there (myself included), make a hard bound volume of the NASA wiring standards.

Continue reading “Wherein Books Are Judged By Their Cover”

[Jimmy The Torch] Making Blown Glass

Skip to about 2:30 if you just want to see the action.

Blowing glass is always so pretty to watch. The warm glow of the glass mixed with the light playing through the cool parts makes for a stunning visual environment, especially when you stop to think about the fact that this is potentially a very dangerous thing as well.

In this video [Jimmy the torch] starts off very conversational. At about 2:30 things shift a bit. Some music starts up, the camera work gets a little more serious, and the real glass blowing begins.