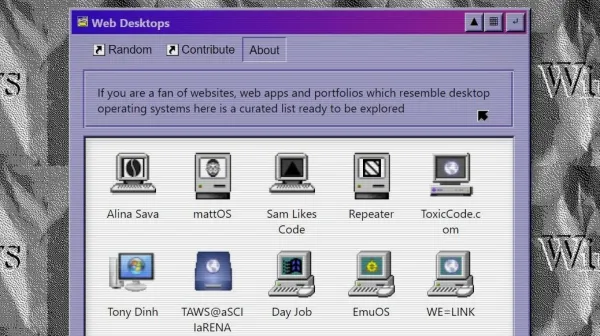
Bluetooth 8-Track Adapters Are A Thing

When it comes to classic cars, the entertainment options can be limited. You’re often stuck with an old cassette deck and AM/FM radio, or you can swap it out for some hideous flashy modern head unit. [Jim] had a working 8-track deck in his Corvette, and didn’t want to swap it out. Thus, he set about building himself a simple Bluetooth to 8-track adapter.

The hack is straightforward, with [Jim] grabbing a Bluetooth-to-cassette adapter off the shelf. These simply take in audio over Bluetooth, and pipe the analog audio out to a magnetic head, which is largely similar to the head that reads the cassette. Pumping the audio to the magnetic coils in the adapter’s head creates a changing magnetic field essentially the same as the audio tape moving past the cassette reader head. It doesn’t really matter whether you’re working with an 8-track player or a regular cassette. Get the magnetic field in the right spot, and it’ll work.

The electronics from the cassette adapter are simply placed inside an old 8-track tape, with holes cut in the chassis for the charge port and on switch. Then, all you need to do is pop the adapter into the 8-track deck, pair with it over Bluetooth, and you can get the tunes pumping.

Others have had success with hilarious Rube Goldberg methods, too. [Techmoan] took a classic cassette-to-8-track adapter, which is actually self-powered by the deck, and simply popped a Bluetooth cassette inside. That worked surprisingly well, and it was interesting to see how it all worked on the inside. We even saw a 3D-printed device on TikTok.

Thus, if you’ve got an old Corvette, particularly of that era with the Doug Nash 4+3 transmission, this might just be the hack for you. Alternatively, you can hack Bluetooth in to just about any classic stereo; we’ve got a guide on how to do just that. Video after the break.

Continue reading “Bluetooth 8-Track Adapters Are A Thing”

Dual Power Supply In A Pinch

Recently I needed a dual voltage power supply to test a newly-arrived PCB, but my usual beast of a lab power supply was temporarily at a client’s site. I had a FNIRSI programmable power supply which would have been perfect, but alas, I had only one. While digging around in my junk box I found several USB-C power-delivery “trigger” boards which I bought for an upcoming project. These seemed almost too small for the task at hand, but after a little research I realized they would work quite well.

The ones I had used the Injoinic IP2721 USB-C power delivery chip, commonly used in many of these boards. Mine had been sold pre-configured for certain output voltages, but they were easy to re-jumper to the voltages I needed, +5 VDC  and +20 VDC. The most challenging aspect was physically using them — they are the size of a fingernail. This version had through-hole output pads on 0.1″ centers, so I decided to solder them to the base of a standard MTA pin header. A few crimps later and I was up and running, along with the requisite pair of USB-C cables and power adapters.

For just a few dollars each, these trigger boards are useful to have in your toolbox, both for individual projects and for use in a pinch. We reviewed these modules a couple of years ago, and check out the far more flexible PD Micro that we covered last year.

This Arduino Pen Plotter Is Built For Speed

We see a lot of simple pen plotter projects around here, and while we appreciate them one and all, most of them are a little on the slow side. That’s OK — a glacial pace is sometimes all that’s needed, as long as it gets the job done. But there’s nothing wrong with putting the pedal to the metal, so to speak. And that’s exactly what this super-fast Arduino-based plotter is all about.

As the story goes, [IV Projects] felt the need for speed after building an earlier pen plotter project that worked, but failed to excite. With the additional goal of keeping the plotter easy to build with cheap parts, the design centers on a “grit roller drive” for the Y-axis — the one that actually moves the paper back and forth. And move it does, using Dremel tool sanding drums on a lightweight shaft to maximize acceleration. In fact, all the moving parts are kept as lightweight as possible, and the results really show — the three steppers really sing when this plotter is in action.

There are some really clever details in [IV Projects]’ design. We particularly like the way the pen lift mechanism works, and the surprise appearance of a clothespin spring as a belt tensioner was a real treat. Judging by the pile of rejected prototype parts, it took quite a bit of work to get this design right. If you’d like to build your own, STLs are available for the printed parts.

If you’re interested in what the other end of the speed scale looks like, check out this bare-minimum pen plotter.

Continue reading “This Arduino Pen Plotter Is Built For Speed”

Laser Brings Autofocus To Tricked-Out Large Format Film Camera

You can’t argue with the results of large-format film cameras — picture the boxy bellows held by a cigar-chomping big-city press photographer of the 1940s — but they don’t really hold a candle to the usability and portability of even the earliest generations of 35mm cameras. And add in the ease-of-use features of later film and digital cameras, and something like a 4×5 Graflex seems like a real dinosaur.

Or maybe not. [Aleksi Koski] has built a large-format camera with autofocus, the “Conflict 45.” The problem with a lot of the large-format film cameras, which tend to be of a non-reflex optical design, is that it’s difficult or even impossible to see what you’re shooting through the lens. This makes focusing a bit of a guessing game, a problem that [Aleksi] addresses with his design. Sadly, the linked Petapixel article is basically devoid of technical details, but from what we can glean from it and the video below, the Conflict 45 is a 4″x5″ sheet-film camera that has a motorized lens board and a laser rangefinder. A short video has a through-viewfinder view showing an LCD overlay, which means there’s some kind of microcontroller on board as well, which is probably used for the calculations needed to compensate for parallax errors during close focusing, as well as other uses.

The camera is built from 3D printed parts; [Aleksi] says that this is just a prototype and that the finished camera will have a carbon-fiber body. We’d love to see more build details, but for now, we just love the idea of an easy-to-use large-format camera. Just maybe not that big.

Continue reading “Laser Brings Autofocus To Tricked-Out Large Format Film Camera”

Pushing The Limits Of A 16×2 LCD With Bad Apple!!

While low-contrast, blue-on-slightly-less-blue 16-character by 2-line LCDs are extremely popular, they really are made specifically for alphanumeric use. They do an admirable job of displaying a few characters, but they don’t exactly spring to mind as a display for non-character purposes. But displaying video on a 16×2 LCD is possible, as long as you’re willing to stretch the definition of “video” a bit and use some imagination while watching.

Normally, a 16×2 display can only display a single character in each spot, chosen from a fixed character set. But [arduinocelantano] was able to leverage the eight custom character slots the display allows to build up images from arbitrary 5×8 pixel bitmaps. After using ffmpeg to scale the original video to a viewport of eight characters, a Python program was used to turn every frame of the scaled video into code to generate the custom bitmaps for each chunk of the viewport. Even with the low refresh rate of the display and the shrunken frame size, the result is a recognizable video, helped no doubt by the choice of the shadow-puppet Bad Apple!! video. Check it out after the break to see how it looks.

We saw a similar rendering of the same video on LCD a while back; that effort was amazing in that it was an EEPROM-only implementation, along with a somewhat bigger LCD with better contrast. That project served as inspiration for [arduinocelantano]’s build here, which in some ways we think looks a bit better — perhaps it’s the inverted pixels. Either way, hats off to both builders for pushing past the normal constraints and teaching us something interesting.

Continue reading “Pushing The Limits Of A 16×2 LCD With Bad Apple!!

Bug Zapper Counts And Serenades Its Victims

Not many creatures are as universally despised as mosquitoes, whether it’s the harmless kind that, at worst, makes you miss winter, or the more serious ones that can be a real threat to your health. A satisfying way to deal with them is to send them off with a bang using one of those racket-shaped high voltage metal mesh bug zappers. [lmu34] saw big potential for some additional gamification here, and decided to equip his zapper with a kill counter and matching sound effects.

The initial thought was that there has to be a way to detect when a mosquito hits the mesh, and use that to trigger further events — in [lmu34]’s case play a sound file and increment a counter. After taking the zapper apart and doing a bit of research, he put theory into practice using a Digispark Pro board containing an ATtiny167, the DFPlayer module for playing a set of WAV files, and an ambitious four digit 7-segment display to keep track of the “score”. A new 3d-printed cover provided enough space to house all the components, including a charging circuit as he swapped the original two AAA batteries with a rechargeable one, which gave a bit more power for the display.

Of course, with these operation voltages, it would be difficult to detect activity on the high voltage side more than once, so [lmu34] went with current sensing instead. He distinguishes between two different levels here and maps them as normal kill and monster kill for the big zaps respectively, playing different sounds for each. Have a look at the video after the break for some quick demonstration.

All in all, this is a delightfully absurd modification that almost screams for an ESP32 to enable multiplayer mode as next iteration. But if chasing mosquitoes with low-tech gadgets isn’t for you, there’s always lasers and good old torture, although those can’t be repurposed to do some hardware fault injections during the winter months then.

Continue reading “Bug Zapper Counts And Serenades Its Victims”

An Interesting Circular Stewart Platform

Stewart platforms are pretty neat, and not seen in the wild all that often, perhaps because there aren’t a vast number of hacker-friendly applications that need quite this many degrees of freedom within such a restricted movement range. Anyway, here’s an interesting implementation from the the curiously named [Circular-Base-Stewart-Platform] YouTube channel (no, we can’t find the designer’s actual name) with a series of videos from a few years ago, showing the construction and operation of such a beast. This is a very neat mechanism comprised of six geared motors on the end of arms, engaging with a large internal gear. The common end of each arm rides on the central shaft, each with its own bearing. With the addition of the usual six linkages, twelve ball joints, and a few brackets, a complete platform is realised.

This circular arrangement is so simple that we can’t believe we haven’t come across it before. One interesting deviation from the usual Stewart platform arrangement is the use of a central slip-ring connector to provide power, allowing the whole assembly to rotate continuously, in addition to the usual six degrees of freedom the mechanism allows. Control is courtesy of an Arduino Pro Mini, which drives the motors using a handful of Pololu TB6612 (PDF) dual H-bridge driver modules. Obviously, the sketch running on the Arduino will give the thing a fixed motion, but add in an additional data link over that central slip-ring setup (or maybe a wireless link), and it will be much more useful.

We recently saw another 6-DOF actuator design, using flexures, yet another ball-balancing hack, but if you want an actually useful Stewart platform application, checkout this pool-playing robot!

Continue reading “An Interesting Circular Stewart Platform”