Real Robot One Is… Real

Most of the robot arms we see are cool but little more than toys. Usually, they use RC servos to do motion and that’s great for making some basic motion, but if you want something more industrial and capable, check out [Pavel’s] RR1 — Real Robot One. The beefy arm has six degrees of freedom powered by stepper motors and custom planetary gearboxes. Each joint has an encoder for precise position feedback. The first prototype is already working, as you can see in the video below. Version two is forthcoming.

When you see the thing in action, you can immediately tell it isn’t a toy. There are four NEMA23 steppers and three smaller NEMA17 motors. While there are 3D printed parts, you can see a lot of metal in the build, also. You can see a video of the arm lifting up a 1 kilogram barbell and picking up a refreshing soft drink.

Continue reading “Real Robot One Is… Real”

KachiChan_Sisyphus_RobotArms-On-A-Platform

Robot Repeatedly Rearranges Remnants In The Round

Sisyphus is an art installation by [Kachi Chan] featuring two scales of robots engaged in endless cyclic interaction. Smaller robots build brick arches while a giant robot pushes them down. As [Kachi Chan] says “this robotic system propels a narrative of construction and deconstruction.” The project was awarded honorary mention at the Ars Electronica’s Prix Ars 2022 in the Digital Communities category. Watch the video after the break to see the final concept.

KachiChan_Sisyphus_RobotArms-On-A-Platform_detail-view

[Kachi Chan] developed the installation in pre-visualizations and through a series of prototypes shown in a moody process film, the second video after the break. While the film is quite short on details, you’ll see iterations of the robot arm and computer vision system. According to this article on the project [Kachi Chan] used Cinema 4D to simulate the motion, ROS for control, PincherX150 robotic arms modified with Dynamixel XM 430 & XL430 servo motors, and custom 3D prints.

We’ve covered another type of Sisyphus project, sand tables like this and the Sisyphish. Continue reading “Robot Repeatedly Rearranges Remnants In The Round”

Hackaday Links Column Banner

Hackaday Links: August 7, 2022

If you ever needed proof that class-action lawsuits are a good deal only for the lawyers, look no further than the news that Tim Hortons will settle a data-tracking suit with a doughnut and a coffee. For those of you who are not in Canada or Canada-adjacent, “Timmy’s” is a chain of restaurants that are kind of the love child of a McDonald’s and a Dunkin Donut shop. An investigation into the chain’s app a couple of years ago revealed that customer location data was being logged silently, even when they were not using the app, and even far, far away from the nearest Tim Hortons. The chain is proposing to settle with class members to the tune of a coupon good for one free hot beverage and one baked good, in total valuing a whopping $8.68. The lawyers, on the other hand, will be pulling in $1.5 million plus taxes. There’s no word if they are taking that in cash or as 172,811 coffees and doughnuts, but we think we can guess.

Continue reading “Hackaday Links: August 7, 2022”

Build A Tablet Out Of Your Framework Motherboard

The Framework laptop project is known for quite a few hacker-friendly aspects. For example, they encourage you to reuse its motherboard as a single-board computer – making it into a viable option for your own x86-powered projects. They have published a set of CAD files for that, and people have been working on their own Framework motherboard-based creations ever since; our hacker, [whatthefilament], has already built a few projects around these motherboards. Today, he’s showing us the high-effort design that is the FrameTablet – a 15″ device packing an i5 processor, all in a fully 3D printed chassis. The cool part is – thanks to his instructions, you can build one yourself!

This tablet sports a FullHD touchscreen IPS display and shows some well-thought-out component mounting, using heat-set inserts and screws, increasing such a build’s mechanical longevity. You lose one of the expansion card slots to the USB-C-connected display, but it’s a worthwhile tradeoff, and the touchscreen functionality works wonders in Windows. [whatthefilament] has also published a desk holder and a wall mount to accompany this design – if it’s a bit too large for you to hold in some situations, you can mount it in a more friendly, hands-free way. This is a solid and surprisingly practical tablet, and unlike the Raspberry Pi tablet builds we’ve seen, its x86 heart packs enough power to let you do things like CAD on the go.

With STLs and STEPs available, his build is a decent option for when you’ll want to replace your Framework’s motherboard with a new, upgraded one. You might’ve already noticed a few high-effort projects with these motherboards on our pages – perhaps, this transparent shell handheld with a mech keyboard and trackball, or this personal terminal with a futuristic-looking round display. This project is part of the “send 100 motherboards to hackers” initiative that Framework organized a few months ago, and we can’t say it hasn’t been working out for them!

Homemade CAT Scan Shouldn’t Scan Cats

[Pyrotechnical] thought about buying a CAT scanner and found out they cost millions of dollars. So he decided to build one for about $200 using a salvage X-ray tube and some other miscellaneous parts. A scintillating detector provides the image for pick up with a camera phone. The control? An Arduino, what else? You can watch the video below, but due to plenty of NSFW language, you might want to put your headphones on if you don’t want to shock anyone.

Of course, you need to be careful when working with energetic X-rays. To keep away from the X-ray source, [Pyrotechnical] used a Roku remote and an IR sensor to control the device from afar. The electronics is pretty easy. You just have to rotate a turntable and trigger the camera while lighting up the X-ray tube.

Continue reading “Homemade CAT Scan Shouldn’t Scan Cats”

CT Scans Help Reverse Engineer Mystery Module

The degree to which computed tomography has been a boon to medical science is hard to overstate. CT scans give doctors a look inside the body that gives far more information about the spatial relationship of structures than a plain X-ray can. And as it turns out, CT scans are pretty handy for reverse engineering mystery electronic modules, too.

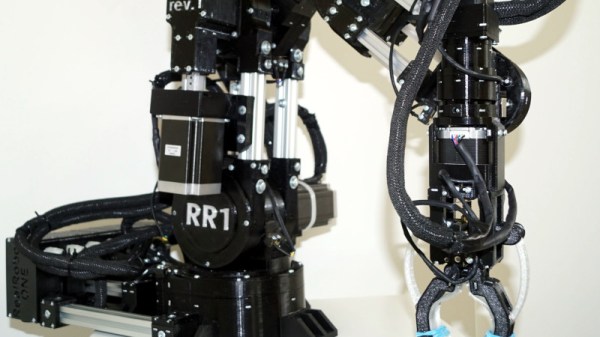
The fact that the mystery module in question is from Apollo-era test hardware leaves little room for surprise that [Ken Shirriff] is the person behind this fascinating little project. You’ll recall that [Ken] recently radiographically reverse engineered a pluggable module of unknown nature, using plain X-ray images taken at different angles to determine that the undocumented Motorola module was stuffed full of discrete components that formed part of a square wave to sine wave converter.

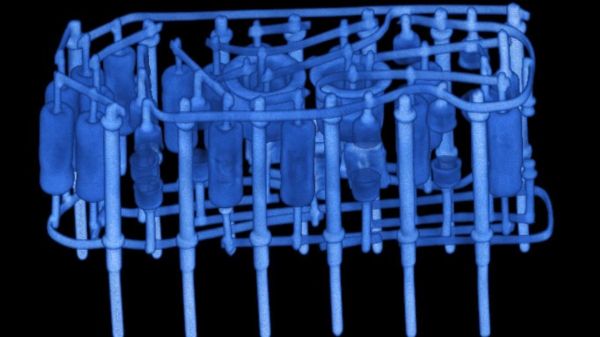
The module for this project, a flip-flop from Motorola and in the same form factor, went into an industrial CT scanner from an outfit called Lumafield, where X-rays were taken from multiple angles. The images were reassembled into a three-dimensional view by the scanner’s software, which gave a stunningly clear view of the components embedded within the module’s epoxy body. The cordwood construction method is obvious, and it’s pretty easy to tell what each component is. The transistors are obvious, as are the capacitors and diodes. The resistors were a little more subtle, though — careful examination revealed that some are carbon composition, while others are carbon film. It’s even possible to pick out which diodes are Zeners.

The CT scan data, along with some more traditional probing for component values, let [Ken] reverse engineer the whole circuit, which turned out to be a little different than a regular J-K flip-flop. Getting a non-destructive look inside feels a little like sitting alongside the engineers who originally built these things, which is pretty cool.

Want Faster Extrusion But Don’t Have A Volcano? Nuts!

A lot of people want to print faster. Maybe they don’t like to wait, or they need to print a lot of things. Maybe it is just human nature to want to push things to go faster. The problem is, if you move filament too fast it may not have time to melt inside the hot end. To combat that, some people install a “volcano” — a larger heat block that takes a special longer nozzle. The melt zone is longer so there is more time for the filament to liquefy before shooting out of the nozzle. This is also a problem if you are using a very large nozzle size. But what if you don’t have one of these special hot ends? According to [Stefan], you can use a normal hotend with a volcano-style nozzle just by adding some common nuts. You can see the explanation in the video, below.

The idea came from a few commercial offerings that allow converting between different-sized melt zones. Some of these use the same idea. But, if you are familiar with [Stefan’s] videos, you know he tested the results thoroughly. The tests reveal that a standard V6-style hotend can handle rates of just over 9.8mm/second. with a 0.4mm nozzle at 210C and is usable beyond that. A true volcano hotend. starts deviating from the ideal at about 15mm/second and, also, is usable at even higher rates. But what about just using a long nozzle in a regular block with or without the nuts?

Continue reading “Want Faster Extrusion But Don’t Have A Volcano? Nuts!”