We’re introducing a new series on CAN and automotive hacking. First, we’ll introduce CAN and discuss how in-vehicle networks work.
In 1986, Bosch introduced the Controller Area Network protocol. It was designed specifically for in-vehicle networks between automotive controllers. CAN became a popular option for networking controllers in automotive, industrial, and robotics applications. Starting in 2008, all vehicles sold in the US must use CAN.
Modern vehicles are distributed control systems, with controllers designed to handle specific tasks. For example, a door control module would take care of locks and windows. CAN allows these controllers to communicate. It also allows for external systems to perform diagnostic tasks by connecting to the in-vehicle network.
Some examples of CAN communication in a vehicle include:
- The engine control module sending the current engine speed to the instrument cluster, where it is displayed on a tachometer.
- The driver’s door controller sending a message to another door controller to actuate the window.
- A firmware upgrade for a controller, sent from a diagnostics tool.
CAN is usually used with little or no security, except for the obscurity of the communications. We can use CAN to USB interfaces to listen to the traffic, and then decode it. We can also use these tools to send forged messages, or to perform diagnostic actions. Unfortunately, most of the tools for dealing with CAN are proprietary, and very expensive. The diagnostics protocols are standards, but not open ones. They must be purchased from the International Organization for Standardization.
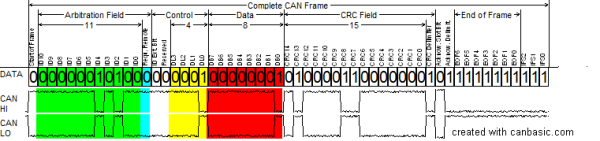
Next time, we’ll get into the structure of CAN frames, and how traffic is encoded on the bus.
[Image via Wikipedia]