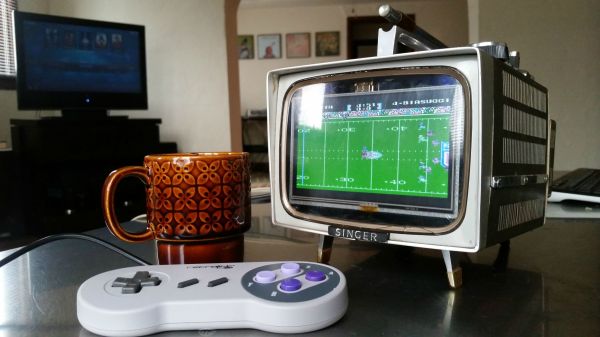
See Who’s Calling With Caller Pi-D

One of the hardest things in life is watching your parents grow old. As their senses fail, the simplest things become difficult or even impossible for them to do.

[kjepper]’s mom is slowly losing her sight. As a result, it’s hard for her to see things like the readout on the caller ID. Sure, there are plenty of units and phones she could get that have text-to-speech capabilities, but the audio on those things is usually pretty garbled. And yes, a smartphone can natively display a picture of the person calling, but [kjepper]’s mom isn’t technologically savvy and doesn’t need everything else that comes with a smartphone. What she needs is a really simple interface which makes it clear who’s calling.

Initially, [kjepper] tried to capture the caller ID data using only a USB modem. But for whatever reason, it didn’t work until he added an FSKDTMF converter between the modem and the Pi. He wrote some Node.js in order to communicate with the Pi and send the information to the screen, which can display up to four calls at once.  To make a mom-friendly interface, he stripped an old optical mouse down to the scroll wheel and encased it in wood. Mom can spin the wheel to wake the system up from standby, and click it to mark the calls as read. Now whenever Aunt Judy calls the landline, it’s immediately obvious that it’s her and not some telemarketer.

[via r/DIY]

Open Source FPGA Pi Hat

Over on Hackaday.io, [Dave Vandenbout] has posted the CAT board, a Raspberry Pi daughterboard hat that features a Lattice FPGA, 32 MB of RAM, EEPROM, and a few Grove and PMOD connectors. The CAT takes advantage of the open source tool chain available for Lattice including the Python-based MyHDL (although, you could just use Verilog directly, if you prefer) and Icestorm. One interesting point: you can run the tool chain on the Raspberry Pi, resulting in a self-contained and largely portable FPGA development environment.

Continue reading “Open Source FPGA Pi Hat”

Latest Raspberry Pi Images Have Improved Scratch

Not everyone likes Scratch — the block-oriented programming language that MIT developed to help kids program. While dyed-in-the-wool programmers probably find it limiting, it can be an effective way to teach basic programming to newcomers and there are some people who enjoy the graphical style of programming.

The latest Raspbian release (the operating system image for Raspberry Pi) has a new and improved version of Scratch for those who want to use it on the Pi. According to the Raspberry Pi blog, the new version is up to ten times faster than previous versions and also includes an improved method for Scratch programs to access the board’s general purpose I/O and other I/O devices.

Continue reading “Latest Raspberry Pi Images Have Improved Scratch”

Take Your Robots Tubing

When you think of a robot, you might think of one with wheels, tracks, or even legs. But today’s robots are as likely to have wings, props, or even some way to propel it through the water. If you are bored with quadcopters and want to build a water-going robot, you should check out Jalcboat, an open source robot/boat. Although the project is under development, the videos (see below) show that they’ve made a good bit of progress.

As you might expect, 3D printing is a key ingredient and the files are available on Thingiverse linked above. In addition, the robotic boat has a Raspberry Pi onboard to control brushless motors. The main web site is more of a discussion forum and some of it is in Spanish, so you might want to keep Google translate handy.

Continue reading “Take Your Robots Tubing”

Music RFID Bot

RFID Enabled Robot Plays Music For 3 Year Old

[Ronald] has a three year old daughter who loves music, but hasn’t quite gotten the hang of complex MP3 players or the radio yet — what gives, three is pretty old?! Inspired by an RFID enabled cassette player he saw, [Ronald] decided to make her something that was cute — and easy to use.

He started with the adorable KNG Andrew Home Invader speaker, and proceeded to jam a Raspberry Pi inside. What he wanted to do was be able to put RFID tags on certain objects that his daughter could associate with her favorite music — only problem, he didn’t know how to use RFID tags! Luckily he found another article which explained how to write a script in Python in order to easily use an RFID system.

Continue reading “RFID Enabled Robot Plays Music For 3 Year Old”

Raspberry Pi Sentry Turret Is The Enemy Of All Mankind

War, huh, what is it good for? Absolutely nothing, except as an excuse to build a Raspberry Pi powered sentry turret that will track and fire upon your enemies. That’s what [Matt Desmaris] decided to do, and he has released the full details of his build.

It lacks the polished elegance of most military hardware, but what do you expect of a quick and dirty hack? It’s not shiny or ominous, but it has that killer motion-tracking feature. [Matt] is using OpenCV to detect movement from a USB webcam, two servos to pan and tilt the camera and gun and a small relay to pull the trigger. Manual control over the Interwebs is also available.

We’ve seen lots of similar builds using weaponry such as rubber bands and Nerf guns, but this one is a great start if you are interested in seeing how you can tie together tools like OpenCV and servos to create a camera that actively tracks movement.

Raspberry Pi 2 Game Boy Brings Sexy Back From 1989

When the ever-versatile Raspberry Pi was released, the potential for cheap video game emulation was immediately obvious. Some of the very first Raspi projects to hit the internet were arcade cabinets, and it wasn’t long until people were making them portable. A purpose-build Linux distort called RetroPie has become very popular specifically because of the Raspi’s game-emulation potential. However, the actual hardware for these emulation systems isn’t always the most aesthetically (or ergonomically) pleasing. That’s where reddit user [Cristov9000] has managed to stand out from the crowd.

[Cristov9000] accomplished this by combining high-quality design (and 3D printing) with the careful use of original Nintendo parts. Game Boy and SNES buttons and elastomers were used to achieve the correct button feel. Other original Game Boy parts, like the volume wheel and power switch, ensure that the system feels as much like 1989 OEM hardware as possible.

Also impressive is the internal hardware, including 3 custom PCBs used to tie everything together to work via the Raspberry Pi 2 GPIO pins. The display is a 3.5″ TFT screen, and with the 6000 mAh it can handle gameplay for more than 7 hours. Other details, like the integrated mono speaker and rear shoulder buttons complete the experience. Combined with the RetroPie and an assortment of emulators, this is one of the most impressive portable gaming builds we’ve seen, especially among a crowded list of awesome raspi-based Game Boy builds.