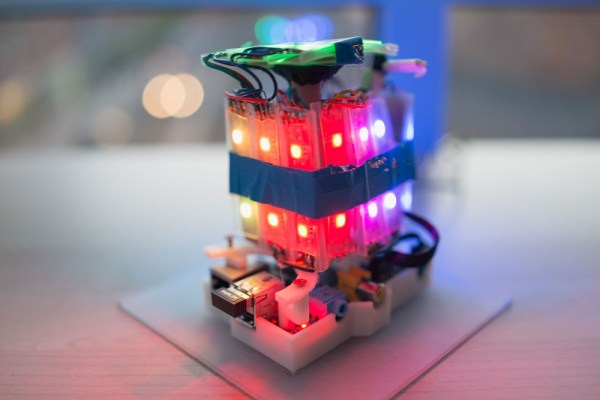
Retro Gaming Console, Now With Internet Radio

RaspPi Retro Gaming Console with Internet Radio

Do you ever miss your gaming system of yesteryear? [yv3] did so he built a retro gaming console. Even though [yv3] likes his old school games, he didn’t want to be stuck listening to old school 8-track tapes while playing those games. The solution for him was to build a retro gaming console with integrated internet radio.

The gaming portion of the build relies on RetroPie. The RetroPie disk image contains all of the software and emulators needed to turn a Raspberry Pi into a dedicated retro gaming system. The RetroPie project supports a lot of gaming systems, [yv3] chose to include Atari, Sega Master System and Genesis, NES, SNES, and Turbografx-16.

Raspberry Pi Internet Radio manages the radio portion of this project and is set up to start playing automatically when the unit is powered on. There are 5 buttons to change the station, volume and settings. The radio stations are managed by a text file residing on the SD card. Audio from the radio can be directed to either the HDMI or the analog out of the RaspPi.

Continue reading “Retro Gaming Console, Now With Internet Radio”

Tetris Duel With The Raspberry Pi

Tetris Duel

Building a multiplayer network game with multiple Raspberry Pis can be very difficult. Doing it in assembly is outright insane! This is exactly what a group of first year students at Imperial College London did; they created a network based multiplayer Tetris game for the Raspberry Pi.

[Han], [Piotr], [Michal], and [Utsav] have created this entire game from bare metal assembly, and it only consists of 4000 lines of code! The code is well documented, so be sure to look through their Github repository. This project is a great reference for those looking to learn bare metal assembly and networking. They even chose to use the old NES controllers, a very nice touch. While we have featured what seems like a million different Tetris games in the past, this is the first multiplayer version. See Tetris Duel in action in the video after the break!

This is a shout-out to all of you students out there. Take the time to create quality documentation for your class project, and upload it to the internet. Not only is it a great resume boost, but it could very well end up on Hackaday!

Continue reading “Tetris Duel With The Raspberry Pi”

Simple Touch Controller Frees Up USB Port

touch screen demonstration using text

[typ.o] was working on a Raspberry Pi project and found himself running short on USB ports. The project required a touch screen interface, which takes up one of the ports. Since he was only using the screen in text mode, he decided to ditch the original USB controller and make his own.

The ever popular Attiny85 is deployed to handle the task, and is interfaced between the resistive touch panel and the Raspberry pi, using only three pins from the GPIO port. The Attiny85 runs off the 3 volt supply from the raspi, so no level shifter is needed, helping to keep his board super simple.

The calibration and calculation of the touched character location is done by a Python script running on the raspi. [typ.o] is a fan of the KISS principle, and it shows. Be sure to check out his site for all source code, schematics and a video demonstrating this simple but effective solution.

Programming Pi Games With Bare Metal Assembly

pifoxWhile the most common use for a Raspberry Pi is probably a media center PC or retro game emulator, the Pi was designed as an educational computer meant to be an easy-to-use system in the hands of millions of students. Team 28 at Imperial College London certainly living up to the Raspberry Pi Foundation’s expectations with their bare metal assembly clone of Star Fox, aptly titled PiFox.

This isn’t the first time a college course has taken up the task of developing software for the Pi without an operating system; a few years ago, Cambridge University started that off with a series of bare metal tutorials for the Pi that included drawing graphics on the screen and playing around with USB keyboards. PiFox greatly expands on what those early tutorials could do, reading an NES joystick from the GPIO pins, sound with DMA, and rendering 3D objects.

If you’d like to build PiFox for yourself, or better yet, expand on the existing build, all the code is up on Github. There’s also a Raspberry Pi emulator for Linux, just in case you have an ARM assembly bug you just can’t scratch with a Raspberry Pi.

Continue reading “Programming Pi Games With Bare Metal Assembly”

Raspberry Pi Bluetooth Receiver For Your Car Stereo

RasPi Car Audio

The ability to play music in your car over a Bluetooth connection is very handy. You can typically just leave your phone’s Bluetooth module turned on and it will automatically pair to your car. Then all you have to do is load up a music player app and press play. You don’t have to worry about physically tethering your phone to the car every time you get in and out of the vehicle. Unfortunately Bluetooth is not a standard option in many cars, and it can be expensive to buy an aftermarket adapter.

[parkerlreed] built his own solution to this problem using a Raspberry Pi. He first installed arch Linux on his Pi. He also had to install pulseaudio and bluez, which is trivial if you use a package manager. He then modified some of the Linux configuration files to automatically bring the Pi’s Bluetooth adapter online once it is initialized by the kernel.

At the end of the boot sequence, the Pi is configured to automatically log in to a virtual console as [parkerlreed’s] user. The user’s bashrc file is then altered to start pulseaudio in daemon mode at the end of the login sequence. This allows the Pi to actually play the audio via the Pi’s sound card. The Pi’s stereo output jack is then plugged into the vehicle’s auxiliary input jack using a standard audio cable.

The Reddit post has all of the configuration details you would need to duplicate this setup. [parkerlreed] also includes some commands you will need to setup the initial pairing of the Raspberry Pi to your smart phone. Be sure to watch the video demonstration below. Continue reading “Raspberry Pi Bluetooth Receiver For Your Car Stereo”

Roll With Dicebot, The Tweeting Dice Roller

dicebot

[David] modernized a 1920’s dice rolling game to bring us DiceBot, a twitter enabled dice rolling robot. DiceBot started with an antique dice tin. The original tin was human controlled. Pushing a button on the side of the tin would spin the bottom, rolling the dice.

It’s a bit hard to push a button from across the world, so [David] added a small motor to spin the tin. He connected the motor to a simple L298 motor driver chip, and wired that up to a Raspberry Pi. The Pi runs a few custom Ruby scripts which get it on the internet and connect to the Twitter API.

Operation is pretty straightforward. A tweet to @IntrideaDiceBot with the hashtag #RollTheDice will cause the Dicebot to spin up the dice. Once things have settled, DiceBot captures an image with its Raspberry Pi camera. The dice values are checked using OpenCV. The results are then tweeted back, and displayed on DiceBot’s results page.

Continue reading “Roll With Dicebot, The Tweeting Dice Roller”

PiGates Validates Your Concert Tickets

gatespi

[Seph] works for a company that handles ticketing for concerts and special events. One of his primary tasks is to check for counterfeit tickets at the gates of an event. Depending on the venue, this can be mag-stripes, bar codes, or one of several breeds of RFID. Until recently, netbooks coupled with USB readers performed the task. The netbooks weren’t a great solution though – they were expensive, relatively fragile, and took up more space than necessary.

[Seph] had a better idea. He created a ticket validation system using a Raspberry Pi. The Pi sits in a translucent case with a PiGlow RGB LED board. A USB reader (in this case a bar code reader) plugs into one of the Pi’s USB ports. These readers can operate in several modes, including keyboard emulation, which [Seph] chose because it wouldn’t require any driver work.

Using PiGates is so simple even a drummer could handle it. Normally the Pi glows blue. When a ticket is scanned, [Seph’s] python script reads the code and verifies it against an online database.If the ticket is valid, the Pi will glow green. A counterfeit ticket is indicated by flashing red LEDs.

Click past the break for more on PiGates.

Continue reading “PiGates Validates Your Concert Tickets”