The Incredible Judges Of The Hackaday Prize

The last challenge of The Hackaday Prize has ended. Over the past few months, we’ve gotten a sneak peek at over a thousand amazing projects, from Open Hardware to Human Computer Interfaces. This is a contest, though, and to decide the winner, we’re tapping some of the greats in the hardware world to judge these astonishing projects.

Below are just a preview of the judges in this year’s Hackaday Prize. In the next few weeks, we’ll be sending the judging sheets out to them, tallying the results, and in just under a month we’ll be announcing the winners of the Hackaday Prize at the Hackaday Superconference in Pasadena. This is not an event to be missed — not only are we going to hear some fantastic technical talks from the hardware greats, but we’re also going to see who will walk away with the Grand Prize of $50,000.


Sherry Huss

Sherry Huss is the former vice president of Maker Media, and oversees the publishing of Make Magazine and Maker Faires across the globe. Sherry is a major advocate of ‘all things maker’ in the global community, and her vision and passion for the maker movement was instrumental in growing the Make: brand within the maker ecosystem. Under her guidance, the largest Maker Faires, the Bay Area and World Maker Faire in New York, have grown from just a few thousand people in 2006 to events with over 200,000 attendees each year. Sherry is a giant in the Maker world, and an unending advocate of maker, DIY, and everyone who makes, whether that’s through wood, code, metal, solder, or fabric.

Anool Mahidharia

Anool is an electrical engineer, and works in Test & Measurement at Lumetronics. He’s part of WyoLum, an international group of hardware nerds who are consistently pumping out projects that push the limits of how blinky, glowey, and interesting a thing can be. They’re behind some projects you may have caught at random hacker meetups, and the creators of an absurd RGB LED cube that’s also a die. Anool is, by every account, an extremely capable hardware engineer, a longtime writer for Hackaday, and is constantly travelling the world presenting the latest developments in electronics to the public.

Danielle Applestone

Before founding Other Machine Co., now Bantam Tools, makers of tiny desktop milling machines that make fantastic circuit boards, Danielle Applestone worked with DARPA to develop high-precision machines that were effectively made out of kitchen cutting boards. HDPE, it turns out, is extraordinarily mechanically stable, cuts and machines easily, and can make very rigid components. Danielle spun this research out into the Othermill, an actual successful hardware startup. Danielle talked about this experience at the Hackaday Superconference, and we’re thrilled to have her on board judging other makers in their efforts to create the next big hardware thing.

Kwabena Agyeman

Kwab is one of the leading experts in computer vision and machine learning applications, and specializes in FPGA and Chip design. His greatest contribution to Open Hardware is the OpenMV, a platform for Computer Vision, ‘at the edge’, or basically a very high performance microcontroller and camera module on a single board, that’s running computer vision algorithms. This project began as a Hackaday Prize project that was then bootstrapped into a successful business. Formerly of Planet Labs where he spent his time pulling off Apollo 13-level hacks on space assets, Kwab is among the most successful designers in the world of Open Hardware.

These are just a few of the amazingly accomplished judges we have lined up to determine the winner of this year’s Hackaday Prize. The winner will be announced on November 3rd at the Hackaday Superconference. There are still tickets available, but if you can’t make it, don’t worry. We’re going to be live streaming everything, including the prize ceremony, where one team will walk away with the grand prize of $50,000. It’s not an event to miss.

Listen To A Song Made From Custom Nintendo LABO Waveform Cards

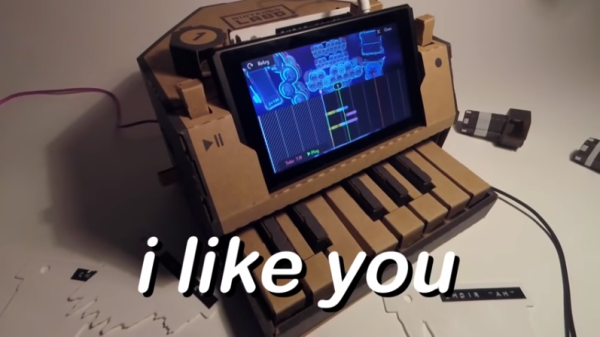
[Hunter Irving] has been busy with the Nintendo LABO’s piano for the Nintendo Switch. In particular he’s been very busy creating his own custom waveform cards, which greatly expands the capabilities of the hackable cardboard contraption. If this sounds familiar, it’s because we covered his original method of creating 3D printed waveform cards that are compatible with the piano, but he’s taken his work further since then. Not only has he created new and more complex cards by sampling instruments from Super Nintendo games, he’s even experimented with cards based on vowel sounds in an effort to see just how far things can go. By layering the right vowel sounds just so, he was able to make the (barely identifiable) phrases I-LIKE-YOU, YOU-LIKE-ME, and LET’S-A-GO.

Those three phrases make up the (vaguely recognizable) lyrics of a song he composed using his custom waveform cards for the Nintendo LABO’s piano, appropriately titled I Like You. The song is at the 6:26 mark in the video embedded below, but the whole video is worth a watch to catch up on [Hunter]’s work. The song is also hosted on soundcloud.

Continue reading “Listen To A Song Made From Custom Nintendo LABO Waveform Cards”

The Solution To DJs Playing Their MacBooks

The greatest invention relating to music in the 20th century was multi-track recording, for which we have Les Paul to thank. The second greatest? Non-linear editing and Pro Tools. For some bizarre reason, we have Ricky Martin to thank for that because Livin’ La Vida Loca was the first #1 single to be recorded and mixed entirely in Pro Tools.

The third greatest invention in recording since Edison is the plugin. If you’ve already got a computer sitting in front of you, you’ve got every instrument ever made. All you need is a plugin. [Jan] was working on his live setup recently, and didn’t want to look like a DJ playing the MacBook. Instead, he built a box that combines those powerful plugins into a single, easy to use box that sits right on top of his keyboard.

Inside this box is a modern Windows machine with a PCI Express audio interface. The display is not a touchscreen, because [Jan] originally thought a touchscreen wouldn’t be good for a live performance. He’s reconsidering that now. Other than that, you’re looking in effect at a microATX motherboard and a 10″ LCD in a box, but that’s where this build gets interesting.

The mechanical design of this build is of paramount importance, so [Jan] is using two mod wheels on the side, a bunch of silicone buttons on the bottom, and a few rotary encoders. These are MIDI controls, able to change whatever variables are available in the custom VSTs. That in itself is a pretty interesting build, with circuit bent MIDI controllers and off-the-shelf buttons.

The completed build attaches right to the Nord Stage master keyboard, and eight VST instrument channels are right at [Jan]’s fingertips. You can check out a video of this build in action below.

Continue reading “The Solution To DJs Playing Their MacBooks”

An Open Source Toy Synth

If you thought the future of electronic musical instruments was massive Emerson-class modular synths, giant MPCs with pads the size of Dance Dance Revolution machines, or hilariously expensive polysynths, you couldn’t be more wrong. The future is, effectively, toys. Those tiny little Korgs you can stuff in your pocket are selling like hot cakes, and Pocket Operators are king of the hill. One of the more interesting musical toys is the Organelle, an aluminum enclosure with maple buttons laid out in a keyboard configuration. It’s a synth, it’s a sound engine, and it does produce some interesting noises. All the software is Open Source, but the hardware isn’t. That leaves it up to someone else to make the hardware for the rest of us. That’s exactly what [mitchell] is doing for his Hackaday Prize entry.

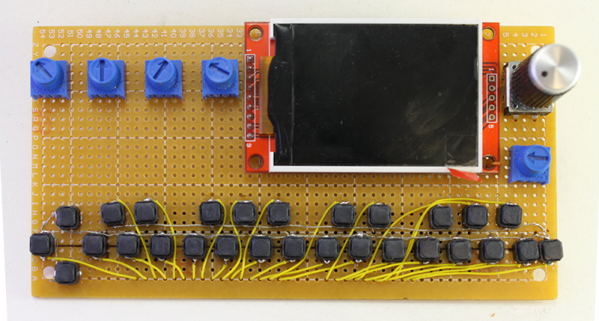
The core of this build is a Nanopi Neo Core, or basically an Allwinner H3 breakout board with 256 MB of RAM running at 1.2 GHz. This runs the basic Organelle scripts, and has all the drivers to become a MIDI device. Added to that, there’s a DAC, a small TFT screen, an STM32F103 for reading the buttons, encoders, and pots, a sound card, a USB hub IC, and a battery torn from a Kindle.

The idea for this project is to have something along the lines of the Teenage Engineering OP-1, another of the very fancy ‘toy’ synths, but also to build something that anyone else can build. [mitchell] is just about there, and the prototype PCB he made actually works. There’s still a lot more work to do, but this is an exceptionally interesting project we can’t wait to see hit prime time.

MIDI Controlled Neon

The people who make neon signs are a vibrant community with glass bending and high voltage electronics. There is a need, though, to sequence these neon signs, and it seems like MIDI is the way to do it. That’s what [david] is doing for his entry to the Hackaday Prize, and the results already look great.

The idea for this project is to transmit MIDI data to a controller that activates neon tubes accordingly. As for why [david] chose MIDI over DMX512 or some other protocol, the object here is to sync with music, and if you already have a drum machine sending MIDI out, you might as well just patch into that.

The build uses an Arduino Leonardo with a MIDI shield produced by Olimex. This shield is connected to a neon power supply that has control circuitry to quickly and easily turn neon signs on and off. The end result is a laptop (with the rest of the DJ software) sending a MIDI clock signal to an Akai drum machine. This drum machine outputs MIDI notes to the shield, which is currently set up to control three neon transformers.

The results look great, with flashing skulls synchronized with bleeps and bloops. This, of course, can be expanded to even more MIDI synced neon signs. You can check out a few videos of the build after the break.

Continue reading “MIDI Controlled Neon”

The 3D Printed Guitar

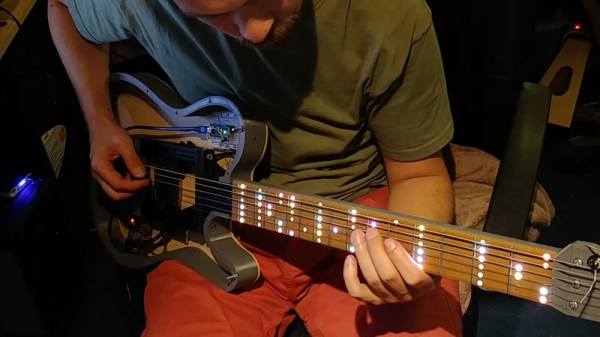
We just wrapped up the Musical Instrument Challenge in the Hackaday Prize, and that means we’re sorting through a ton of inventive electronic musical instruments. For whatever reason we can’t seem to find many non-electronic instruments. Yes, MPCs are cool, but so are strings and vibrating columns of air. That’s what makes this entry special: it’s a 3D printed physical guitar. But it’s also got a hexaphonic pickup, there are lights in the fretboard, and it talks to a computer for PureData processing.

First, the construction of this guitar. It’s mostly 3D printed, with the ‘frame’ of the body made in a Creality 3D printer. It’s a bolt-on neck with a telecaster body, but the core of this guitar — where the pickups and bridge attach — are made out of aluminum extrusion. Another piece of aluminum extrusion runs down the neck, which is clad in a 3D-printed ‘back’ that looks ‘comfortable enough’. The headstock is bolted onto the end of this neck, and it seems reasonably tolerant of having a hundred pounds or so of strings pulling on it. The bridge is also 3D printed, with the saddles integrated into the print. Conventional wisdom says this would sound terrible, but nylon saddles were a thing back in the day, so we’re just going to roll with it.

The electronics are where this project really shines. The pickup is a salvaged Roland GK3 hexaphonic deal, with six outputs for each string. This is sent into a Teensy with an audio path for each individual string. Audio processing happens in the guitar, and latency is under five milliseconds, which is quick enough to not be a terrible distraction.

Except for synths and drum machines and computers, the last fifty or so years of technological progress hasn’t really made it to the world of musical instruments. Guitarists, especially, are technophobes who hate everything invented after 1963. While the neck of [Frank]’s ElektroCaster probably doesn’t feel great, this is a really interesting instrument and a great entry to the Hackaday Prize.

A Better Charger For Your Coin Cell Batteries

Rechargeable coin cell batteries are great for all your small projects. They look exactly like regular coin-cell batteries, but in a shocking turn of events you can recharge these little guys. They can put out a reasonable amount of current, and they’re small. Just what you need for your Arduino smart watch, or whatever else the kids are doing these days.

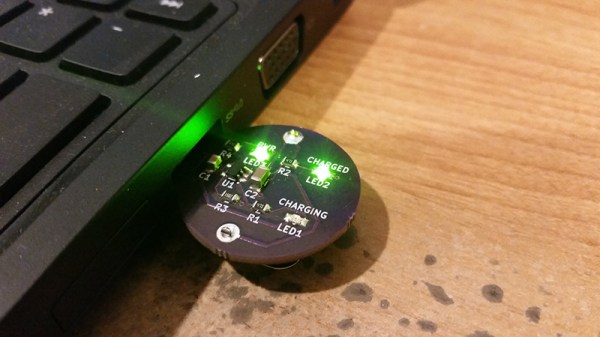
But if these batteries are rechargeable, you need a charger. That’s where [Jon]’s entry for the Hackaday Prize comes in handy. It’s a small, cheap charger for LIR2032 and other rechargeable batteries comes in. It’s barely larger than the battery itself, and it plugs right into a USB port. How this isn’t a product already, we’ll never know.

The circuit on this coin cell charger is built from an MCP73831, a nice single cell, lithium ion and lithium polymer charge management controller. In the standard, ‘I only need to read the first page of the datasheet’ configuration, this chip can put 500 mA into a battery. Standard rechargeable coin cells only have a capacity of 40 mAh, so you’ve got plenty of headroom at 1C.

The total cost for this project was under $8 for three boards, and a BOM cost of $2 for one. That’s fourteen bucks for three of them, if you know how to solder, compared to a standard, off-the-shelf charger for about $20. Building this is cheaper than buying the equivalent product. It’s unbelievable, but true.