Atari Lynx 2600 Console Mod

Atari Lynx Becomes Modern 2600 Console Homage

With its introduction in 1989, the Atari Lynx was the first handheld videogame system to include a color LCD. The gigantic size and equally gigantic price tag did not win-over a massive audience, but that doesn’t mean the Lynx was without its fans. Over the past few months a modder named [Jared] has been toiling away with his project to transform an Atari Lynx into a home console.

Atari Lynx 2600 Console Mod Motherboard

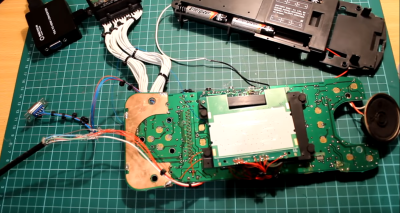
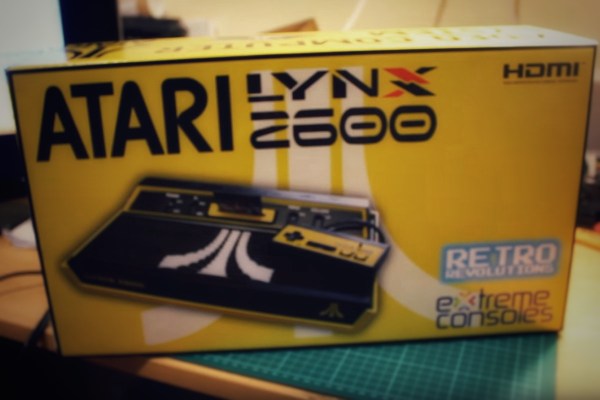
The inspiration behind the mod was the original Atari console, the Atari 2600. [Jared’s] console mod, called the Atari Lynx 2600, utilizes a four-switch 2600 case as an enclosure. However, since the Atari 2600 joystick did not offer enough button real estate an NES controller was used instead. A male-male serial cable serves as the new controller cord, while all the buttons on the face of the Lynx are hardwired to a female DB9 port. As an added touch a custom 3D printed cartridge adapter was incorporated into the original 2600 cartridge slot.

Since the Lynx did not natively support video out, and intermediary device known as the McWill LCD mod kit was used. The McWill LCD mod is typically done in order to modernize the Atari Lynx’s screen with hardware from this decade, but [Jared] used the kit in order to get VGA video output from the Lynx. Not satisfied with just VGA [Jared] also included a VGA to HDMI scaler inside to ensure a wider compatibility with current displays. Fittingly the HDMI port was placed on the back of the 2600 enclosure where the RF video used to come from.

Bonus points should go to [Jared] for going the extra mile and creating a custom console box to accompany the console mod. The entirety of the project was detailed in a three-part video series, but you can watch the console in action in part 2 below:

Continue reading “Atari Lynx Becomes Modern 2600 Console Homage”

The Little Cat That Could

Most humans take a year to learn their first steps, and they are notoriously clumsy. [Hartvik Line] taught a robotic cat to walk [YouTube link] in less time, but this cat had a couple advantages over a pre-toddler. The first advantage was that it had four legs, while the second came from a machine learning technique called genetic algorithms that surpassed human fine-tuning in two hours. That’s a pretty good benchmark.

The robot itself is an impressive piece inspired by robots at EPFL, a research institute in Switzerland. All that Swiss engineering is not easy for one person to program, much less a student, but that is exactly what happened. “Nixie,” as she is called, is a part of a master thesis for [Hartvik] at the University of Stavanger in Norway. Machine learning efficiency outstripped human meddling very quickly, and it can even relearn to walk if the chassis is damaged.

We have been watching genetic algorithm programming for more than half of a decade, and Skynet hasn’t popped forth, however we have a robot kitty taking its first steps.

Continue reading “The Little Cat That Could”

Build Your Own LAN Cable Tester

Sure, you can buy a cable tester, but what fun is that? [Ashish] posted a nice looking cable tester that you can build with or without an onboard Arduino. If you don’t use an Arduino, the project uses a 555 chip to test the eight wires in an Ethernet cable. The readout is simple. When testing a conductor, one of 8 LEDs will light. If one doesn’t light, the cable is open. If more than one light up, there is a short. Mixed up pins will cause the LEDs to light out of sequence. You can see the device in the video below.

The 555 device is fine for the design and we were surprised that the project had provisions for using an Arduino as nothing more than a pulse generator. It could replace most of the circuit which is pretty simple. A decade counter converts the pulses into 8 pulses (a wiring change makes it reset on the 9th count). The rest of the circuit is nothing more than LEDs, resistors, and diodes.

Continue reading “Build Your Own LAN Cable Tester”

Recovering Data From A Vintage MFM Drive

Even if you aren’t a vintage computer aficionado, you’re probably aware that older computer hard drives were massive and didn’t hold much data. Imagine a drive that weighs several pounds, and only holds 1/1000th of what today’s cheapest USB flash drives can. But what you might not realize is that if you go back long enough, the drives didn’t just have lower capacity, they utilized fundamentally different technology and relied on protocols which are today little more than historical footnotes.

A case in point is the circa 1984 Modified Frequency Modulation (MFM) drive which [Michał Słomkowski] was tasked with recovering some files from. You can’t just pop this beast into a USB enclosure; copying files from it required an interesting trip down computing’s memory lane, with a sprinkling of modern techniques that are sure to delight hackers who still like to dip their toes into the MS-DOS waters from time to time.

The drive, a MiniScribe 2012, has its own WD1002A-WX1 8-bit ISA controller card. [Michał] is the kind of guy who just so happens to have an ISA-compatible AT motherboard laying around, but he didn’t have the correct cooler for its Pentium processor. He stuck a random heatsink down onto it with a rubber band and set the clock speed as low as possible, which worked well enough to get him through the copying process.

Not wanting to fiddle with floppies, [Michał] then put together a setup which would let him PXE boot MS-DOS 6.22 under Arch Linux. He used PXELINUX, part of the syslinux package, and created an entry for DOS in the configuration file under the pxelinux.cfg directory. He then installed netboot which combines a DHCP and TFTP server into one simple package, and configured it for the MAC address of the AT machine’s 3com 3C905C-TXM network card.

With the hardware and operating system up and running, it was just a matter of getting the files off of the MFM drive and onto something a bit more contemporary. He tried to copy them to a secondary IDE drive, but it seemed there was some kind of conflict as both drives wouldn’t operate at the same time. So he pulled another solution from his bag of tricks: using a USB mass storage device on MS-DOS. By emulating a SCSI drive, he was able to get a standard flash drive plugged into a PCI USB card working, which ultimately dragged these ~35 year old files kicking and screaming into the 21st century.

We love keeping old hardware alive here at Hackaday, and documented methods to not only PXE boot DOS but use USB storage devices when you get it up and running will hopefully inspire some more hackers to blow the dust off that old 386 in the attic.

The 3D Printed Guitar

We just wrapped up the Musical Instrument Challenge in the Hackaday Prize, and that means we’re sorting through a ton of inventive electronic musical instruments. For whatever reason we can’t seem to find many non-electronic instruments. Yes, MPCs are cool, but so are strings and vibrating columns of air. That’s what makes this entry special: it’s a 3D printed physical guitar. But it’s also got a hexaphonic pickup, there are lights in the fretboard, and it talks to a computer for PureData processing.

First, the construction of this guitar. It’s mostly 3D printed, with the ‘frame’ of the body made in a Creality 3D printer. It’s a bolt-on neck with a telecaster body, but the core of this guitar — where the pickups and bridge attach — are made out of aluminum extrusion. Another piece of aluminum extrusion runs down the neck, which is clad in a 3D-printed ‘back’ that looks ‘comfortable enough’. The headstock is bolted onto the end of this neck, and it seems reasonably tolerant of having a hundred pounds or so of strings pulling on it. The bridge is also 3D printed, with the saddles integrated into the print. Conventional wisdom says this would sound terrible, but nylon saddles were a thing back in the day, so we’re just going to roll with it.

The electronics are where this project really shines. The pickup is a salvaged Roland GK3 hexaphonic deal, with six outputs for each string. This is sent into a Teensy with an audio path for each individual string. Audio processing happens in the guitar, and latency is under five milliseconds, which is quick enough to not be a terrible distraction.

Except for synths and drum machines and computers, the last fifty or so years of technological progress hasn’t really made it to the world of musical instruments. Guitarists, especially, are technophobes who hate everything invented after 1963. While the neck of [Frank]’s ElektroCaster probably doesn’t feel great, this is a really interesting instrument and a great entry to the Hackaday Prize.

The 555 And How It Got That Way

There’s a certain minimum set of stuff the typical Hackaday reader is likely to have within arm’s reach any time he or she is in the shop. Soldering station? Probably. Oscilloscope? Maybe. Multimeter? Quite likely. But there’s one thing so basic, something without which countless numbers of projects would be much more difficult to complete, that a shop without one or a dozen copies is almost unthinkable. It’s the humble 555 timer chip, a tiny chunk of black plastic with eight leads that in concert with just a few extra components can do everything from flashing an LED a couple of times a second to creating music and sound effects.

We’ve taken a look under the hood of the 555 before and featured many, many projects that show off the venerable chip’s multiple personalities quite well. But we haven’t looked at how Everyone’s First Chip came into being, and what inspired its design. Here’s the story of the 555 and how it got that way.

Continue reading “The 555 And How It Got That Way”

Friday Hack Chat: FPGA Bootcamp

For this week’s Hack Chat, we’re going to be talking all about FPGAs, with our own resident FPGA expert.

This summer, Hackaday.io launched FPGA bootcamps, simple, easy-to-follow tutorials that will get you up and running with Verilog. These were all done by Al Williams, Hackaday’s resident FPGA hacker. Al’s an electrical engineer, author of over thirty books, countless magazine articles, and thousands of blog posts. He’s been an amateur radio operator for 41 years, and his first computer used an 1802 chip.

Now Al is putting a little bit of his wisdom over on Hackaday.io. He’s written up a bunch of tutorials that will get you started in programmable digital logic. Everything from a refresher on the ins and outs of nands and nors. a short introduction to Verilog, moving into sequential logic, to putting that code on real FPGA hardware is already up, and this bootcamp isn’t done yet.

If you want to get started in FPGA design, Al’s the guy you want to talk to. During this Hack chat, you’ll be able to ask questions about FPGAs, and about what’s coming up in future bootcamps. We’ll also be talking about Al’s other projects that you might see on Hackaday in the future, like the embedded logic analyzer, his IceStorm workflow, and much more.

During this Hack Chat, we’re going to be talking about:

  • How to use the FPGA tutorials
  • What other FPGAs you can use the tutorials for and how
  • Other Hackaday Bootcamp topics — FPGA or otherwise — that you’d like to see.

You are, of course, encouraged to add your own questions to the discussion. You can do that by leaving a comment on the FPGA Bootcamp Hack Chat and we’ll put that in the queue for the Hack Chat discussion.

join-hack-chat

Our Hack Chats are live community events on the Hackaday.io Hack Chat group messaging. This week we’ll be sitting down on Friday, October 12th, at noon, Pacific time. If time zones got you down, we have a handy time zone converter.

Click that speech bubble to the right, and you’ll be taken directly to the Hack Chat group on Hackaday.io.

You don’t have to wait until Friday; join whenever you want and you can see what the community is talking about.