Video Shows Power Isn’t Everything In Laser Engraving

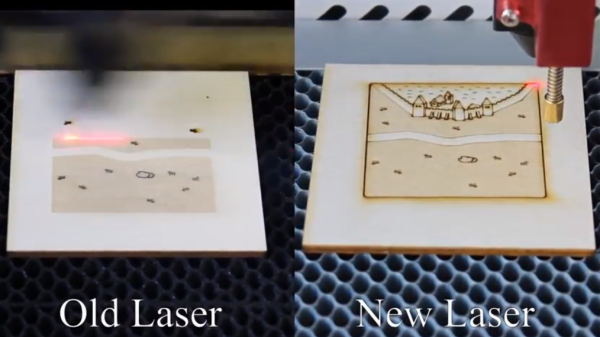
When it comes to power tools, generally speaking more watts is better. But as laser maestro [Martin Raynsford] shows, watts aren’t everything. He shares a brief video showing his older 100 W laser being handily outperformed by a newer 30 W machine. Shouldn’t the higher power laser be able to do the same job in less time? One might think so, but wattage isn’t everything. The 30 W laser engraves and cuts a wooden tile in just under half the time it takes the 100 W machine to do the same job, and with a nicer end result, to boot.

Why such a difference? Part of the answer to that question lies in that the newer machine has better motion control and can handle higher speeds, but the rest is due to the tubes themselves. The older 100 W machine uses a DC-excited (big glass water-cooled tube) CO2 laser, and the newer 30 W machine uses an RF-excited laser that looks a bit like a big metal heat sink instead of oversized lab glassware. Both tubes output what is essentially the same beam, but the RF tube is overall capable of a more refined, more stable, and more finely focused point than that of the glass tube. Since engraving uses only a small fraction of even the 30 W laser’s power, the finer control that the RF laser has over the low end of the power scale results in a much higher quality engraving.

Embedded below is a short video showing both machines engraving and cutting the same tile, side by side. You may wish to consider watching this one full screen, to better see the fine details.

Continue reading “Video Shows Power Isn’t Everything In Laser Engraving”

Bird Beats Cancer With The Help Of A 3D-Printed Prosthetic

It’s a reasonable certainty that 3D-printing is one day going to be a huge part of medicine. From hip implants to stents that prop open blood vessels to whole organs laid down layer by layer, humans will probably benefit immensely from medical printing. But if they do, the animals will get there first; somebody has to try this stuff out, after all.

An early if an unwilling adopter of 3D-printed medical appliances is [Jary], a 22-year-old Great Pied Hornbill, who recently received a 3D-printed replacement for his casque, the large, mostly hollow protuberance on the front the bird’s skull leading out over the upper beak. There’s no known function for the casque, but it had to be removed since cancer was destroying it and [Jary] wouldn’t have fared well post-surgically without one. Working from CT scans, the veterinary team created a model of the casque as well as a jig to guide the saw during surgery. There’s no word on what filament was used, but we’d guess PLA since it’s biocompatible and available in medical grades. The video below shows some of the surgery; it’s interesting to note that the prosthetic started out natural colored but quickly turned yellow as [Jary] preened with oils from glands near his tail feathers, just like a natural casque would.

Hornbills live to about 40 years old, so [Jary] is just middle-aged. Here’s hoping that he lives a long, happy life in return for being a pioneer in 3D-printing for medical and surgical appliances.

Continue reading “Bird Beats Cancer With The Help Of A 3D-Printed Prosthetic”

Swedish Front Plus Japanese Back Makes For Useful Hybrid Camera

Professional or amateur, doing things the hard way doesn’t always make for better results. Take photography as an example. Once upon a time, the success or failure of what happened during the instant that the camera’s shutter was open was only known hours or days later after processing the film. Ruin the shot with bad exposure or suboptimal composition? Too bad. Miss a once-in-a-lifetime moment as a result? Ouch.

Once instant photography came along, pros were quick to adopt it as a quick and dirty way to check everything before committing the shot to higher-quality film. Camera manufacturers made special instant film cartridges that could be swapped for roll film, and charged through the teeth for them. Unwilling to shell out big bucks, [Isaac Blankensmith] hacked his own instant film back for his Hasselblad medium-format camera. The unlucky donor camera was a Fujifilm Instax, a camera that uses film packs similar to those used by Polaroid and Kodak instant cameras from the 70s and 80s. Several of these cameras were dissected – carefully; those flash capacitors pack a wallop – and stripped down to the essential film-handling bits. An adapter was fabricated from laser-cut acrylic to mount the film back to the Hasselblad, with care taken to match the original focal plane. The shots are surprisingly good; despite a minor light leak from the adapter, they’re fine for the purpose. The best part: the whole build took just 48 hours from conception to first shots.

Speaking of Polaroid, we’ve featured quite a few hacks of Edwin Land’s venerable cameras over the year. From replacing the film with a printer to an upgrade to 35-mm film, instant cameras in general and Polaroids in particular seem to have quite a following among hackers.

Thanks for tipping us off, [macsimski].

Trashed TV Gets RGB LED Backlight

It might not be obvious unless you’ve taken one apart, but most of the TVs and monitors listed as “LED” are simply LCD panels that use a bank of LEDs to illuminate them from behind. Similarly, what are generally referred to as “LCDs” are LCD panels that use fluorescent tubes for illumination. To get a true LED display with no separate backlight, you need OLED. Confused? Welcome to the world of consumer technology.

With those distinctions in mind, the hack that [Zenodilodon] recently performed on a broken “LED TV” is really rather brilliant. By removing the dead white LED backlights and replacing them with RGB LED strips, he not only got the TV working again, but also imbued it with color changing abilities. Perfect for displaying music visualizations, or kicking your next film night into high gear with a really trippy showing of Seven Samurai.

In the video after the break, [Zenodilodon] starts his RGB transplant by stripping the TV down to its principal parts. The original LEDs were toasted, so they might as well go straight in the bin alongside their driver electronics. But the LCD panel itself was working fine (tested by shining a laser pointer through it to see if there was an image), and the plastic sheets which diffuse the LED backlight were easily salvaged.

With the old LEDs removed, [Zenodilodon] laid out his new strips and soldered them up to the external controller. He was careful to use all white wires, as he was worried colored wires might reflect the white light and be noticeable on the display. After buttoning the TV back up, he went through a few demonstrations to show how the image looked with the white LEDs on, as well as some interesting effects that could be seen when the LEDs are cycling through colors.

The RGB strips don’t light up the display as well as the original backlight did, as there are some obvious dark spots and you can see some horizontal lines where the strips are. But [Zenodilodon] says the effect isn’t too bad in real-life, and considering it was a cheap TV the image quality was probably never that great to begin with.

On the flip side, if you find an LED TV or monitor in the trash with a cracked screen, it might be worth taking it home to salvage its super-bright white LEDs for your lighting projects.

Continue reading “Trashed TV Gets RGB LED Backlight”

MIDI Controlled Neon

The people who make neon signs are a vibrant community with glass bending and high voltage electronics. There is a need, though, to sequence these neon signs, and it seems like MIDI is the way to do it. That’s what [david] is doing for his entry to the Hackaday Prize, and the results already look great.

The idea for this project is to transmit MIDI data to a controller that activates neon tubes accordingly. As for why [david] chose MIDI over DMX512 or some other protocol, the object here is to sync with music, and if you already have a drum machine sending MIDI out, you might as well just patch into that.

The build uses an Arduino Leonardo with a MIDI shield produced by Olimex. This shield is connected to a neon power supply that has control circuitry to quickly and easily turn neon signs on and off. The end result is a laptop (with the rest of the DJ software) sending a MIDI clock signal to an Akai drum machine. This drum machine outputs MIDI notes to the shield, which is currently set up to control three neon transformers.

The results look great, with flashing skulls synchronized with bleeps and bloops. This, of course, can be expanded to even more MIDI synced neon signs. You can check out a few videos of the build after the break.

Continue reading “MIDI Controlled Neon”

International Space Station Is Racing The Clock After Soyuz Failure

Today’s failed Soyuz launch thankfully resulted in no casualties, but the fate of the International Space Station (ISS) is now in question.

Just two minutes after liftoff, the crew of the Soyuz MS-10 found themselves in a situation that every astronaut since the beginning of the manned space program has trained for, but very few have ever had to face: a failure during launch. Today the crew of two, Russian Aleksey Ovchinin and American Nick Hague, were forced to make a ballistic re-entry into the Earth’s atmosphere; a wild ride that put them through higher G forces than expected and dropped the vehicle approximately 430 km from the launch site in Baikonur. Both men walked away from the event unharmed, but while the ordeal is over for them, it’s just beginning for the crew of the ISS.

Until a full investigation can be completed by Roscosmos, Russia’s space agency, the Soyuz rocket is grounded. This is standard procedure, as they obviously don’t want to launch another rocket and risk encountering the same issue. But as the Soyuz is currently the only way we have to get humans into space, this means new crew can’t be sent to the ISS until Roscosmos is confident the issue has been identified and resolved.

Soyuz MS-11, which would have brought up three new crew members to relieve those already on the Station, was scheduled for liftoff on December 20th. While not yet officially confirmed, that mission is almost certainly not going to be launching as scheduled. Two months is simply not long enough to conduct an investigation into such a major event when human lives are on the line.

The failure of Soyuz MS-10 has started a domino effect which will deprive the ISS of the five crew members which were scheduled to be aboard by the end of 2018. To make matters worse, the three current crew members must return to Earth before the end of the year as well. NASA and Roscosmos will now need to make an unprecedented decision which could lead to abandoning the International Space Station; the first time it would be left unmanned since the Expedition 1 mission arrived in November 2000.

Continue reading “International Space Station Is Racing The Clock After Soyuz Failure”

Ken Shirriff Chats About A Whole World Of Chip Decapping

Reverse engineering silicon is a dark art, and when you’re just starting off it’s best to stick to the lesser incantations, curses, and hexes. Hackaday caught up with Ken Shirriff at last year’s Supercon for a chat about the chip decapping and reverse engineering scene. His suggestion is to start with an old friend: the 555 timer.

Ken is well-known for his work photographing the silicon die at the heart of an Integrated Circuit (IC) and mapping out the structures to create a schematic of the circuit. We’re looking forward to Ken’s talk in just a few weeks at the Hackaday Superconference. Get a taste of it in the interview video below.

Continue reading “Ken Shirriff Chats About A Whole World Of Chip Decapping”