SMD Soldering On… Hot Sand?

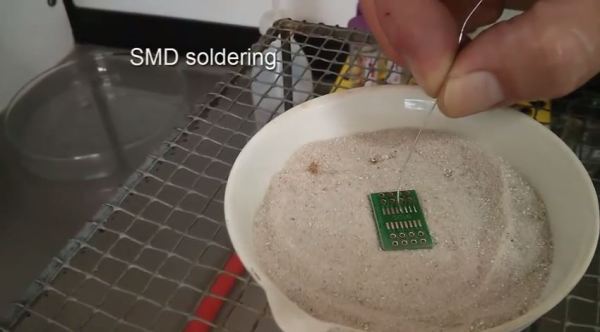
Need to do some SMD soldering? No tools? No problem! Here’s a creative method that could be a handy tool to add to your belt: SMD soldering using hot sand.

[Oliver Krohn] recently released this little video demonstrating how to perform re-flow soldering using hot sand. He’s using a bunsen burner to heat up a ceramic pot of sand to use as a kind of hot plate. It seems to work pretty well, and it’s a very unique way of doing it — if you wanted to get a bit more technical, you could also throw a temperature probe in the sand to get a much finer heat control!

Of course there are lots of other ways of doing re-flow soldering, like using a re-purposed toaster oven, frying up some circuits on a skillet after you’ve had your bacon, or if you want to be fancy, you could even build your own toolkit for it!

Anyway, stick around for the epic video of SMD soldering on hot sand.

Continue reading “SMD Soldering On… Hot Sand?”

Mini-Forge On A Budget

7

Feeling a little black-smithy? Ever wanted to hammer some red-hot steel into a new shape? Turns out, it’s well within your reach!

We’ve seen soup can forges, paint can forges, and even full blown coal fired forges — but none quite as simple as this. All you need is a fire brick — and some tools.

The problem is, fire bricks are kind of fragile. In order to drill into it without cracking the brick [Mike] advises us to clamp it in a wooden jig to help support it. Slowly drill a long hole lengthwise in it, slightly oblong to allow for your work piece to go inside. Flip the brick sideways, and add a second perpendicular hole in order to insert your gas torch of choice.

Now before you go heating it up, it is wise to reinforce the brick by wrapping some wire around it to prevent it from falling apart when it inevitably cracks due to temperature changes. A more permanent solution is to encase the entire brick in concrete to make it more durable, which [Mike] plans on doing next time. Continue reading “Mini-Forge On A Budget”

Cheap, Resourceful DIY Mini CNC Router/Mill Contraption

Few Hackaday Readers would disagree with the classic phrase: Necessity is the mother of invention. That statement is certainly no exaggeration when it comes to this mini 3-axis CNC Machine. The builder, [Jonathan], needed a way to prototype circuit boards that he designed. And although he admittedly doesn’t use it as much as he intended, the journey is one of invention and problem solving.

[Jonathan] started from the ground up with his own design. His first machine was a moving gantry style (work piece doesn’t move) and ended up not performing to his expectations. The main problem was alignment of the axis rails. Not becoming discouraged, [Jonathan] started on version 2. This time around the work piece would move in the X and Y directions like a conventional vertical milling machine. The Porter-Cable laminate trimmer would move up and down for the Z axis. It is clear that the frame is built specifically for this project. Although not the prettiest, the frame is completely functional and satisfactorily stiff for what it needs to do.

Continue reading “Cheap, Resourceful DIY Mini CNC Router/Mill Contraption”

Hack A Mag-Lite To Be Rechargeable

rechargeMaglite

Most tools sport rechargeable batteries these days, but there’s no need to toss that old flashlight: just replace the cells with rechargable ones!

[monjnoux] had a 3-cell D-sized MagLite lying around—though you could reproduce this hack with a 2 to 5 cell model—which he emptied of its regular batteries and replaced with some 11000mAh NiMHs from eBay. The original bulb was also tossed in favor of a 140-lumens LED.

After disassembling the flashlight, [monjnoux] set about installing the new parts. He replaced the original bulb with the LED, soldering it into place and securing it with hot glue. He then drilled a hole in the body of the flashlight for a DC socket. The charger he purchased is adaptive, detecting the number of cells and adjusting its voltage accordingly. It had the wrong connector, though, so [monjnoux] simply chopped off the end and soldered on a new one. For a hack that comes in at 40€, it’s definitely a cheaper alternative to the official rechargeable model: which costs 80€. And with a duration of 7 hours (though it’s unclear whether this number reflects continuous use), it likely outlasts the official model, as well.

Behold Lil’ Screwy, A Homebrew 100-Ton Press

Here we have a magnificent example of the power of the inclined plane. [Chris] has built Lil’ Screwy, a 100-ton home-built press for about $35 plus scrap on hand. He demonstrates its frightening power by punching a 17-mm hole through 8mm-thick steel using an Allen key.

As [Chris] explains in his hilarious video waiting for you after the jump, the force comes from using really big screws. Lil’ Screwy uses four 1-inch L7-rated ready rods with eight threads to the inch. The bolts run between two 1″ steel plates to form the press. In the top plate, he drilled 1″ holes. The bottom holes are drilled out 7/8″ and tapped so the two plates clamp together with awesome crushing power when you twist the giant coupling nuts.

[Chris] milled a pocket in the underside of the top plate for a big neodymium magnet that will keep, for instance, a 17-mm Allen key in place while you punch a piece of steel with it. He has a ring of smaller ones embedded into the bottom plate to hold supports in place for broaching.

As a special bonus, [Chris] shows you how to stick it to the man when it comes to using that last bit of Never-Seez in the can, and also how to make your decals temporarily repositionable.

Continue reading “Behold Lil’ Screwy, A Homebrew 100-Ton Press”

A USB Connected Box-o-Encoders

picoscope-encoder

[Colin] loves his PicoScope, a USB based “headless” oscilloscope. While using it he found himself longing for a classic oscilloscope interface. Mouse clicks just weren’t a replacement for grabbing a dial and twisting it. To correct the situation he created his USB-Connected Box-o-Encoders. The box maps as a USB keyboard, so it will work with almost any program.

[Colin] started by finding encoders. There are plenty of choices – splined or flatted shaft, detents or no detents, panel, PCB, or chassis mount. He settled on an encoder from Bourns Inc. which uses an 18 spline shaft. His encoder also includes a push button switch for selection. With encoders down, knobs were next. [Colin] chose two distinct styles. The two knob styles aren’t just decorative. The user can tell which row of knobs they are on by touch alone. Electronics were made simple with the use of a Teensy++ 2.0. [Colin] used a ATUSBKey device running Teensy software, but says the Teensy would have been a much better choice in terms of size and simplicity.

Once everything was wired into the box, [Colin] found his encoders would “spin” when the knobs were turned. They are actually designed to be PCB mounted, and then screwed into a control panel. Attempts to tighten down the panel mounting nut resulted in a broken encoder. Rather than redesign with purely panel mounted encoders, [Colin] used a dab of epoxy to hold the encoder body in place.

Continue reading “A USB Connected Box-o-Encoders”

Soldering In The Dark — Add Some Light To Your Iron!

iron_01

While [William] may not know what he’s doing (his words, not ours!), at least he can SEE what he’s doing now with this awesome soldering iron light modification. And judging by the build quality, we’d reckon he really does know what he’s doing!

He’s taken a piece of copper-clad PCB, and formed it to create a nice circular copper donut. This allows him to make a ring of LEDs in parallel that will slide nicely over the soldering iron and integrate into the plastic case.

To power it, he’s made a small diode bridge to rectify the AC, and a 24 ohm high-wattage resistor run in series with the heating element. The voltage drop across the resistor is 7.5V max, which equates to about 5.3V RMS minus the diode voltage drops. This means the LEDs see about 4.5V at a total of 135mA, which works out to about 17mA each — just under the approved rating. All of this fits nicely into the original casing of the soldering iron.

Finally to finish it off, he’s MacGyver’d an old pill bottle into a protective casing around the LED ring — it looks surprisingly stock on the soldering iron!

Do you have a tool hack that adds handy features? Let us know through the Tips Line!