Skillet Reflow Controller

Using an electric skillet to reflow surface mount circuit boards is a popular alternate use for those kitchen appliances. The real trick is monitoring and controlling the temperature. [Mechatronics Guy] built his own skillet temperature controller using a thermistor, a solid state relay, and an Arduino.

He was inspired by [Ladyada’s] work which used a servo to adjust the temperature dial on the skillet’s power supply. This started by attaching the thermistor to the bottom of the skillet using JB weld. since this area will be heating up he also attached a terminal block for connecting the feed wires as the heat would melt any solder joints. Those wires travel back to a control box housing the Arduino and solid state relay. To gain finer control over the heating element the relay is switched on and off, resulting in low-frequency Pulse Width Modulation, which should help maintain a consistent temperature better than just turning the temperature dial on the cord.

Pair this up with the vacuum tweezers hack and you’re on your way to a surface mount assembly line. If you want to see this process in action check out this post. It goes from stenciling, to populating, to reflowing in a toaster oven.

[Thanks Rob]

ATX Psu Turned Into An Adjustable Voltage Bench Supply

Here’s a fancy way to convert an ATX powers supply into a bench supply. [TG] didn’t just cut off the motherboard connector and add banana plugs, but improved the functionality. Right off the bat you’ll notice that he’s added a control panel. There is an Ammeter and Ohmmeter to let you know what the unit is putting out. He added an MIC29152WT adjustable voltage regulator so that he’s not limited to the fixed voltages of the psu. As a final touch he added an external voltage probe which can be used with the flick of a switch. It’s no replacement for a proper bench supply, especially since it doesn’t have adjustable current limiting, but it’s a nice improvement upon previous psu hacks.

Quick, Cheap, And Simple Vacuum Tweezers

[Ken] found that using traditional tweezers is a good way to lose tiny surface mount parts and so set out to make his own vacuum tweezers (PDF). He already had a small aquarium pump that he used as a bubbler for etching circuit boards. After opening up the case he found it was possible to connect tubing to the input of the pump to use as the source for the vacuum. The business end of the device is a syringe which he already had for applying oil in tight spaces. A file took off the sharp tip, and a small hole lined with a bit of soft tubing serves as a valve. Put the needle tip in place and plug the hole with your finger to pick it up. Works like a charm and will go well with our next feature, building your own reflow skillet.

We like [Ken’s] work. We just looked in on his copper clad enclosures yesterday.

Vacuum Forming At Home

A little dumpster-diving let [Nick Skvarla] build his vacuum form machine for around $5. He pulled a vacuum cleaner out of the trash, which was tossed away because of a broken power plug. He put it into a box which had been sealed with spray foam and used a piece of pegboard for the top side of the enclosure. He takes a piece of 40 mil PETG plastic from the hobby shop and mounts it in a wooden frame. That goes into the oven on broil until the entire sheet is sagging, then onto the vacuum former. Above he’s making forms out of some figurines which he’ll walk you through in the video after the break.

There’s a whole world of manufacturing processes that use these forms as a starting point. What would you use this for?

Continue reading “Vacuum Forming At Home”

Heater For Bending Acrylic

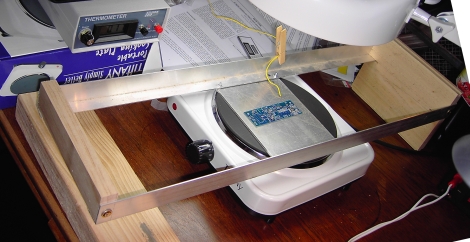
We like using acrylic in our projects but there are a couple of tricky techniques, particularly getting clean cuts for glued edges and bending the material into curves. [Giorgos Lazaridis] has a great solution to the latter, a dedicated acrylic heater. Instead of using an oven to warm the material for bending he’s using localized heat produced by a high-powered lamp pulled from an old laser printer. The next part of his solution is to keep the heated area of the acrylic as small as possible. This was achieved by creating heat sinks on either side of the bulb. The metal bars seen above have water running through them to help isolate the softening of the material to a narrow strip. See how well this system works in the video after the break.

Continue reading “Heater For Bending Acrylic”

Single LED Ultraviolet Exposure Box

[Jacques Lebrac] built a UV exposure box for printed circuit boards using just one LED. He usually makes boards that are just a few square inches and didn’t think building a box that had upwards of 80 LEDs was worth his time. He passed by the low power LEDs for a single 5W unit. Pumping 1.5A through this LED makes for some quick exposures, but causes heat issues. To solve this, an aluminum arm was used to mount the LED, acting as mechanical support and heat sink at the same time. The voltage regulator was glued directly to the chassis, providing at least some heat dissipation.

[Jacques] came up with an eloquent solution for holding the transparency and copper clad in place. A piece of acrylic is hinged on the back using a piece of aluminum tubing. The front has a magnet glued to it, with another one in the base to hold the cover tight to the work surface during operation.

Unlocking RS232 Serial Comm On A Multimeter

[Craig] cracked open a multimeter to unlock RS232 serial communications that can be used for data logging. There’s a couple of things that make this possible. First of all, the multimeter’s processor is not covered in a black epoxy blob, leaving the pins exposed for hacking. Second, the chip model is known and [Craig] was able to get his hands on the datasheet. One of the pins enables serial output when pulsed low. Touching it to V- even turns on an RS232 icon on the display, as seen above. To make this accessible without opening the case a momentary push button can be added, as well as connector for signal output, and a bit of parsing on the PC side to handle incoming data.