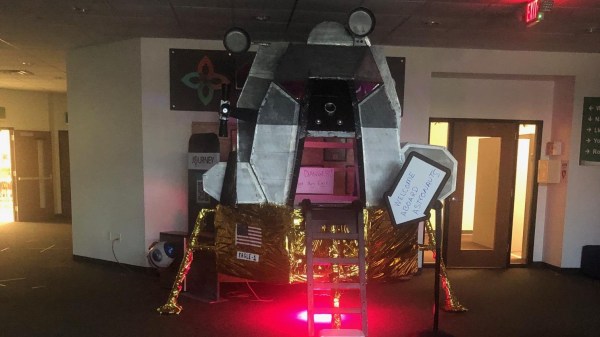
Joel showing off his webshooter

Spider-Man Swings A Little Closer To Reality

Despite reading Hackaday daily and seeing the incredible things that people do, something comes along that just sort of blows you away every once in a while. Sometimes it’s just technically impressive, but often it is just, “I didn’t think that anyone would try this or even think of this.” [Joel Creates] is one such example with his Spider-Man wrist-mounted web-shooters.

Previously, [Joel] had built a web-slinging system based around a pressurized tank of hot glue worn like a backpack. What it lacked in miniaturization, it made up for in functionality. However, [JT of Build IRL] created a grappling-based Spider-Man system that fired ropes which got [Joel] thinking that perhaps the hot glue and the grappling system could be combined for a smaller overall package.

His solution is quite simple. Old CO2 cartridges filled with glue and a small nozzle drilled in are loaded into a quick-connect fitting. The hot glue is heated via an induction coil on a small tool belt before loading. A thermally insulating layer of paint and micro-vacuum spheres on the canister helps [Joel] place it in the wrist shooter without burning himself. A bike tire inflator with a lever-activated system forms the main assembly of the shooter. Using compressed air, the system fires a glob of hot glue at a surface and a metal web-shaped disk with holes and a rope attached to the blob of hot glue. As the glue rapidly cools, the metal disk provides a lot of surfaces for the adhesive to hang onto. Overall, the results are pretty impressive, but the engineering challenges make for an exciting journey. Everything from failed prototypes to failed power supplies seems to happen on this build.

Combined with some electromagnets, you could really have the whole spider package.

Thanks [Carson B] for sending this one in! Video after the break.

Continue reading “Spider-Man Swings A Little Closer To Reality”

You Can Build A Lego Rubik’s Cube

Rubik’s cubes are a popular puzzle — one found exciting or infuriating depending on your personal bent. [PuzzLEGO] has designed a LEGO Rubik’s cube, with the latest revision improving on flimsy earlier designs.

The first step was to design a core that would allow the cube to rotate freely without being too loose. This involved a lot of trial and error until [PuzzLEGO] found just the right combination of parts to do the job. From there, it was a matter of introducing the edge pieces and corner pieces without jamming everything up.

It took some experimenting to get everything moving together smoothly, but the end result is pretty impressive. It’s certainly not a build you’d use for speedcubing; the fragility meant that it took 20 minutes to solve just one face. [PuzzLEGO] hopes to make further improvements to increase playability.

If you want to replicate the feat, you’ll need plenty of little Lego bits and pieces, but it’s definitely a replicable build. Alternatively, consider using Lego to build a Rubik’s Solver, instead. Video after the break.

Continue reading “You Can Build A Lego Rubik’s Cube”

A Promising Start For The Doritos Space Program

Rocketry is tricky stuff, but as long as you’re not trying to get into space, the whole idea can basically be boiled down into a simple concept: if you put enough thrust behind it, anything can fly. At least, for awhile. It’s this basic premise that allows what hobbyists sometimes refer to as “Odd-Rocs” fly; these unusual objects might not be ideal rockets, but put a big enough motor in there, and it’ll get off the pad.

Recently, [concretedog] thought he’d try putting together his own oddball rocket, and set out to modify a Doritos STAX tube for powered flight. There’s plenty of precedent for turning Pringles tubes into rockets, but of course, that’s hardly surprising. After all, what’s a rocket if not a strong and lightweight cylinder? But the rounded triangular shape of the STAX tube promised to be an interesting change of pace. Plus it looked cool, so there’s that.

Turning the snack container into a rocket was actually pretty straightforward. To start with, [concretedog] sketched around the outside of the tube on a piece of paper, and then took a picture of that with his phone. That image was then brought into Inkscape, and turned into a vector file that he could fiddle around with in CAD.

Between the thin plywood cut on his laser and PETG loaded into his 3D printer, he was able to come up with a strong enough motor mount to take an Estes D12-5. He then created some fins to glue on the side, and a triangular nosecone. A simple recovery system was installed, and the whole thing was finished off with a Doritos-appropriate orange and black color scheme.

The unusual shape of the rocket meant simulating its flight characteristics on the computer wouldn’t work without custom software, so [concretedog] had to use the old school method of checking stability by swinging it around in a circle on a string. After trimming it out so it would orient itself properly on the tether, he was fairly sure it would fly straight under power. Sure enough, the video below shows the nacho cheese flavored rocket streaking skyward with impressive speed and stability.

It’s far from the most advanced model rocket we’ve seen recently, but we really appreciate the simplicity of this build. It’s a great reminder that fun doesn’t have to be high-tech, and that by following some basic construction principles, you can knock out a safe park flier rocket on a weekend.

Continue reading “A Promising Start For The Doritos Space Program”

A Toy Jeep For After The Apocalypse

When your friends are off to the post-apocalyptic Wasteland Festival and present you with a defunct Power Wheels clone toy Jeep to make ready for the festivities, what are you to do? If you happen to be [Victor Frost], soup it up with new electrics and uprated steering, and send it forth into the hideous no-mans land.

These toys usually have one or two 12V high-speed motors driving plastic gear trains for the rear wheels. This one is a two-motor model and unexpectedly comes with a steering motor for parental remote control. All its electronics were dead, so rather than do a complete motor upgrade he instead doubled the voltage and installed decent motor controllers with an Arduino sending them instructions. Otherwise it received an upgrade and stiffening of its chassis and steering components, and the kids plastic steering wheel was replaced with a wooden one.

The result is not quite Mad Max as while it’s faster than the original there’s still something of the pedestrian about it. But it seems to be a load of fun, and we can’t help admitting we’d like a go in it. If you’re hungry for more, this isn’t the first such story we’ve covered.

Documentation Is Hard, Let The SkunkWorks Project Show You How To Do It Well

Documentation can be a bit of a nasty word, but it’s certainly one aspect of our own design process that we all wish we could improve upon. As an award-winning designer, working with some of the best toy companies around, [Jude] knows a thing or two about showing your work. In his SkunkWorks Project, he takes a maker’s approach to Bo Peep’s Skunkmobile and gives us a master class on engineering design in the process.

As with any good project brief, [Jude] first lays out his motivation for his work. He was very surprised that Pixar hadn’t commercialized Bo Peep’s Skunkmobile and hoped his DIY efforts could inspire more inclusive toy options from the Toy Story franchise. He does admit that the Skunkmobile presents a more unique design challenge than your standard, plastic, toy action figure. Combining both the textile element to create the illusion of fur and the RC components to give the toy its mobility requires careful thought. You definitely don’t want the wheels ripping into the fabric as you wheel around the backyard or for the fur to snag every object you pass by in the house.

Given the design challenges of making the Skunkmobile from scratch, [Jude] decided the best way forward was to retrofit a custom-designed skunk-shaped body onto a standard RC car chassis. The difficulty here lies in finding a chassis that can support the weight of the retrofitted body as well as one big enough to hold a 9-inch Bo Peep doll inside the driver’s compartment. Before spending endless hours 3D printing (and re-printing) his designs, [Jude] first modeled the Skunkmobile in card (using cardboard), a practice we’ve seen before, and are always in love with. He continually emphasized the form of his device was probably even more important than its function as capturing the essence as well as the “look and feel” of the Skunkmobile were critical design criteria. You can even see the skunk wagging its tail in all his demo videos. Prototyping in card gave [Jude] a good feel for his Skunkmobile and the designs translated pretty well to the 3D printed versions.

What really impressed us about [Jude’s] project is the incredible detail he provides for his entire design process from his backstory, to the initial prototypes, to the user testing, and, finally, to the realization of the final product. Remember, “We want the gory details!”

Continue reading “Documentation Is Hard, Let The SkunkWorks Project Show You How To Do It Well”

You Can 3D Print Your Own RC Motorbikes

Radio control cars have been a popular toy for decades, but their motorcycle counterparts have always lagged behind due to balance issues and compromised agility. At the same time, a little toy motorbike can be mesmerizing in action. [brettt3] built a few of his own design that look remarkably fun to play with.

Modeled after the Ducati Draxter and Suzuki GSX-RR, the 3D printed bodies do a great job of aping their full-size counterparts. With a lick of paint and some finer touches, these could be absolutely exquisite, but they look awesome in the bare plastic nonetheless. The bikes use a belt drive to deliver power from a motor in the body to the rear wheel. To keep them upright, a weighted front wheel is used as a passive gyroscope for stabilization.

But the finest touch is arguably the rider which sits atop each motorcycle. Articulated and with hands resting on the handlebars, the rider moves with the steering of the bike, creating an eerie realism that we can’t get enough of. There’s even a tiny micro-servo in the head which allows the rider to swivel and look in the direction of motion as you’d expect.

Files are available for those wishing to recreate these designs at home. Alternatively, dive deeper into gyro-stabilised designs to learn more about how it all works. Video after the break.

Continue reading “You Can 3D Print Your Own RC Motorbikes”

Spooky USB Baby Types Out Messages From Beyond

You might think it’s a bit early for us to be running Halloween hacks, but don’t worry. While this microcontroller-equipped doll that mimics a USB keyboard to type out messages in the creepiest way possible might seem like a gag gift you’d get after attending somebody’s bone-chilling holiday bash, creator [Jonathan] actually put it together for a friend’s wedding. So not only is it an interesting piece of hacked together hardware, but it’s also a great reminder about the importance of having a wedding registry.

Even if this seems like a rather unusual wedding gift from an outsider’s perspective (for the record, pranks involving this “haunted doll” have been a running gag between them since their school days), we can’t help but be impressed with the way [Jonathan] implemented it. An ATtiny85-powered Digispark is hidden inside the doll, along with a simple USB 2.0 hub that supposedly eases some teething issues the diminutive development board has with newer USB 3.0 ports. Through the use of V-USB, this lets the baby type out messages once plugged into the recipient’s computer.

Soldering the Digispark to a cheap USB hub keeps newer computers happy.

Now he could have just stopped there, but [Jonathan] wanted this to be an interactive experience. Specifically, he wanted the baby to present the newlyweds with a personally test of sorts, and that meant taking user input. He came up with the clever user interface demonstrated in the video below, which responds to changes in the system’s “Caps Lock” state.

This platform-agnostic solution lets the user navigate the doll’s menu system by tapping a single key, although the Chromebook users out there will have to break out the Alt key to play along. It’s a neat trick for getting two-way communication going between a MCU and a computer without any client-side software, and worth filing away mentally for future non-haunted projects. It’s also worth checking out the effort [Jonathan] put into optimizing everything to fit into the chip’s paltry 6012 bytes of flash.

Incidentally, this is a good a time as any to remind readers that our Halloween Hackfest contest is live right now and taking entries until October 11th. If you’ve got any cursed bar mitzvah gifts you’ve been putting the finishing touches on, we’d love to see them.

Continue reading “Spooky USB Baby Types Out Messages From Beyond”