Epoxy Resin Night Light Is An Amazing Ocean-Themed Build

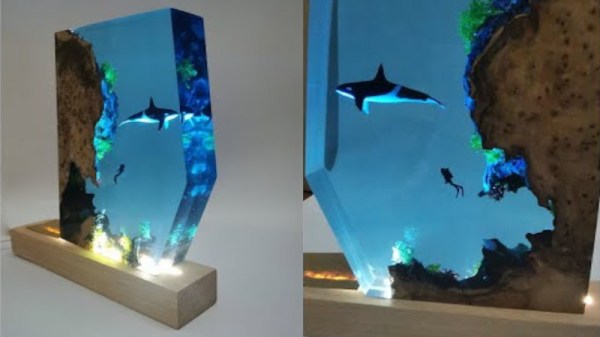
We’ve all seen those “river” tables where a lovely old piece of tree is filled with some blue resin to create a water-like aesthetic. This project from [smartyleowl] takes that basic idea, but pushes it further, and the result is a beautiful build that is as much a diorama as it is a simple lamp.

First up, an appropriate rough piece of unprepared wood is chosen to create a cliff for the underwater scene. Speckles of UV-reactive blue powder are scattered on to the wood and some little plastic coral and marine plants are stuck down as well. A mold is then constructed around the wood using acrylic. Small whale and diver figurines are dangled in place, and blue resin poured in to complete the underwater scene. Once the resin has hardened, it’s polished to a clear sheen and its edges are nicely beveled. It’s then placed on a illuminated base which lights the scene from below, giving it a somewhat ethereal underwater quality.

It’s not a complicated project by any means, but it’s a great example of the beautiful things one can create with the creative application of colored resin. Producing a lamp that looks this good obviously takes some skill, of course – getting a bubble-free resin pour and a nice shiny finish on the wood isn’t easy. However, there’s no reason you can’t start learning today! Video after the break.

Continue reading “Epoxy Resin Night Light Is An Amazing Ocean-Themed Build”

Machining Waveguides For 122 GHz Operation Is Delicate Work

Millimeter-wave Radars used in modern cars for cruise control and collision avoidance are usually designed to work at ranges on the order of 100 meters or so. With some engineering nous, however, experimenters have gotten these devices sending signals over ranges of up to 60 km in some tests. [Machining and Microwaves] decided to see if he could push the boat out even further, and set out machining some waveguide combiner cavities so he could use the radar chips with some very high-performance antennas.

Precision-machined components are required to successfully use these 122 GHz components for long-range transmissions.

The end goal of the project is to produce a 53 dBi antenna for the 122GHz signal put out by the mmWave radar chips commonly found in automotive applications. Working at this frequency requires getting tolerances just so in order to create an antenna that performs well.

Plenty of fine lathe work and cheerful machining banter later, and the precision waveguide is done. It may not look like much to the untrained eye, but much careful design and machining went on to make it both easy to attach to the radar and parabolic antenna system, and to make it perform at a high enough level to hopefully break records set by other enterprising radio experimenters. If that wasn’t all hard enough, though, the final job involved making 24 of these things!

There aren’t a whole lot of microwave antenna-specific machining channels on YouTube, so if you’ve been thirsty for that kind of content, this video is very much for you. If you’re more interested in antennas for lower frequencies, though, you might find some of our other stories to your liking. Video after the break.

Continue reading “Machining Waveguides For 122 GHz Operation Is Delicate Work”

Spin Some Spudgers From Secondhand Silverware

Even though it’s not the right tool for the job, we’ve all used a flat head screwdriver for other purposes. Admit it — you’ve pried open a thing or two with that one in the toolbox that’s all dirty and dinged up anyway. But oftentimes, screwdrivers just aren’t thin enough. What you need is a spudger, which for some reason, seem to only come in plastic. Blame our disposable times.

In a relevant break from building electronics, [lonesoulsurfer] took the time to craft a set of spudgers and such from secondhand silverware. These are all made from spoons and butter knives sourced from a thrift store. For the spoons, [lonesoulsurfer] removed the heads with an angle grinder, shaped them on a belt sander, and thinned them out until they were spudger-slim. After doing the same with the handle end, [lonesoulsurfer] polished up the new tools on the wheel with some compound.

Not all of these are spudgers — some are destined to scrape, and others for lifting badges and decals. But they all live in harmony in a handy carrying case. Check out the build video after the break.

On the other hand, sometimes a disposable tool is all you really need.

Continue reading “Spin Some Spudgers From Secondhand Silverware”

This ESP32 Pico Wristwatch Has Plenty Of Potential

First hand-built prototype. Nurse! isopropyl alcohol, stat!

Prolific hacker [Sulfuroid] is a medical doctor by day, and an electronics hobbyist by night, and quite how he finds the time, we have no idea.

The project we want to highlight is an ESP32 based LED smart watch, which we’ll sure you’ll agree, looks pretty nicely developed so far, and [Sulfuroid] has bigger plans, as you may find, when you dig into the GitHub repo. This analog-style design uses four groups of 0603-sized LEDs, arranged circularly to indicate the passage of time, or anything else you fancy. Since there are four control buttons, a pancake vibration motor, as well as Wi-Fi and Bluetooth, the possibilities are endless.

In order to stand a hope of driving those 192 LEDs from a single ESP32-Pico-D4, it was necessary to use a multiplexed LED driver, courtesy of the Lumissil IS31FL3733 device, which can handle arrays up to 12 x 16 devices. This chip is one to remember, since it has some really nice features, such as global current control to reduce CPU overhead, automatic breathing loops for those fancy fade effects, and even includes a handy open/short detection function, so it can report back assembly problems, assisting in reworking your dodgy soldering!

Routing circular arrays is such a pain.

Power and interfacing are taken care of via USB-C, with a TP4054 single Li-Ion cell charger chip handling the battery. This is a Taiwanese clone of the popular LTC4054, but that chip may be a bit hard to get at the moment. There is the common-as-muck CP2104 USB chip dealing with the emulated serial port side of things, since for some reason, the ESP32 still does not support USB. The Pico-D4 does have RTC support, but [Sulfuroid] decided to use a DS3231M RTC chip instead. We noticed the touch functionality wasn’t broken out – that could be added easily in the next revision!

We’ve covered watches a lot, because who doesn’t want custom geek-wear! Here’s a slick one, a fun one with the brains on display, and finally one using charlieplexing to get the component count down.


Color Dot Puzzle Will Wrinkle Your Brain

2022 is a good year for puzzles, and if you’re getting tired of Wordle, you might be after a new challenge. This color puzzle from [Sebastian Coddington] could be just what you’re looking for. 

[Sebastian] describes the 4×4 Color Dot Puzzle as a sort of combination of the ideas behind the Rubik’s Cube and the 15 puzzle. The aim is to arrange the 16 colored tiles on the board to form four single-colored 2×2 squares in the overall 4×4 board. The puzzle is 3D printed, using 6 colors of filament – black for the body of the puzzle, white for the control sticks, and yellow, green, red, and blue for the individual tiles.

We haven’t seen any mathematical proofs of how to beat the game, but we’re sure [Sebastian] has gotten good at beating the puzzle having designed it himself. According to tipster [Michael Gardi], who knows a thing or two about 3D printing games himself, the puzzle makes for a fun little mind teaser.

If you’re more of a jigsaw person, consider this advanced illuminated build.

Tutorial Teaches You To Use Neopixels With Micropython

Addressable LEDs are wonderful things, with products like Neopixels making it easy to create all kinds of vibrant, blinking glowables. However, for those without a lot of electronics experience, using these devices can seem a bit daunting. [Bhavesh Kakwani] is here to help, with his tutorial on getting started with Neopixels using the MicroPython environment. 

The tutorial flows on from [Bhavesh’s] Blink example for MicroPython, and is aimed at beginners who are learning for the first time. It explains the theory behind RGB color mixing that allows one to generate all manner of colors with WS2812B-based LED strings, and how to code for the Raspberry Pi Pico to make these LEDs do one’s bidding.

The guide even covers the use of the Wokwi simulation tool. This is a great way for beginners to test their projects before having to play with actual hardware. This is useful for beginners, because it’s a great way to catch mistakes – is there a software problem, or did they push the soldering iron through the microcontroller? It’s also a technique that pays dividends when working on more complicated projects.

Whether you’re entirely new to the embedded world, or just want to learn the intricacies of talking to addressable LEDs and make sense of color mixing theory, this tutorial will serve you well. Before you know it, you’ll be building glowing projects with the best of them!