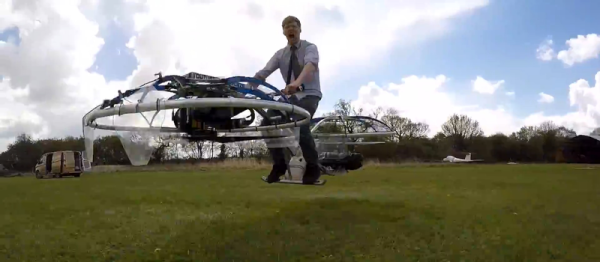
A new video has been stirring questions on the internet this week. It shows a test of the Flyboard Air, a device that is somewhere between a Back to the Future Hoverboard and Green Goblin’s glider. The video depicts pilot [Frank Zapata] taking off, flying around, and landing an a platform not much larger than a milk crate. Plenty of folks are calling the video a fake. After a few back of the napkin calculations though, we’re coming out to say we think it’s real. Details are few and far between, so much of the information in this article is educated guessing based upon the video.
Here’s our hypothesis: Flyboard Air is a jet powered platform with little or no built-in intelligence. Balance, stability and control are all handled by the pilot. A hand controller simply provides throttle to adjust altitude, take off, and land.
 Let’s start with the jet powered part. During the video, [Frank] looks down at his board and the water below. Between his sneakers we can see two round openings – which look a lot like jet intakes. At the end of the video, [Frank] flies over the camera. stopping the action shows a split second where four exhaust holes are visible on the bottom of the board. These jets look quite a bit like model aircraft jet engines.
We don’t know exactly which engines [Frank] is using, but as an example, the Jet-Cat P 400 RX-G packs 88 lbs of thrust into a shell less than 6 inches in diameter, weighing less than 8 lbs. Four of those engines would provide 352 lbs of thrust. That’s plenty to lift [Frank], the board, and a few gallons of Jet-A strapped to his back.
Why no built-in intelligence? Even the smallest quadcopters have gyros, accellerometers, and PID loops keeping them upright. The problem boils down to the physics of jet engines. Active stability in a fixed pitch rotary blade system requires very fast throttle response. Quadcopters have this with their brushless motors. Turbines however, have throttle lag on the order of seconds. You can’t beat physics. Accelerating 3 or 4 pounds metal from 78,000 RPM (~70% throttle) to 98,000 RPM (~100 % throttle) takes time.
 Standing on a column of uncontrolled thrust would take quite a bit of skill on the part of the pilot. As it turns out, [Frank] is one of the world’s most experienced thrust riders. His previous invention, the Flyboard uses a personal watercraft to create a column of thrust which the rider stands on. These boards have become tremendously popular at vacation spots in the last few years. There are plenty of videos on [Frank’s] YouTube channel showing the amount of control a skilled ride has over the board. Loops, spins, and other aerobatics look easy.
With that much skill under his belt, [Frank] would have no problem keeping balanced on four jet engines.
Such a skilled rider means that control wouldn’t really be needed on the board. We’re betting that the only electronics are the remote throttle control and the Engine Control Computers (ECU) needed to keep the jets running and synchronized. The two electric ducted fans on the sides of the Flyboard Air appear to be running all the time, only shutting down when [Frank] lands the board.
One final thought – taking off and landing a jet vertically is difficult. Ground effects destabilize the craft. Engines can suck in their own exhaust, stalling them. These are problems faced by the harrier jump jet and the joint strike fighter. [Frank’s ] solution is not never get too close to the ground. If you watch closely, he takes off and lands from a perforated metal platform mounted off the back of a van. The metal doesn’t reflect enough thrust to cause the Flyboard to become unstable or stall.
So is the video real? We think so. This is an amazing achievement for [Frank Zapata]. Is it practical or safe? Heck no! Nor is it cheap – those engines cost €8,845.00 each. That said, we’d love a chance to ride the Flyboard Air – after a few hours of training on the original Flyboard of course.
Continue reading “Hoverboards Are Here – If You’re Crazy Enough To Try” →
 [REDNIC79] walks us through all the details of the improvements he made since the first version. After the last failure, he figured, that a larger screw pod diameter would give the vehicle a better floatation while smaller thread profile would prevent the screws from digging too deep into the ground, thus reducing the force required to move the vehicle forward.


 The system runs on punch cards. You can’t buy them anymore, so a local printer makes them – several hundred are needed every time there is a schedule change. The punching pliers (which also can no longer be purchased) get so worn out they replace the pins with custom-made ones from a local locksmith. The moving parts of the card reader have split-pins which need to be replaced every week or two – the stress of repeated movement simply wears them away. There’s nothing to do but replace them regularly. The assembly needs regular cleaning since dust accumulates on the cards and gets into the whole assembly. The list goes on… and so does the station.

 Let’s start with the jet powered part. During the video, [Frank] looks down at his board and the water below. Between his sneakers we can see two round openings – which look a lot like jet intakes. At the end of the video, [Frank] flies over the camera. stopping the action shows a split second where four exhaust holes are visible on the bottom of the board. These jets look quite a bit like model aircraft jet engines.
 Standing on a column of uncontrolled thrust would take quite a bit of skill on the part of the pilot. As it turns out, [Frank] is one of the world’s most experienced thrust riders. His previous invention, the


