Want to learn why ducted propellers improve both thrust and efficiency? Well, we’ve got both the lesson and the teacher for you. [Bruce Simpson] isn’t exactly a household name, but we bet most of you already know who he is. He’s the guy from New Zealand that in 2003 set out to make a $5000 DIY Cruise Missile – and he claims that he would have succeeded if the NZ Government hadn’t got in the way. Now-a-days [Bruce] focuses most of his energy on his two YouTube channels, RC Model Reviews and XJet.
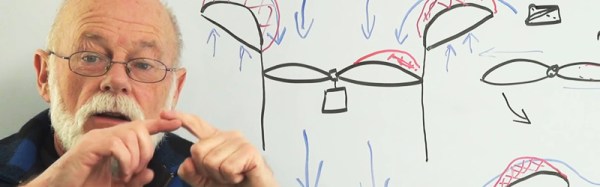
Back to the lesson at hand: In the video after the break, he does a wonderful job explaining how the walls of a duct work to stop the high pressure area of the propeller from moving to the low pressure area. You’ll see something similar on the wings of jets aircraft. There will be a small vertical fin on the end of the wing, and much like a duct, it’s job is to physically separate the two areas and prevent tip vortex effects. That in turn increases efficiency. [Bruce] has some other great RC/model type videos, so if you like what you see, you might want to subscribe. Or you can learn more about the DIY Cruise Missile saga.
Continue reading “A Guy Named Bernoulli And Ducted Propeller Designs”