This week Jonathan chats with Valentyn Danylchuk about BreezyBox — an interactive shell and toolkit that provides various tools and a compiler on an ESP32 microcontroller. What was the inspiration for this impressive project, and what direction is it heading? Watch to find out!
Back in 1966, a suitable toy for a geeky kid was a radio kit. You could find simple crystal radio sets or some more advanced ones. But some lucky kids got the Philips Electronic Engineer EE8 Kit on Christmas morning. [Anthony Francis-Jones] shows us how to build a 2-transistor AM radio from a Philips Electronic Engineer EE8 Kit.
According to [The Radar Room], the kit wasn’t just an AM radio. It had multiple circuits to make (one at a time, of course), ranging from a code oscillator to a “wetness detector.”
The kit came with a breadboard and some overlays for the various circuits, along with the required components. It relied on springs, friction, and gravity to hold most of the components to the breadboard. A little wire is used, but mostly the components are connected to each other with their leads and spring terminals.
The hack we have for you today is among our most favorite types of hack: a good, honest, simple, and well documented implementation that meets a real need. Our hacker [Solo Pilot] has sent in a link to their basement monitor.
The documentation is quite good. It’s terse but comprehensive with links to related information. It covers the background, requirements, hardware design, sensors, email and SMS alerts, software details, and even has some credits at the end.
Implementing this project would be a good activity for someone who has already made an LED flash and wants to take their skills to the next level by sourcing and assembling the hardware and then configuring, compiling, deploying, and testing the software for this real-world project.
To make this project work you will need to know your way around the Arduino IDE in order to build the software from the src.zip file included with the documentation (hint: extract the files from src.zip into a directory called AHT20_BMP280 before opening AHT20_BMP280.ino and make sure you add necessary boards and libraries).
One feature of the basement monitor that we would like to see is a periodic “everything’s okay” signal from the device, just so we can confirm that the reason we’re not getting an alarm about flooding in the basement is because there is no flood, and not because the battery ran dead or the WiFi went offline.
If you’ve recently started on your journey into where electronics meets software a project such as this one is a really great place to go next. And of course once you are proficient with the ESP8266 there are a thousand such projects here at Hackaday that you can cut your teeth on. Such as this clock and this fault injection device.
The advantage of a radio-controlled clock that receives the time signal from WWVB is that you never have to set it again. Whether it’s a little digital job on your desk, or some big analog wall clock that’s hard to access, they’ll all adjust themselves as necessary to keep perfect time. But what if the receiver conks out on you?
Well, you’d still have a clock. But you’d have to set it manually like some kind of Neanderthal. That wasn’t acceptable to [jim11662418], so after he yanked the misbehaving WWVB receiver from his clock, he decided to replace it with an ESP8266 that could connect to the Internet and get the current time via Network Time Protocol (NTP).
As a general concept, fault injection is a technique that studies how a system reacts to unusual or unexpected external forces. The idea is that, if you can trigger a glitch at the precise moment, you might be able to use that to your advantage in disabling security features or otherwise gaining further access to the device in question. In the hardware world, this could be achieved by fiddling with the power going into the device, or subjecting it to extreme temperatures.
We’ve covered voltage glitching attacks on these pages in the past, but most of the tools used are fairly expensive if you’re not doing this kind of thing professionally. Luckily for us, [Aditya Patil] has developed a fault injection tool that can run on a standard ESP8266 development board. Obviously it’s not as capable as a bespoke device costing hundreds of dollars, but if you just want to experiment with the concept, it’s a fantastic way to wrap your head around it all.
Wood heat offers unique advantages compared to more modern heating systems, especially in remote areas. But it also comes with its own challenges, namely, keeping the fire going at the optimum temperature. If it’s too cold you risk buildup in the chimney, but if you’ve got it stoked up more than necessary, you’ll end up burning through your wood faster.
To keep the fire in that sweet spot, [Jay] decided to put an ESP8266 and a thermocouple to work. Now, this might seem like an easy enough job at first, but things are complicated by the fact that the flue temperature above the stove lags considerably behind the temperature inside the stove. There’s also the fact that the top of the chimney will end up being much colder than the bottom.
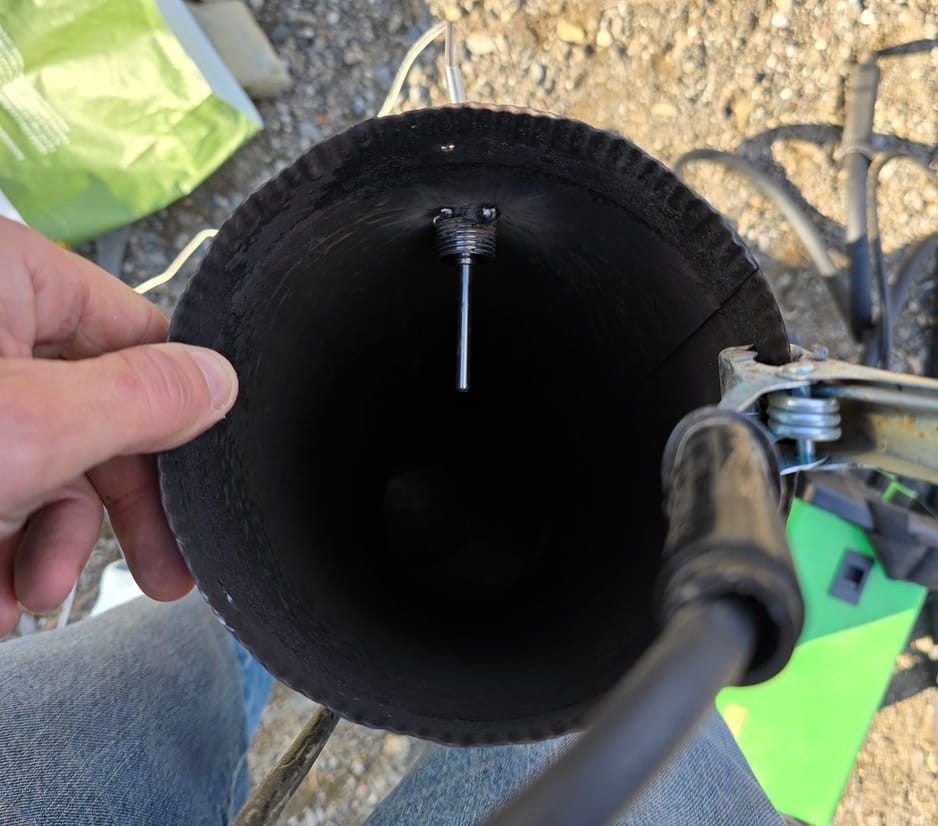
Mounting the thermocouple in the flue pipe.
In an effort to get a more complete view of what’s happening, [Jay] plans on putting at least two thermocouples in the chimney. But as getting on the roof in December isn’t his idea of fun, for now, he’s starting with the lower one that’s mounted right above the stove. He popped a hole in the pipe to screw in a standard K-type probe, and tapped it a few times with the welder to make sure it wasn’t going anywhere.
From there, the thermocople connects to a MAX6675 amplifier, and then to the WeMos D1 Mini development board that’s been flashed with ESPHome. [Jay] provides the configuration file that will get the flue temperature into Home Assistant, as well as set up notifications for various temperature events. The whole thing goes into a 3D printed box, and gets mounted behind the stove.
This project is a great example on how you can get some real-world data into Home Assistant quickly and easily. In the future, [Jay] not only wants to add that second thermocouple, but also look into manipulating the stove’s air controls with a linear actuator. Here’s hoping we get an update as his woodstove learns some new tricks.
The QN8066 is a fun little FM transmitter chip. It covers the full FM broadcast band and has built-in DSP. You would find this sort of part in car cell phone adapters before every vehicle included Bluetooth or an AUX port. [Ricardo] has created an Arduino library to bring the QN8066 to the masses.
The chip is rather easy to use – control is handled with a common I2C interface. All the complex parts – Phase Locked Loop (PLL), RF front end, power management, and audio processing are all hidden inside. [Ricardo’s] library makes it even easier to use. One of the awesome features of the 8066 is the fact that it handles Radio Data System (RDS). RDS is the subcarrier datastream that allows FM stations to inject information like song title and artist into the signal. The data is then displayed on your radio screen.

![[Anthony] holding the EE8 kit](https://hackaday.com/wp-content/uploads/2025/10/EE8-banner.jpg?w=600&h=450)