3D printed fish leaping through waves

A Crazy Wave Automaton

[Henk Rijckhaert] recently participated in a “secret Santa” gift exchange. In a secret Santa, everyone’s name goes in a hat, and each person must pick a name without looking. Each gives a gift to the person whose name they drew.

Henk needed a gift for Amy, a friend who loves the water and water sports as well as maker-y things.  So he built her a wave automaton — a sea wave and fishies, and documented the build in this video.

The build is mostly plywood and 3D printed parts. We have to  think reprising it in a nice wood and brass would make a lovely project for a hobby wood and metalworker.

The bulk of the project is 30 plywood boards stacked up with spacers. Each board is mounted with a 3D printed stepped bushing on one end that rides in a horizontal slot. On the other end is a 3D printed eccentric riding in an oversized (about 5cm) hole. So the board moves in a circle at one end and back and forth at the other for a very nice simulation of an ocean wave. Continue reading “A Crazy Wave Automaton”

partially finished print, with the embedded animation

Flip Book Animations On The Inside Of 3D Prints

We’ve all seen 3D printed zoetropes, and drawn flip book animations in the corner of notebooks. The shifting, fluid shape of the layers forming on a 3D printer is satisfying. And we all know the joy of hidden, nested objects.

Hackaday alumnus [Caleb Kraft] has a few art pieces that all reflect all these. He’s been making animations by recording a 3D printer. The interesting bit is that his print is made of two objects. An outer one with normal infill that gives a solid form, and a layer cake like inner one with solid infill. It’s documented in this video on YouTube.

CAD model of the stack of frames

There are lots of things to get right.  The outer object needs to print without supports. The thickness of the “layer cake” layers determines the frame rate. I had to wonder how he triggered the shutter  when the head wasn’t in the way.

His first, experimental, piece is the classic ‘bouncing ball’ animation, inside a ball, and his mature piece is Eadward Muybridge’s “The Horse, In Motion” inside a movie camera.

We’ve covered [Caleb Kraft] before, of course. His Moon On A Budget piece is wonderful.  And we’ve covered a number of 3D printer animations. and 3D zoetropes.  We particularly were drawn to this one.

Thanks [jmc] for the tip!

Continue reading “Flip Book Animations On The Inside Of 3D Prints”

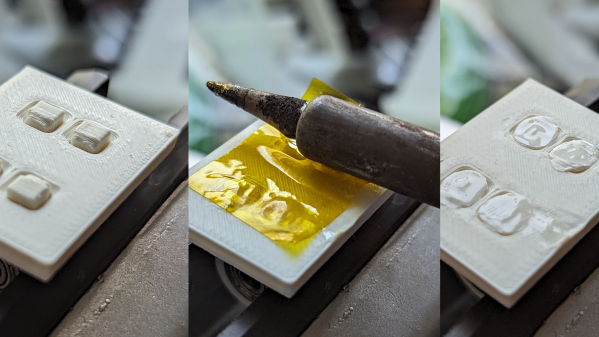
6 panel diagram of process

Add Conductive Traces On Vacuum Formed Plastic With 3D Printing

Surface conductors on vacuum formed parts appear in many hacks, from cosplay armor to 3D touch pads and smart objects. But making them has always been painful. Either they had to be hand painted after forming, which looked sloppy and was labor intensive, or they had to be printed with some difficult to use stretchable ink tech. [Freddie Hong] and his group have another solution, using tech most hackers already have – a 3D printer and a vacuum former.

plastic tray with electrodes to sense foil wrapped chocolates
Smart tray created by this method.

They 3D print the traces with conductive PLA filament directly onto a base plastic sheet, and then vacuum form the whole thing. The filament is happy to deform when heated – it’s printer filament.

We like this process.  We’ve found conductive filament isn’t reliably resistive across vertical layers, but is reliable in the XY plane. Their method only requires one layer. Also, they suggest 3D printing a layer of non conductive PLA atop most of the conductor, like a PCB solder mask.

Conductive filament has a fair bulk resistance. They suggest electroplating it before applying the top mask layer. They also are exploring 3D printing logos, stripes, and such with colored filament, or even making surface detail like rivets on model parts or adding thickness where the plastic thins during vacuum forming.

Designing the 3D print requires guessing what bit of plastic sheet ends up where in the vacuum formed final part.  His group used a commercial program, t-sim,  to do the prediction and Grasshopper to import the result into Rhino3D. This seems a lot for a home hacker. Drawing lines on a test sheet and vacuum forming seems simpler.

We’ve looked at vacuum forming before. We did a piece on 3D printing bucks , and covered [Ted Brull]’s Kevo vacuum former back in 2015.

Thanks to [howielowe] for the tip.

Desktop Performance In A Custom Mac Laptop

Most of us either own or have used a laptop at some point. For traveling, as a student, or even for browsing Hackaday on the couch in front of the TV, they are pretty much indispensable. They do tend to have a sharp performance reduction compared to a desktop though thanks to the thermal and battery limitations of a portable form factor. [Scott Yu-Jan] wanted to solve that in his own life by building a custom Mac laptop with none of these downsides.

Noticing that a modern iPad Mini has exactly the same width of his Mac Mini, [Scott] set about combining the two devices into a single unit that he could assemble when traveling. A 3D printed case with a traditional laptop clamshell design takes care of physically combining these two devices, and a USB-C cable between the two takes care of combining them in software thanks to Apple’s Duet program. While this has better performance than a Macbook Pro it might actually have some perks, since Apple continues to refuse to make a laptop with a touchscreen.

There are some downsides, of course. The price is higher than a comparable Macbook Pro for the iPad and Mac together, plus it doesn’t include a keyboard or mouse. It also has no battery, so it needs to be plugged in. In the follow-up video linked below, though, [Scott] notes that for him this still made sense as he uses the Mac and iPad individually already, and only works remotely at places that have power outlets readily available. For the average person, though, we might recommend something different if you really need an esoteric laptop-like machine.

Thanks to [Varun] for originally sending in this tip!

Continue reading “Desktop Performance In A Custom Mac Laptop”

Upgraded 3D Printed Tank Gets Better Drivetrain And Controls

When it comes to 3D printed builds, they’re often limited in size due to the small build volume of most printers. However, [Ivan Miranda] has always gone big with his builds, and his latest tank design shows that off in spades.

Looks comfy!

[Ivan] has been working on printed human-sized tanks for years, and his latest revision aims to solve many of the problems that have hampered its performance in the past. A belt drive is the first major upgrade, aiming to improve the reliability of the drivetrain which has been a pain point in the past. The motor mounts also get built out of aluminium this time to help keep things cooler, as melting was a potential concern previously.

The tank’s controls are also upgraded, this time using a simple pedal system to control the brushless motors for easier driving. There’s even a printed seat for better ergonomics. The result is a giant tank big enough for an adult human, with the bonus that it’s now easy to steer and no longer requires [Ivan] to lie down inside to fit.

[Ivan’s] big printers are key to his success on big builds. One new part for the tank weighs a full 5.8 kg, printed in just 2.5 days! We can’t wait to see what giant thing he builds next. Word is the tank will be getting a turret, too. Video after the break.

Continue reading “Upgraded 3D Printed Tank Gets Better Drivetrain And Controls”

Recycling Soda Bottles Into Filament To Print Smaller Soda Bottles

Thermoplastics are great, because you can melt them down and reform them into whatever you like. This is ably demonstrated by [The Q] by recycling old soda bottles into usable 3D printer filament.

Cute, huh? Why aren’t Coca-Cola making these? Tiny fake grocery items already proved hugely popular in Australia.

Soda bottles are usually made out of PET plastic, or polyethylene terephthalate, which is one of the most popular thermoplastics in modern society. A soda bottle can be cut into a continuous long, thin strip with the use of a simple hand-operated machine that slices the bottle with a blade. This strip of plastic can then be fed through a heated nozzle in order to produce filament for 3D printing. [The Q] demonstrates both parts of this process, including using a motorized reel to take up filament as the bottle material is fed through the extruder.

The filament is then demonstrated by printing tiny versions of soda bottles. [The Q] fills these with soda and gives them the appropriate lids and labels for completion’s sake. It’s a neat way to demonstrate that the filament actually works for 3D printing. It bears noting that such prints are almost certainly not food safe, but it’s really a proof of concept rather than an attempt to make a usable beverage container.

Like similar builds we’ve seen in the past, the filament is of limited length due to the amount of plastic in a single bottle. We’d like to see a method for feeding multiple bottles worth of plastic into the extruder to make a longer length spool, as joining lengths of filament itself can be fraught with issues. Video after the break.

Continue reading “Recycling Soda Bottles Into Filament To Print Smaller Soda Bottles”

Mini Linear Actuators From DVD Drive Parts

For many years now a source for some of the smallest and cheapest home made CNC mechanisms has been the seemingly never-ending supply of surplus CD and DVD-ROM drives. The linear actuator that moves the laser may not be the longest or the strongest, but it’s free, and we’ve seen plenty of little X-Y tables using CD drives. It’s these mechanisms that [Nemo404] has taken a little further, freeing the lead screw and motor from the drive chassis and placing them in a 3D-printed enclosure for a complete linear actuator that can be used in other projects. (Video, embedded below.)

There seems to be no positional feedback, not even the limit switch that would grace a typical CD drive, but aside from that it makes for a compact unit. There are two versions, one for a linear bearing and the other for the brass bushes found in CD drives. It’s unclear how strong the result is, but it appears to be strong enough to demonstrate lifting a small container of screws.

Should you need to make your own actuator then aside from the easy-to-obtain old CD drive the files can be found on Thingiverse. And introduce yourself to the world of CD drives for CNC machines by taking a look at this mill.

Thanks [BaldPower] for the tip!

Continue reading “Mini Linear Actuators From DVD Drive Parts”