Bringing Zelda Classic To The Browser

Finding a device or app that isn’t a web browser doesn’t seem easy. These days, it is either connected to the web (looking at you ESP32) or is just a web browser pretending to be something else (a la electron, PWAs, or React Native). So, of course, it is on us to create more and more exciting things to browse. [Connor Clark] is one of those people, and he brought Zelda Classic to the browser.

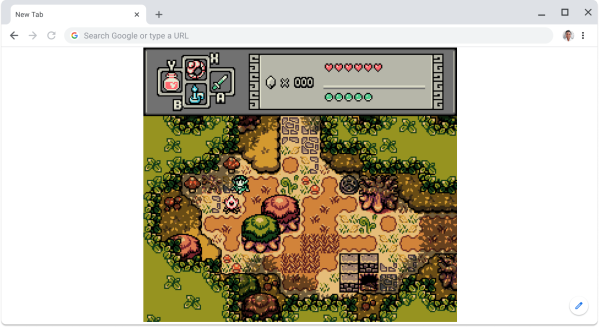
Zelda Classic (ZC) isn’t an official Zelda game. Instead, it’s an old engine designed to run the world in the OG Legend of Zelda and be easily modified to support hundreds of different games. To date, there are over 600 games submitted by a large community. ZC is an Allegro-based Windows-only game, so the first step was to bust out Emscripten to start tweaking the C++ code to support a web environment. Rather than completely port the huge codebase over from Allegro, [Connor] made the jump from Allegro 4 to 5. Allegro 5 has SDL as a backend and adds support for Emscripten.

Unfortunately, the 4 to 5 wasn’t as simple as changing the dependency. The API was wholly re-written, and there is a handy adapter known as Allegro Legacy to help transition a project from one to another. After squashing a multitude of bugs, it was a relatively painless procedure. After a quick detour getting music and level data working, [Connor] faced his next challenge: multi-threading. Efforts to move the main loop off of the browser thread and into a web worker ran into issues with having to yield in loops, deadlocks, and recursive mutexes. Finally, he added music and gamepad support after fixing several bugs in SDL and Allegro.

It’s an incredible journey with many tips and tricks for debugging seemingly intractable bugs. The code is up on GitHub, or jump in and start playing if you’re interested. Why not check out this browser-based OpenSCAD as well?

partially finished print, with the embedded animation

Flip Book Animations On The Inside Of 3D Prints

We’ve all seen 3D printed zoetropes, and drawn flip book animations in the corner of notebooks. The shifting, fluid shape of the layers forming on a 3D printer is satisfying. And we all know the joy of hidden, nested objects.

Hackaday alumnus [Caleb Kraft] has a few art pieces that all reflect all these. He’s been making animations by recording a 3D printer. The interesting bit is that his print is made of two objects. An outer one with normal infill that gives a solid form, and a layer cake like inner one with solid infill. It’s documented in this video on YouTube.

CAD model of the stack of frames

There are lots of things to get right.  The outer object needs to print without supports. The thickness of the “layer cake” layers determines the frame rate. I had to wonder how he triggered the shutter  when the head wasn’t in the way.

His first, experimental, piece is the classic ‘bouncing ball’ animation, inside a ball, and his mature piece is Eadward Muybridge’s “The Horse, In Motion” inside a movie camera.

We’ve covered [Caleb Kraft] before, of course. His Moon On A Budget piece is wonderful.  And we’ve covered a number of 3D printer animations. and 3D zoetropes.  We particularly were drawn to this one.

Thanks [jmc] for the tip!

Continue reading “Flip Book Animations On The Inside Of 3D Prints”

The TPM module that Viktor designed, inserted into the motherboard

TPM Module Too Expensive? DIY Your Own Easily!

Since Windows 11 has announced its TPM module requirement, the prices for previously abundant and underappreciated TPM add-on boards for PC motherboards have skyrocketed. We’ve been getting chips and soldering them onto boards of our own design, instead – and [viktor]’s project is one more example of that. [Viktor] has checked online marketplace listings for a TPM module for his Gigabyte AORUS GAMING 3 motherboard, and found out they started at around 150EUR – which is almost as much as the motherboard itself costs. So, as any self-respecting hacker, he went the DIY way, and it went with hardly a hitch.

Following the schematic from the datasheet, he quickly made a simple KiCad layout, matching it to the pinout from his motherboard’s user manual, then ordered the boards from PCBWay and SLB9665 chips from eBay. After both arrived, [viktor] assembled the boards, and found one small mistake – he designed a module for 2.54mm pin headers, but his motherboard had 2.0mm headers. He wired up a small adapter to make his assembled V1.0 boards work, and Windows 11 installed without any TPM complaints. He shows that he’s designed a new, V1.1 version with an updated connector, too, and published its (untested but should work) design files for us on GitHub. These modules can vary, by manufacturer and motherboard series, but with each module published, a bunch of hackers can save money – and get a weekend project virtually guaranteed to work out.

Regardless of whether the goal of running Windows 11 is ultimately worthwhile, it has been achieved. With scalpers preying on people who just want to use their hardware with a new OS, rolling your own TPM PCB is a very attractive solution! Last time we covered a DIY TPM module for ASrock server motherboards, we had a vivid discussion in the comments, and if you’re looking to create your own TPM board, you could do worse than checking them out for advice and insights!

The MCH2022 Badge Has Landed!

As spring slowly slides into summer here in Europe where this is being written, the warm weather is a reminder that on the horizon are the summer’s crop of hacker camps. The largest European one this year will be the Dutch MCH2022 near the end of July, and to whet our appetite they’ve made public some details of their badge. And true to the past form of Dutch camps, it’s rather an impressive build.

Since this is another piece of work from badge.team it has the expected ESP32 module, but alongside it on the elegantly-designed PCB there’s an RP2040 and a Lattice ICE40UP5K FPGA. The ESP is there to run the badge team firmware which even includes backwards compatibility with the original SHA2017 badge, the RP2040 ties everything together and provides a multitude of USB peripherals, and the FPGA is there to run user code. From the front, the badge has a Game Boy Advance-style form factor with a large colour TFT screen and the usual joystick and buttons. Other peripherals include a brace of addressable LEDs, a pair of nifty sensors from Bosch, and a 16-bit stereo audio channel that even powers a small onboard mono speaker when no headphones are connected.

The hardware may be slick, but it’s the badge.team firmware that makes this as special as all their previous offerings. It offers the chance to easily write apps either in MicroPython for the ESP32, or as payloads for the FPGA, and what makes it special is that it comes with an online app store from which all the apps can be downloaded. We’re told that it will be able to run a range of emulators out of the box, so we’re really looking forward to seeing the final version at the event. Meanwhile they’ve released a demo video that you can see below the break, and if you’re curious you can take a look at its SHA2017 badge ancestor.

Continue reading “The MCH2022 Badge Has Landed!”

2022 Hackaday Prize: ArmaLamp Provides Light, No Matter What

Instant access to electric light is a luxury that most of us take for granted, but in times of crisis, the power is often the first thing to go. So whether you’re worried about a natural disaster or the outbreak of war, a reliable source of light is a must-have in your emergency kit. Creator [bobricius] calls his is ArmaLamp the “Armageddon resistant night lamp”, and while we’re not eager to test that particular claim, it certainly looks robust enough to get you through some tough times.

The basic idea behind the ArmaLamp is to make a light source so simple that, outside of being physically destroyed, it can’t fail. That means deleting the mechanical power switch and designing the circuit so the LED light will kick on automatically in the dark. Rather than using a traditional rechargeable battery, the solar powered ArmaLamp stores its charge in a 10 farad supercapacitor that can be charged and depleted daily without having to worry about long-term degradation.

Charging the ArmaLamp with a simple solar cell is clearly out of the question as it would represent not just a single point of failure, but a particularly fragile one at that. Instead, [bobricius] is using an array of six BPW34 photodiodes that come in a hard plastic package. Combined with an efficient driver circuit that can run the LED even when the supercap is down to 0.3 V, leaving the ArmaLamp outside during the day should provide you with four hours of ultra-reliable light every night.

Continue reading “2022 Hackaday Prize: ArmaLamp Provides Light, No Matter What”

Healing Wounds With The Power Of Electricity

Once upon a time, even a simple cut or scrape could be a death sentence. Before germ theory and today’s scientific understanding of medicine, infections ran rampant and took many lives.

While we’re now well-armed with disinfectants, dressings, and antibiotics, scientists are continuing to investigate new and unique methods to improve the treatment of wounds. As it turns out, a little electricity might actually help wounds heal faster.

Continue reading “Healing Wounds With The Power Of Electricity”

A (Nearly All) New Commodore 64

The Commodore 64 remains one of the most influential of the 8-bit home computers four decades after its launch, so not surprisingly there is a huge enthusiast community surrounding it. With so many produced over the years it was available one might think that there would be no shortage of surviving specimens, but sadly time and component failure have taken their toll and the classic micro is not always the most reliable kid on the block. Thus a cottage industry has sprung up supplying C64 parts, leading [The Retro Shack] to have a go at making a new one entirely from scratch.

As you can see in the video below the break it’s not quite an entirely new ’64, as parts including some of the custom silicon come from failed boards. The PCB is a modern recreation of the original and the SID sound chip is an ARMsid though, and most of the parts come from a handy bagged-up kit that makes assembling the BoM much easier. Instead of the big silver box of the original RF modulator is a modern composite board, and there are a few issues with minor connector part differences.

Assembly is simply a very long through-hole soldering process, and once he’d completed it there was the expected refusal to work. We’ve all been there, and eventually he traced it to an incorrectly fitted chip. If you think you’ve seen a few brand new C64s here before you’d be correct, one of them even used LEGO for those elusive keycaps.

Continue reading “A (Nearly All) New Commodore 64”