Somehow or another, the modern hackerspace isn’t centered around table saws, drill presses, band saws, lathes, or mills. The 3D printer and laser cutter are the tools of the future. No one has yet figured out how to build a 3D printer or laser cutter out of several hundred pounds of cast iron, so until then [Chad] will lead the charge modifying old table saws into these modern machine tools.
The build logs for the laser engraver and 3D printer are pic heavy and text lean, but there’s enough detail to make a few educated guesses. Both of these machines use Craftsman table saws from the early to mid 1950s for the chassis. Inside each chassis, the rails, belts, and shafts that make up a Cartesian bot are installed, and the electronics are tucked gently inside.
There’s a lot of creativity in this build; the electronics for the 3D printer are tucked away in the shell of the old motor. For the laser cutter, the focus adjustment is the same knob that used to lock the blade at an angle.
While this may look like a waste of two beautiful tools, keep in mind these are equivalent to contractor saws you can pick up at Home Depot for $500 today. They’re not professional cabinet saws, they just look really pretty. They’re still a solid piece of metal, though, and refurbishing the frames into useful tools is probably the best thing you could do with them.
The Midwest RepRap Festival is over – forever. This was the last one. Apparently enough people complained that Goshen, Indiana wasn’t in the midwest. The number of Dairy Queens I passed contradicts this, but whatever. Next year, there’s going to be a different con in Goshen. Same content, different name. If you have a suggestion, you know where to put it.
Contaminated with masterbatch
The world’s largest 3D printed trash can. People were taking pictures of them standing next to it.
What the infill looks like on the PartDaddy
The Groot fail
I promised the world’s largest 3D printed trash can, and I gave you the world’s largest 3D printed trash can. This gigantic orange vase was printed on the PartDaddy, SeeMeCNC’s 18-foot tall delta printer a few months ago at the NYC Maker Faire. I have been using this as a trash can in my basement since then, making me one of the only people who have their trash can on Wikipedia.
A failed print on Saturday morning
Speaking of the PartDaddy, this is what a fail looks like. The first PartDaddy print was a Groot, a 13-hour long print job. It was left running overnight, but it ran out of PLA pellets sometime around 4 in the morning. If you’re wondering what the black band is around the Groot’s face is, here’s the breakdown:
The PartDaddy sucks PLA pellets up from a trash can (that’s not 3D printed), and dispenses it into a hopper above the print head. This hopper was 3D printed on the PartDaddy, and there is still a little bit of colarant dust in there. When the PLA pellets run out, that dust is embedded in the extrusion. When you realize that masterbatch is only about 5% of the finished plastic, it doesn’t take much black dust to discolor a print.
Yes, this is a print fail that could have been fixed by having an all-night bash. A few other people left their printers running overnight including [The Great Fredini] and his Scan-A-Rama. This was a Rostock Max that had something wonky happen with the Bowden. There was filament everywhere.
How about some Star Wars droids? An R2 from the Droid Builder’s Club was there, but there was also the beginnings of a completely 3D printed Roger. While we’re on the subject of plastic robots that will fall apart at a moment’s notice, there was a K’NEX 3D printer. Yes, it’s made almost entirely out of K’NEX, and it did work at one time. Those orange parts sitting next to it? Those came out of the K’NEX printer. If you’re looking for the definitive RepStrap, there ‘ya go.
Roger Roger, or a B1 Battle Droid
K’NEX Printer
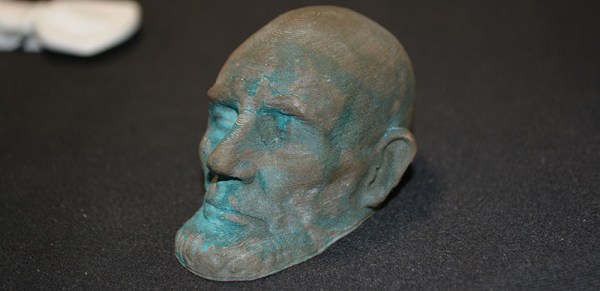
Lincoln death mask in bronzefill. Patinaed with vinegar.
NEW FILAMENTS
For the last few months, metal filaments – PLA with tiny particles of copper, brass, bronze, iron, or aluminum have been available. MRRF was the first place where you could see them all together. A few things of note: these filaments are heavy – the printed objects actually feel like they’re made out of metal. They’re actually metal, too: the iron-based filaments had a tiny bit of red corrosion, and the Lincoln death mask above was treated with acetic acid. These filaments are also expensive, around $100 for 1kg. Still, if you want to print something that will be around in 100 years, this is what you should get.
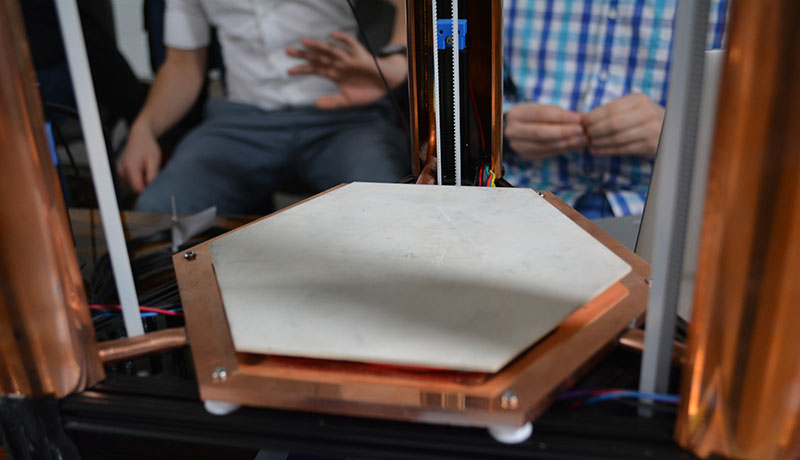
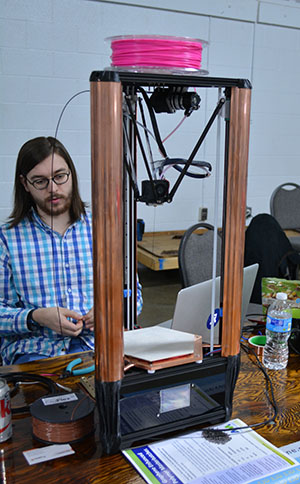
The most beautiful printer ever
MRRF should have had a contest for the best looking 3D printer at the show. A beautiful delta from Detroit Rock City would have won:
That white hexagon in the center is a ceramic PCB that I’m told cost an ungodly amount of money. Underneath the ceramic build plate, there’s a few Peltiers between the bed and the large copper heat sink. The heat sink is connected to the three risers by heat pipes, making the entire printer one gigantic heat sink. Why would anyone make such an amazing art deco printer? For this.
Because you can use Peltiers to heat and cool a bed, a little bit of GCode at the end of a print will cool the bed to below room temperature. If you do your design right, this means the print will just fall over when it’s done. When the print bed is cooling, you can actually hear the bond between the bed and print cracking. It’s beautiful, it’s cool, and I’m told this printer will make its way to hackaday.io soon.
There you go, the best and coolest from the last Midwest RepRap Festival ever. There will never be another one. It only needs a better name, and [John] at SeeMeCNC is great at coming up with names. Just ask what VIP is a backronym of.
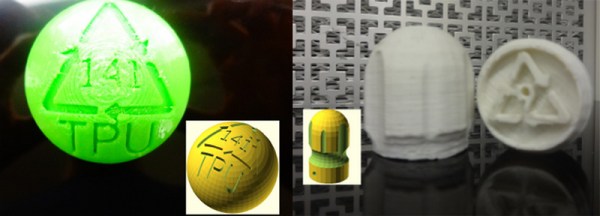
Every little plastic bauble you interact with has some sort of recycling code on it somewhere. Now that we’re producing plastic 3D printed parts at home, it would be a good idea to agree on how to recycle all those parts, and [Joshua Pearce]’s lab at Michigan Tech has the answer; since we’re printing these objects, we can just print the recycling code right in the object.
The US system of plastic recycling codes is particularly ill-suited for identifying what kind of plastic the object in question is made of; there are only seven codes, while China’s system of plastic identification uses 140 identification codes. This system for labeling 3D printed parts borrows heavily from the Chinese system, assigning ABS as ‘9’, PLA as ’92’, and HIPS as ‘108’.
With agreed upon recycling codes, the only thing left to do is to label every print with the correct recycling code. That’s an easy task with a few OpenSCAD scripts – the paper shows off a wrench made out of HIPS labeled with the correct code, and an ABS drill bit handle sporting a number nine. 3D printing opens up a few interesting manufacturing techniques, and the research team shows this off with a PLA vase with a recycle code lithophane embedded in the first few layers.
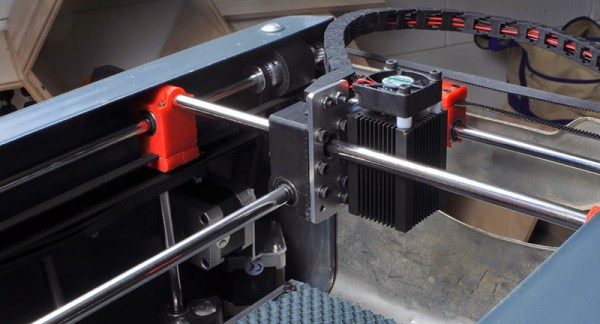
Every filament-based 3D printer you’ll find today heats plastic with resistive heaters – either heater cartridges or big ‘ol power resistors. It’s efficient, but that will only get you so far. Given these heaters can suck down only so many Watts, they can only heat up so fast. That’s a problem, and if you’re trying to make a fast printer, it’s also a limitation.
Instead of dumping 12 or 24 VDC into a resistive heater, induction heaters passes high-frequency AC through a wire that’s inductively coupled to a core. It’s also very efficient, but it’s also very fast. No high-temperature insulation is required, and if it’s designed right, there’s less thermal mass. All great properties for fast heating of plastic.
A few years ago, [SB] over on the RepRap blog designed an induction heater for a Master’s project. The hot end was a normal brass nozzle attached to a mild steel sleeve. A laminated core was attached to the hot end, and an induction coil wrapped around the core. It worked, but there wasn’t any real progress for turning this into a proper nozzle and hot end. It was, after all, just a project.
Finally, after several years, people are squirting plastic out of an induction heated nozzle. [Z], or [Bulent Unalmis], posted a project to the RepRap forums where he is extruding plastic that has been heated with an induction heater. It’s a direct drive system, and mechanically, it’s a simpler system than the fancy hot ends we’re using now.
Electronically, it’s much more complex. While the electronics for a resistive heater are just a beefy power supply and a MOSFET, [Z] is using 160 kHz AC at 30 V. That’s a much more difficult circuit to stuff on a printer controller board.
This could be viewed as just a way of getting around the common 24V limitation of common controller boards; shove more power into a resistor, and it’s going to heat faster. This may not be the answer to hot ends that heat up quicker, but at the very least it’s a very neat project, and something we’d like to see more of.
You can see [Z]’s video demo of his inductive hot end below. Thanks [Matt] for the tip.
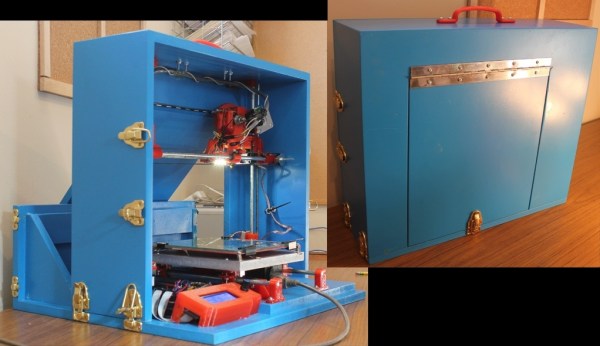
The great thing about RepRaps are that there are so many to choose from! No matter what features or design intent you could want, there is probably a RepRap for that. Even so, there has been a recent addition to the RepRap family. Creator [jlguil] calls it the Case-Rap, and for good reason, the frame of the printer folds up into a suitcase.
The Case-Rap is inspired by the Mendel90 which tries to improve on the original Mendel by replacing the threaded rods for a more rigid sheet material frame with bracing to keep the X, Y and Z axes perpendicular to each other. The Case-Rap goes a little further with the design to have the frame also perform double duty as a travel case.
Check out the video after the break, the printer is actually built in 2 complete separate assemblies. The X and Z axes are mounted in a 4-sided wooded frame. The Y axis and the electronics are mounted on a 2-sided wooden frame. When the frame pieces are latched together in one orientation, they conceal the printer inside a suitcase-sized box. The latch positions were thoughtfully placed so the frame pieces could also be latched together in ‘printer mode’. Setting up and breaking down the printer takes all of 30 seconds.
You may think a super portable printer has to be small… but you’d be wrong. The Case-Rap has a commendable 8x8x8 inch print area. According to [jlguil], the total DIY cost comes in around 350$ CAD, which is not too bad for a 3D printer, and pretty good for one that is unique, portable and capable.
Nintendo is well known for… odd… hardware integration, but this video takes it to a new level. It’s a Gamecube playing Zelda: Four Swords Adventure, a game that can use a Game Boy Advance as a controller. [fibbef] is taking it further by using the Gamecube Game Boy Advance player to play the game, and using another GBA to control the second Gamecube. There’s also a GBA TV tuner, making this entire setup a Gamecube game played across two Gamecubes, controlled with a Game Boy Advance and displayed on a GBA with a TV tuner. The mind reels.
TI just released a great resource for analog design. It’s the Analog Engineer’s Pocket Reference, free for download, if you can navigate TI’s site. There are print copies of this book – I picked one up at Electronica – and it’s a great benchtop reference.
A few months ago, a life-size elephant (baby elephants are pretty small…) was 3D printed at the Amsterdam airport. A model of the elephant was broken up into columns about two meters tall. How did they print something two meters tall? With this add-on for a Ultimaker. It flips an Ultimaker upside down, giving the printer unlimited build height. The guy behind this – [Joris van Tubergen] – is crazy creative.
And you thought TV was bad now. Here’s the pitch: take a show like Storage Wars or American Pickers – you know, the shows that have people go around, lowball collectors, and sell stuff on the Internet – and put a “Tech” spin on it. This is happening. That’s a post from a casting producer on the classic cmp message boards. Here’s the vintage computer forums reaction. To refresh your memory, this is what happens when you get ‘tech’ on Storage Wars. Other examples from Storage Wars that include vastly overpriced video terminals cannot be found on YouTube. Here’s a reminder: just because it’s listed on eBay for $1000 doesn’t mean it’ll sell on eBay for $1000.
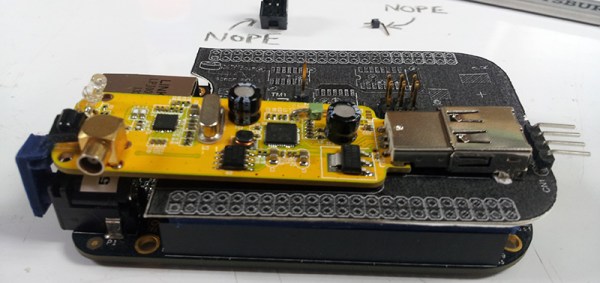
Laying out one PCB, sending it out to a fab, stuffing it with components, and having the whole thing actually work when you’re done is a solved problem. Doing the same thing and having it plug in to another PCB… well, that’s a bit harder. Forget about building a PCB and having it fit inside an enclosure the first time.
The usual solution to this problem is printing the board to be fabbed on a piece of paper, take some calipers, and measure very, very carefully. Extra points for sticking a few components you’re worried about to the paper before lining the mechanical prototype up to the existing board. [N8VI] over at the i3 Detroit hackerspace had a better idea – print the whole thing out on a 3D printer.
[N8VI] is working on a software defined radio cape for a BeagleBone. He was a bit concerned about a few caps getting in the way of a board stack. This was tested by printing out a bit of plastic in the shape of the new board, adding header spacers and parts that might be troublesome.
While the idea is great, there’s not much in the way of a software solution or a toolchain to make plastic copies of completed boards. We know rendering 3D objects from KiCAD is rather easy, but there aren’t many tools available for those of us who are still stuck with Eagle. If you know of a way to print populated boards, drop a note in the comments.


 That white hexagon in the center is a ceramic PCB that I’m told cost an ungodly amount of money. Underneath the ceramic build plate, there’s a few Peltiers between the bed and the large copper heat sink. The heat sink is connected to the three risers by heat pipes, making the entire printer one gigantic heat sink. Why would anyone make such an amazing art deco printer?