Keeping Tabs On Your Pets’ Busy Lives

mouse_wheel_tracking

[Stephen’s] daughter has a pair of mice she keeps as pets, who happen to be quite active at night. After they kept her awake for an entire evening by running like mad in their treadmill, they were moved from her bedroom. Since they were so active in the treadmill, [Stephen] thought it would be cool to try measuring how much the mice actually ran each night.

To keep track of their activity, he built a simple circuit that records how many rotations the treadmill makes. He fitted it with a rare earth magnet, installing a reed switch on the outside of case that ticks off each spin of the wheel. Any time the wheel starts moving, his PIC begins counting the rotations, displaying them on a 7-segment LED display. To mitigate data loss in the event of a power outage, the PIC stores the current number of rotations in its EEPROM every 10 seconds or so.

The counter keeps track of the total number of rounds the mice have completed, which his daughter uses to manually calculate their running sessions. Since they started tracking the mice, they have run over 700,000 rounds, sometimes completing as many as 20,000 in an evening.

We think it’s a pretty cool project, especially since it makes it fun for his daughter to stay involved in her pets’ lives.

Hacking Cakes With LEDs, The Sequel!

A few weeks back we ran a piece about the convergence of making and baking in an attempt to create a cake festooned with working LEDs. The moral was that not every creative idea ends in victory, but we applauded the spirit it takes to post one’s goofs for the whole internet to see and to learn from.

[Craig]’s LED matrix proved unreliable…and the underlying cake didn’t fare much better, resembling that charred lump in the toaster oven in Time Bandits. The cakes-with-lights meme might have died right there if not for a fluke of association…

Continue reading “Hacking Cakes With LEDs, The Sequel!”

Washing Machine Mechanical Timer Replaced With Microcontroller

After the electromechanical timer on [Paul Canello’s] washing machine broke for the third time he decided he needed to stop repairing it and find a more permanent fix. He decided to build his own microcontroller-based system for washing his clothes (translated). Caution: The image links on [Paul’s] page seem to be broken and will unleash a never-ending storm of empty pop-up windows if you click on them. We’ve embedded all of the images after the break to save you some hassle.

The controller on a washing machine is nothing more than a mechanical alarm clock. It starts the cycle, then moves through various modes based on the passage of time. [Paul] started his hack by observing how long the delay between cycles was meant to be, and recording which parts of the machine were switched on and off at each stage.

It turns out that when the mechanical knob is turned, it reroutes how water flows through the detergent chamber. Since that knob won’t be in the new system [Paul] came up with a way for the microcontroller to handle this by using a servo motor. The rest of the control involves relays to control the motor, and solenoid valves for the water. There are also pressure switches that give feedback for the level of the water in the machine. A PIC 16F872 serves as the new controller, with the help of a 7 segment display, a buzzer, and a pair of buttons as the user interface.

This is an older project, but after reading about the Arduino controlled dishwasher [Ramiro] sent us a link. Thanks! Continue reading “Washing Machine Mechanical Timer Replaced With Microcontroller”

Fan Throttling For PS3 Temperature Control

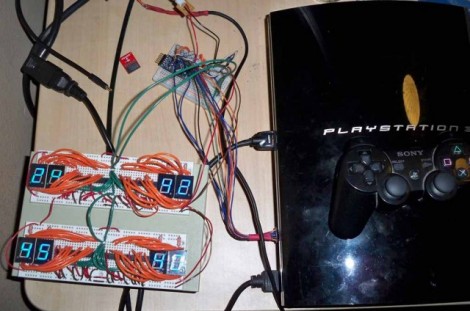
This setup will let you monitor Play Station 3 temperatures and throttle the cooling fan accordingly. [Killerbug666] based the project around an Arduino board, and the majority of the details about his setup are shared as comments in the sketch that he embedded in his post. He installed four thermistors in his PS3 on the CPU heatsink, the GPU heatsink, the Northbridge or Emotion Engine, and one in front of the air intake grate to measure ambient room temperature.

Above you can see the setup he used to display temperatures for each sensor on a set of 7-segment displays. The project also includes the ability to push this data over a serial connection for use with a computer or a standalone system.

The project is still in a prototyping stage. It works, but he likens the fan throttling to the sound of a car engine constantly revving. Future plans include smoothing out the fan speed corrections and scaling down the size of the hardware used in the system. We’d suggest doing away with three of the displays and adding a button that lets you select which set of sensor data you’d like to display.

[Thanks User]

Prototyping The New Office Clock

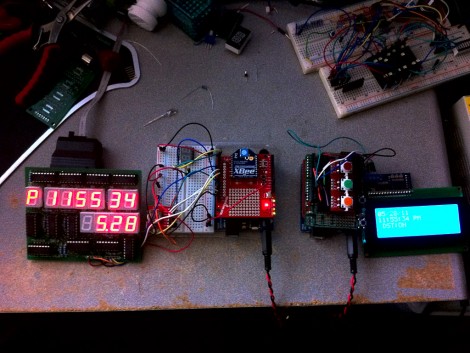
[Damage] was tapped to build a new clock to hang on the wall at the office. He got a hold of some 6.5 inch seven segment displays for the hours and minutes, as well as some 4.5 inch modules for the date and month. Rather than jump right in with the large hardware (especially because he’s waiting for the PCB order to arrive)  he built this prototype with more commonly sized displays.

His build is Arduino powered. In the video after the break he mentions the temperature compensated crystal oscillator that keeps the time. We’d wager that’s the DS3234 based RTC module that Sparkfun sells. This is the same chip family as the Chronodot and it was our choice for the Ping Pong Clock.

The finished clock will hang high on wall, out of reach when you need to set the time. This shouldn’t need to be done much – if ever – since that RTC includes a backup battery. But [Damage] took the time to develop a remote programming device anyway. Using another Arduino, an LCD display, and an Xbee pair he whipped up a remote that can be used to navigate and change the main unit’s settings.

Continue reading “Prototyping The New Office Clock”

Egg Clock (it’s Egg-ceptional)

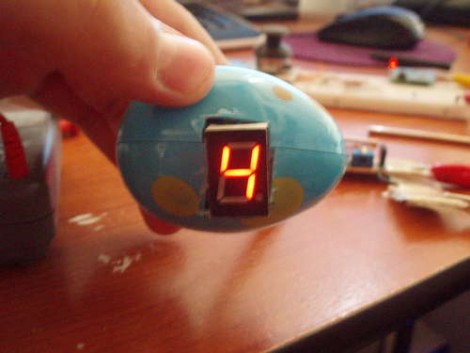
Easter is over and with some plastic eggs still on hand, [Franspaco] was looking for something to do with them. He decided to use an egg as an enclosure for a digital clock.

You can see that the finished project uses just one 7 segment LED display to show the time. A scrolling number method is used to delineate each digit of the 24-hour time readout. The display will go blank, followed by two numbers for the hours, a dash as a separator, and finally two more digits for the minutes. A PICAXE microcontroller drives the clock, but for accuracy a DS1307 does the timekeeping.

[Franspaco] etched his own circuit board that is sized to fit perfectly, housing the two chips, an LED, and a programming header. The on-board LED blinks at 1 Hz, giving some inner glow to the plastic shell. He accomplished most of his goals, but was unable to fit the batteries inside of one egg, prompting the need for a tethered power-egg. If he moves to surface mount components for the next generation of this device we think he’ll have no problem fitting a small battery (like an A23) inside.

DTMF Shield Aimed At Ham Controlled Arduino

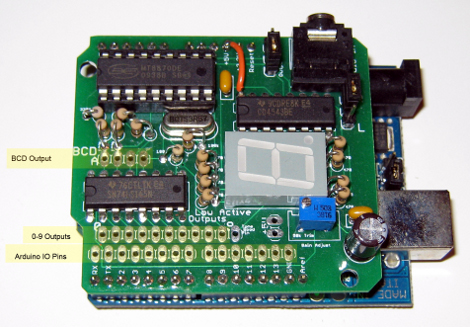
[Colin] wanted a way to reliably control an Arduino via ham radio. One of the easiest methods of automated radio control makes use of Dual-Tone Multi-Frequency signalling. To those who aren’t into amatuer radio you probably recognized DTMF as the touch-tone system for telephone communications. [Colin] built a shield that has an audio input and can decode DTMF signals.

The hardware is based around an MT8870 DTMF decoder chip. This is a popular choice for DTMF hardware because it does all of the decoding work for you. Whenever a valid tone is detected it outputs the associated value in binary on four output pins. There is a fifth pin that strobes after each new tone. [Colin’s] design offers a lot of feedback for what’s going on with the input signal. The DTMF value is displayed on a 7-segment display (controlled completely in hardware), the value is output on for Binary Coded Decimal pins, and mapped to a set of ten pins which pull to ground to match the digit received.