Analog Robot Navigates Around The Workshop With Ease

556_wall_following_robot

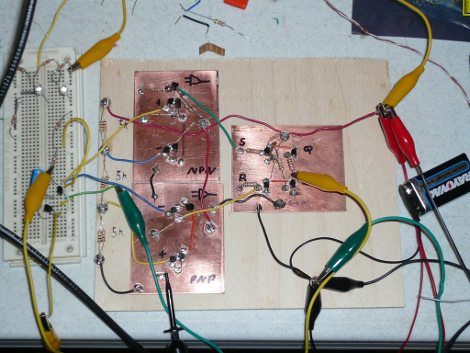
Many of the robots we feature here are driven by some sort of microcontroller, whether it be an Arduino, Launchpad, Picaxe, etc. Rarely do we see a robot however, using analog circuits to perform higher-level functions typically relegated to those more complex controllers. Instructables user [hasn0life] built such a robot recently, which he entered into a contest at his college. After hearing about the 555 design contest from a friend, he tweaked his project and created a wall-following robot using a 556 timer.

The robot is fairly simple when you take a close look, though that does not take away from the elegance of his design. A single IR sensor is used to detect objects in the robot’s periphery, guiding the robot along. When the robot gets too close to a wall, one wheel reverses, pulling the robot away. Once the robot has moved a sufficient distance, the other wheel is reversed in order to straighten out the robot. Then, both wheels work in concert to get the robot moving forward.

Take a look at the video below to watch the robot navigate its way around his workshop, and if you are interested in learning more about analog robotics, check out this post from a few days back.

Continue reading “Analog Robot Navigates Around The Workshop With Ease”

Analog Robotic Concepts

Everyone’s getting on board with the 555 timer projects. But [Tom] didn’t just come up with one project, he shared a slew of ideas related to analog robotics. They’re center around servo motor control. You can see in the video after the break he has a pleasing way of sharing a lot of details while also making an easy to view demonstration video. He’ll put up a schematic for about one second and then move on, saving those that don’t care about the details by not droning on.

The first schematic that flashes by is the main circuit for controlling the servo motor. The rest of the concepts build from this circuit, using light, sound, flex, and other sensors as inputs. For instance, the setup above is using a light sensor. When the ball blocks the light the servo moves that vertical rod hitting it out of the way. When it swings back the process repeats. It’s striking how lifelike the reactions are, reminding us of insect movements. But this is really just the tip of the iceberg as he’s got a lot of future video ideas that we can’t wait to see.

Continue reading “Analog Robotic Concepts”

Building A 555 Timer From Discrete Components

The 555 Design Contest shook a whole bunch of really creative circuits out of the trees, hence the 555-heavy content lately. While not technically part of the contest, [esalazar] wanted to know what made the 555 tick, literally! He started working on the project in a circuit simulator, then ultimately ended up building the three main logic blocks inside the familiar timer on pieces of copper-clad board. He’d built a 555 using discrete components.

While this isn’t 100% compatible with the classic 555 IC, it covers the basics pretty well, and [esalazar] gets extra-credit points for embracing the hacker spirit of seeing for himself how stuff works while documenting it well and citing his references.

Mixed I/O Testing Module

Needing to test the display interface for a multitude of different sensors [Fileark] built himself this analog and digital input/output simulator. Along the bottom is a double row of trimpots that adjust analog voltages. Each voltage is measured by the Arduino inside and its value is displayed on the graphic LCD screen to confirm that the hardware you’re testing is making correct measurements. There’s also digital I/O in two different forms. To the upper left are momentary push buttons but the DIP switch bank below that allows the same connections to be toggled on and off. It’s not an automated test bed, but if you’ve got a lot of I/O, or a lot of hardware to test this will save you some real time.

Don’t miss the demonstration video after the break.

Continue reading “Mixed I/O Testing Module”

Replace An N64’s Worn Out Joystick

As gaming consoles age the controllers will inevitably show some wear, and sadly may give out all together. [Kyle] couldn’t bear to watch his Nintendo 64 controller bite the dust so he replaced the thumb stick with one from a PlayStation. This is a bigger job than you might imagine because the two parts are fundamentally different. The original N64 stick uses a rotary encoder to output data to the control chip, while the PlayStation stick is an analog device. [Kyle’s] solution was to read the analog values using a PIC, but lower in the thread you can read about another user who pulled off a similar hack using an AVR. Both convert the signals into the rotary encoder format that the N64 chip is listening for. From the looks of the clip embedded after the break, this couldn’t work any better!

Continue reading “Replace An N64’s Worn Out Joystick”

IPhone Tilt Motion Controller

Here’s a mounting system that adds mechanical tilt control to the iPhone (link dead, try the Internet Archive version). It uses two servo motors to rotate along the X and Y axes. An analog joystick is used along with an Arduino to control the movement of the apparatus. As you can see in the video after the break, this works quite well when playing accelerometer-based games. But adding a joystick isn’t the end-goal of the project. [Shane] plans to point a camera at the iPhone and use image recognition to play games automatically. That sounds like a big bite the chew but we’ve seen this work with Guitar Hero so we’re optimistic.

Continue reading “IPhone Tilt Motion Controller”

Segfault: Balancing Transport Using A Dozen Op-amps

The Segfault is a balancing transport similar to a Segway, but it uses analog comparators instead of digital circuitry. On board you’ll find no less than twelve LMC6484 op amps. They take signals from the gyroscope and the accelerometer, balance and filter them, then drive the motor h-bridges accordingly.

[Charles], the guy behind the Segfault, is also the one responsible for DeathBlades. As with that project he does just as well at documenting as he does at fabrication. Take some time to enjoy his posts associated with this two-wheeled-wonder (especially the build process) and then watch in the video after the break.

Continue reading “Segfault: Balancing Transport Using A Dozen Op-amps”