A few months ago, we heard about a random guy finding injection molds for old Commodore computers. He did what the best of us would do and started a Kickstarter to remanufacture these cool old cases. It’s the best story on retrocomputing this year, and someone else figured out they could remanufacture Commodore 64 keycaps. If you got one of these remanufactured cases, give the keycaps a look.
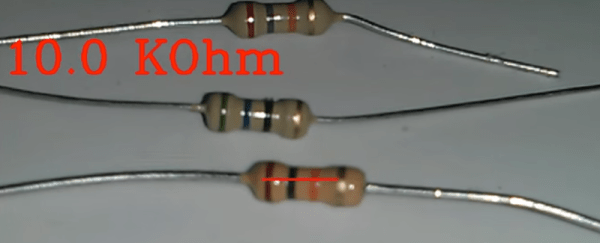
Remember this Android app that will tell you the value of resistors by reading their color code. Another option for the iOS crowd was presented at Maker Faire last weekend. It’s called ResistorVision, and it’s perfect for the colorblind people out there. An Android version of ResistorVision will be released sometime in the near future.
A few folks at Langly Research Center have a very cool job. They built a hybrid electric tilt wing plane with eight motors on the wing and two on the tail. It’s ultimately powered by two 8 hp diesel engines that charge Liion batteries. When it comes to hydrocarbon-powered hovering behemoths, our heart is with Goliath.
A bottom-of-the-line avionics panel for a small private plane costs about $10,000. How do you reduce the cost? Getting rid of FAA certification? Yeah. And by putting a Raspberry Pi in it. It was expoed last month at the Sun ‘N Fun in Florida, and it’s exactly what the pilots out there would expect: a flight system running on a Raspberry Pi. It was installed in a Zenith 750, a 2-seat LSA, registered as an experimental. You can put just about anything in the cabin of one of these, and the FAA is okay with it. If it’ll ever be certified is anyone’s guess.