Smart Brake Lights And More With OpenXC

smart-brake-light

At a recent hack-a-thon event, [Al Linke] tapped into a vehicle’s OBD port with an OpenXC vehicle interface and hacked an LED screen in the rear window to display data based on events. If you haven’t heard of OpenXC, you can expect to read more about it here at Hackaday in the near future. For now, all you need to know is that OpenXC is Ford’s open source API for real-time data from your vehicle: specifically 2010 and newer model Ford vehicles (for now).

[Al] connected the OpenXC interface to his Android phone over Bluetooth, transmitting data from the OBD port to the phone in real time. From here, the Android can do some really cool stuff. It can use text to speech to announce how much your lead foot cost you, add sound effects for different car events, and even interact with additional devices. Although he managed all of those features, [Al’s] primary goal was to add an LED screen that displayed messages on the vehicle’s back window.

When the phone detected a braking event from the car, it directed the LEDs to light up with a “braking” image, adding some flavor to the process of stopping. He could also change the image to a “Thank You” sign with a waving hand, or—for less courteous drivers—an “F U” image with a slightly different hand gesture. You’ll want to check your local and/or national laws before attempting to strap any additional lighting to your vehicle, but you can watch [Al’s] car light up in the video below. For a more detailed look under the hood, he’s also provided an Instructables page.  If OpenXC catches on, the number of vehicle hacks such as the Remote Controlled Car may skyrocket.

Continue reading “Smart Brake Lights And More With OpenXC”

Controlling Chromecast: AirCast APK Released

[Koush] is at it again, this time releasing AirCast, an Android app that’ll push videos to the Chromecast from Dropbox, Google Drive, and your phone’s Gallery. Astute Hackaday readers will recall that AirCast has been around for a few weeks now, but limited to only his whitelisted Chromecast. As [Koush] explains it, he had to reverse engineer the protocols and now he simply avoids the Chromecast SDK entirely. If you’re lucky enough to have a Chromecast, you’ll want to hurry and grab the APK (direct download link) and have some fun with it before it self-destructs. [Koush] isn’t ready to release it for more than a 48 hour period, but we encourage you to take advantage of AirCast and contribute to his call for feedback, bugs, and crash reports. You have a little under a day left.

See “AllCast” work its magic in the video below. No, that’s not a typo. Apparently [Koush] has been struggling with available names for the app, and you’ll hear him call it “AllCast” in the Youtube video. That name was taken for some other product, though, and “AirCast” has now replaced it. If you suddenly regret not immediately ordering a Chromecast and are sitting this one out, go read [Mike’s] rant and get psyched up for when they’re back in stock.

Continue reading “Controlling Chromecast: AirCast APK Released”

Rant: Why I Love What The Chromecast Stands For

I’ve had my hands on this Chromecast for almost a week now and I love it. Years ago I hacked my first Xbox after seeing [Kevin Rose] do it on The Screensavers (I did the hardware mod but that’s inconsequential). Why did I do this? So that I could run Xbox Media Center, the predecessor of XBMC. Since then I’ve dreamed of a device which can be hung on the back of the TV with Velcro and run XBMC. We basically got there with the Raspberry Pi, but the Chromecast is the form-factor that I had always envisioned. This lets me watch Netflix, while the RPi runs XBMC. The two are match made in heaven for under a hundred bucks.

That’s why I love the Chromecast device itself, but the bigger picture is that I love what it stands for. Keep reading to see what i mean.

Continue reading “Rant: Why I Love What The Chromecast Stands For”

Visualize Twitter With An LED Matrix

visualizing-twitter

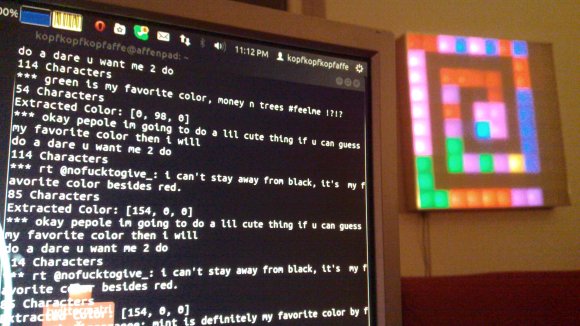
What’s your favorite color? Don’t tell us, Tweet it to [Sebastian’s] favorite color Twitter display and you’ll be contributing to the artwork hanging on his wall.

This answers a very important question, what do you do with your projects after they’re completed? For us the best part is the planning and building. Once it’s done the thrill is pretty much gone for us. We haven’t even switched on our Ping Pong clock in over a year. But [Sebastian] recently dusted his 10×10 LED matrix for this project.

Tweets are parsed by a Python project he wrote to try out the Twitter API. It looks for a set list of colors . He asserts that people aren’t that creative when you solicit their favorite color but to prove him wrong we’re going to say our favorite is Amaranth. After it finds the color it pushes it to the next pixel in the spiraling pattern shown above. But wait, there’s more! To give the pixels a but if extra meaning he uses the total length of the tweet to set intensity.

If you need a Titter enabled hack that displays a bit more specific data you’ll want something that can actually display what was Tweeted.

Minecraft For RPi Released

Minecraft for RPi

Mojang, the folks behind Minecraft, have officially released Minecraft: Pi Edition. This free version of the popular game is optimized to run on the Raspberry Pi hardware, and has an API that exposes the game’s internals to a variety of programming languages.

Mojang intends this release to be an educational tool for teaching and learning programming. Since the API provides instant feedback in the game, it could be an interesting way to make learning to code fun for people of all ages.

Having access to the API on a RPi also means that the game can be connected to the real world. For example, using Python and the RPi.GPIO, pins on the GPIO header can be used for output or input. This creates a slew of possible hacks that interface with the game.

Any ideas on what you’d like to do with Minecraft on a RPi? Let us know in the comments. Also, we coincidentally just printed a minecraft pick on our 3d printer. There’s a time lapse video of it after the break!

Continue reading “Minecraft For RPi Released”

Rack Mount Home Automation With A RPi

RPi Home Automation

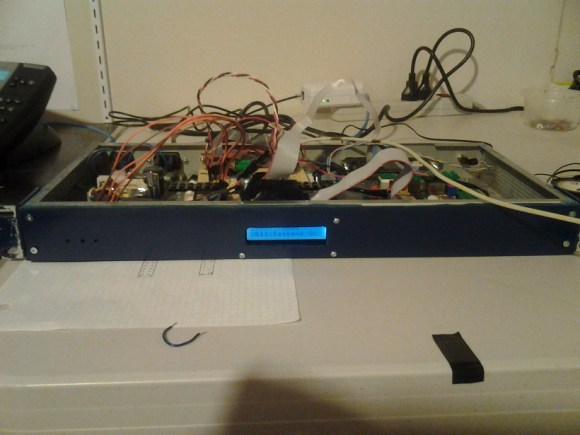
[Patrick] wanted to have centralized sensing and control over various parts of his house. His Raspberry Pi Home Automation System integrates a bunch of functionality in one rack mount package, salvaged from an old network switch.

The automation system is based on a Raspberry Pi running Arch Linux, which talks to an ATmega over SPI. We’ve seen this setup used many times before to add additional ports to the Raspberry Pi, but what makes [Patrick]’s build unique is the amount of control he’s built into the system.

The box controls outdoor lighting at sunset and sunrise, generates wakeup calls, controls IR cameras, and plays sounds based on events. It’s capable of monitoring sump pump water level, the state of a house alarm, and more. A custom REST API is used to interact with the device. This allows for programs on any platform to interface with his home, and acts as an API for his house.

[Patrick] provides a lot of details in his build log, which should be helpful to anyone looking to roll their own home automation system. The source is also provided.

Using An Oscilloscope As A Composite Video Adapter

Confronted with a monitor that would display neither HDMI signal, nor composite video, [Joonas Pihlajamaa] took on a rather unorthodox task of getting his oscilloscope to work as a composite video adapter. He’s using a PicoScope 2204 but any hardware that connects to a computer and has a C API should work. The trick is in how his code uses the API to interpret the signal.

The first thing to do is make sure the voltage levels used in the composite signal are within the tolerances of your scope. [Joonas] used his multimeter to measure the center pole of the RCA connector and found that the Raspberry Pi board puts out from 200 mV to 2V, well within the PicoScope’s specs. Next he started to analyze the signal. The horizontal sync is easy to find, and he ignored the color information — opting for a monochrome output to ease the coding process. The next big piece of the puzzle is to ascertain the vertical sync so that he knows where each frame starts. He got it working and made one last improvement to handle interlacing.

The proof of concept video after the break shows off the he did. It’s a bit fuzzy but that’s how composite video looks normally.

Continue reading “Using An Oscilloscope As A Composite Video Adapter”