A Simple 6DOF Hall Effect ‘Space’ Mouse

The 3DConnexion Space mouse is an interesting device but heavily patent-protected, of course. This seems to just egg people on to reproduce it using other technologies than the optical pickup system the original device uses. [John Crombie] had a crack at building one using linear Hall effect sensors and magnets as the detection mechanism to good — well — effect.

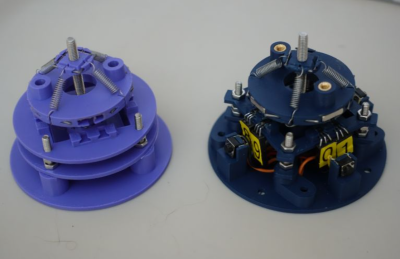
Using the SS49E linear Hall effect sensor in pairs on four sides of a square, the setup proves quite straightforward. Above the fixed sensor plate is a moveable magnet plate centred by a set of springs.  The magnets are aligned equidistant between each sensor pair such that each sensor will report an equal mid-range signal with zero mechanical displacement. With some simple maths, inputs due to displacements in-plane (i.e., left-right or up-down) can be resolved by looking at how pairs compare to each other. Rotations around the vertical axis are also determined in this manner.
Tilting inputs or vertical movements are resolved by looking at the absolute values of groups or all sensors. You can read more about this by looking at the project’s GitHub page, which also shows how the to assemble the device, with all the CAD sources for those who want to modify it. There’s also a detour to using 3D-printed flexures instead of springs, although that has yet to prove functional.

On the electronics and interfacing side of things, [John] utilises the Arduino pro micro for its copious analog inputs and USB functionality. A nice feature of this board is that it’s based on the ATMega32U4, which can quickly implement USB client devices, such as game controllers, keyboards, and mice. The USB controller has been tweaked by adjusting the USB PID and VID values to identify it as a SpaceMouse Pro Wireless operating in cabled mode. This tricks the 3DConnexion drivers, allowing all the integrations into CAD tools to work out of the box.

We do like Space Mouse projects. Here’s a fun one from last year, an interesting one using PCB coils and flexures, and a simple hack to interface an old serial-connected unit.


Custom Mouse-Making: Clay Is The Way

For something that many of us handle all day long, it sure would be nice if mice came in more sizes and shapes, wouldn’t it? Until that day, we’ll just have to find something passable or else design and build a custom-shaped mouse from scratch like [Ben Makes Everything] did.

First, [Ben] played around with some modelling clay until he had a shape he was happy with, then took a bunch of pictures of it mounted on a piece of wood for easy manipulation and used photogrammetry to scan it in for printing after cleaning it up in Blender. About six versions later, he had the final one and was ready to move on to electronics.

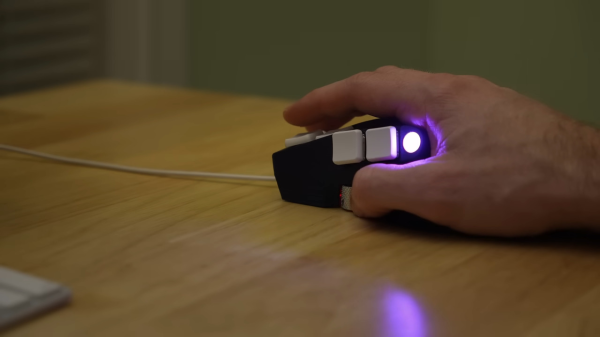
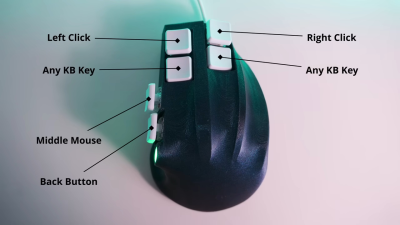
That’s right, this isn’t just mouse guts in an ergonomic package. Inside is Arduino Pro Micro and a PMW 3389 optical sensor on a breakout board. [Ben] was going to use flexible 3D printed panels as mouse buttons, but then had an epiphany — why not use keyboard switches and keycaps instead? He also figured he could have two buttons per finger if he wanted, so he went with Kailh reds for the fingers and and whites in the thumb.

Speaking of the thumb, there was no room for a mouse wheel in between those comparatively huge switches, so he moved it to the the side to be thumb-operated. [Ben] got everything working, and after all this, decided to make it wireless. So he switched to an Adafruit Feather S3 and designed his first PCB for both versions. Ultimately, he found that the wireless version is kind of unreliable, so he is sticking with the wired one for now.

Continue reading “Custom Mouse-Making: Clay Is The Way”

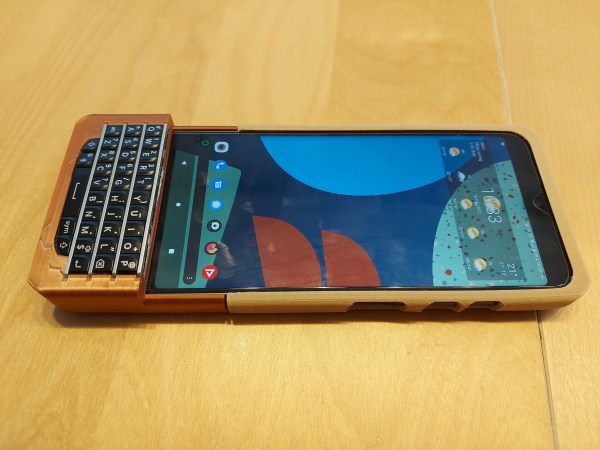
An image of a smarphone sitting on a lightly-colored wooden table. It has a tan case surrounding it on the top 2/3, and a copper case holding a BlackBerry Q10 keyboard jutting out over the bottom of the phone.

FairBerry Brings The PKB Back To Your Smartphone

Missing the feel of physical keys on your phone, but not ready to give up your fancy new touchscreen phone? [Dakkaron] has attached a BlackBerry keyboard to a slightly more recent device.

Designed for the FairPhone 4, [Dakkaron]’s hack should be transferable to other smartphones as it connects to the phone over USB without any of that tedious mucking about with Bluetooth. There’s even a handy OpenSCAD-based generator to help you along in the customization process.

[Dakkaron] started with an Arduino Pro Micro-based implementation, but the most recent iteration uses a custom board that can be obtained partially-populated. Unfortunately, the Hirose connector for the keyboard isn’t available off-the-shelf, so you’ll have to solder that yourself if you’re planning to do this mod. Sounds like a perfect opportunity to practice your surface mount soldering skills!

If the Q10 keyboard looks familiar, it’s probably because it’s one of the most popular keyboards for small projects around here. Check out Regrowing a BlackBerry from the Keyboard Out or a LoRa Messenger with one. We’ve even seen them in a conference badge!

The ScottoKatana Keyboard Is Cutting-Edge

The lovely thing about a hobby like keyboard building is that the melting pot of designs manages to never turn into a nasty porridge. Rather, it remains a tasty chili that keeps getting more flavorful with time. It’s a simple recipe, really; someone becomes dissatisfied enough with their peripherals to do something about it, often trying various designs until they either settle on one, or come up with yet another awesome variant that suits their needs — and possibly someone else’s down the line.

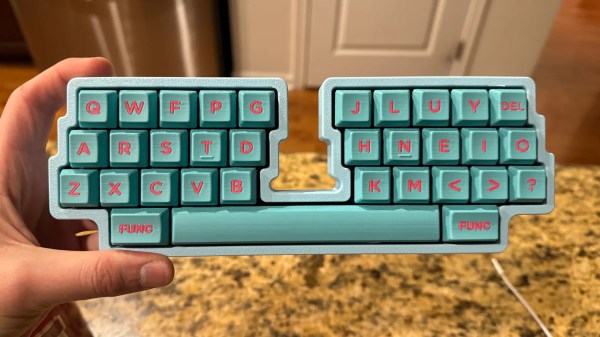
The inimitable [Joe Scotto] has happened upon the katana layout, which has an inverse left-hand row stagger that lends symmetry to the design, and Scotto-ized it into a 33-key build that he says is the best-sounding one yet with lubed Gateron Milky Yellows.

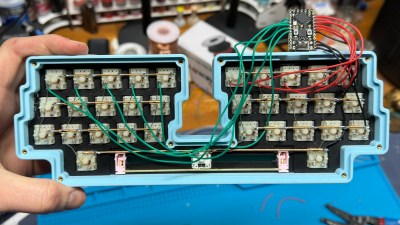
The case and the keycaps are both 3D-printed, and as with all Scotto builds, it is beautifully hand-wired. This one uses an RP2040 Pro Micro, but an ATMega Pro Micro will work, too.

Everything is available on GitHub, and [Joe] promises a typing test soon, as well as a gasket version that foregoes the integrated plate.

Do you need a fast keyboard? Like, ridiculously fast? Then you should use an FPGA.

Via KBD and Make:

Interactive Chameleon Lamp Changes Color At Your Whim

You never forget your first diorama, especially when it’s interactive. Although admittely a bit late to celebrate Erntedankfest (Germanic Thanksgiving), [Markus Bindhammer] is ahead of the curve when it comes to the American version.

This interactive diorama lamp features a cute chameleon that [Markus sculpted from a wire frame and a lump of clay]. In the chameleon’s midsection is a ping pong ball that does the work of diffusing an RGB LED. Wires run out the far side and through the bamboo stand and connect to a TCS34725 RGB color sensor and an Arduino Pro Micro.

The lamp does what you think — hold any colored object up to the color sensor, and the chameleon will change colors to match. When no one is interacting with the lamp, it slowly runs through a rainbow of colors. Be sure to check out the build video after the break.

Don’t have a color sensor? You can roll your own with an RGB LED, a photocell, and not much else. If you’re wondering how they work, we’ve seen the color sensor demystified.

Continue reading “Interactive Chameleon Lamp Changes Color At Your Whim”

CAT Is Not Your Average Meow-cropad

Are you completely over the idea of the keyboard in any flattish form and looking for something completely different for inputting your data? Or do you want a mega macropad for 3D design, GIMP or Inkscape work, or to use while relaxing with a nice first-person shooter? Then this ergonomic, double-fistable keyboard/controller mashup named CAT may be what you’re looking for.

Inside each of these slinky felines is pretty much what you’d expect to find — 25 or so switches and an Arduino Pro Micro. Interestingly enough, the switches are all lever-action and not push buttons. There are two breeds of CAT available to build or buy: one has 25 buttons, and the other has a joystick or trackball on the thumb between two upper and two lower buttons. You could have one type for each hand!

More information is available on the Lynx Workshop site, which is where you’ll also find tutorials and instructions for everything from the 3D printing to the electronics to the assembly and coding. There is even a bonus 3D modeling tutorial. Don’t want to invest the time to make your own CAT? These kitties are also available for pre-order. Claw past the break to check them out in action.

Looking for something with regular keyswitches? Oh, we have plenty of those.

Continue reading “CAT Is Not Your Average Meow-cropad”

A DIY CAD Mouse You Can Actually Build

When you spend a lot of time on the computer doing certain more specialised tasks (no, we’re not talking about browsing cat memes on twitter) you start to think that your basic trackpad or mouse is, let’s say, lacking a certain something. We think that something may be called ‘usability’ or maybe ease-of-use? Any which way, lots of heavy CAD users gush over their favourite mouse stand-ins, and one particularly interesting class of input devices is the Space Mouse, which is essentially patented up-to-the-hilt and available only from 3DConnexion. But what about open source alternatives you can build yourselves? Enter stage left, the Orbion created by [FaqT0tum.] This simple little build combines an analog joystick with a rotary knob, with a rear button and OLED display on the front completing the user interface.

The idea is pretty straightforward; you setup the firmware with the application you want to use it with, and it emits HID events to the connected PC, replacing the mouse or keyboard input. Since your machine will take input from multiple sources, it doesn’t replace your mouse, it augments it. It may not be very accurate for detailed PCB layout work, but for moving around in a 3D view, or dialling in a video edit, this could be a very useful addition to your workstation, so why not give it a try? The wiring is simple, the parts easily found and cheap, and it’s only a few printed parts! This scribe is already printing the plastics right now, if you listen carefully you might be able to make out the sound of the Lulzbot in background.

There are many other takes on this idea, with varying levels of complexity, like this incredible build from [Ahmsville] that sadly doesn’t make the PCBs available openly, and here’s one we covered earlier mashing the expensive 3DConnexion spacemouse into a keeb.

Continue reading “A DIY CAD Mouse You Can Actually Build”