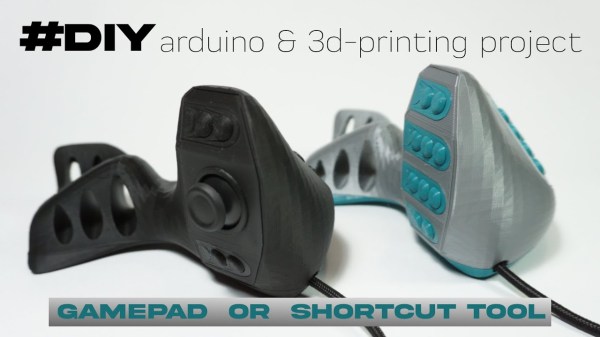
A French Minitel terminal becomes a Raspberry Pi-powered mini laptop.

Minitel Terminal Becomes Mini Laptop

In 1980, France took a step into the future when the telecom companies introduced the Minitel system — a precursor to the Web where users could shop, buy train tickets, check stocks, and send and receive electronic mail through a small terminal. Minitel still had 10 million monthly connections in 2009, but the service was discontinued in 2012.

The keyboard of a French Minitel terminal is wired up to an Arduino Pro Micro.So, you can imagine how many Minitel terminals must be floating around at this point. [Gautchh] picked one up at a garage sale a while back and converted it into a battery-powered laptop for taking notes in class. Luckily for us, [Gautchh] recently open-sourced this project and has given us a wiring diagram, STLs, BOM, and a good look into the build process.

[Gautchh] started by gutting the Minitel, but saved the power button and the très chic power indicator that looks like a AA cell. The new 10.4″ LCD screen is held in place with four 3D-printed corner blocks and a bit of hot glue, and the original keyboard (which we’d love to clack on) is now wired up to an Arduino Pro Micro. The main brain — a Raspberry Pi 3B — is easily accessible through a handy little hatch in the back. Well, it looks like we’ve got a new ebay alert to set up.

In the mood for more AZERTY goodness? Check out this gallery of French computers, or a more traditional take on a Minitel with a Raspberry Pi.

A macro keypad making music.

Meet The Marvelous Macro Music Maker

Do you kind of want a macropad, but aren’t sure that you would use it? Hackaday alum [Jeremy Cook] is now making and selling the JC Pro Macro on Tindie, which is exactly what it sounds like — a Pro Micro-based macro keypad with an OLED screen and a rotary encoder. In the video below, [Jeremy] shows how he made it into a music maker by adding a speaker and a small solenoid that does percussion, all while retaining the original macro pad functionality.

[Jeremy]’s original idea for a drum was to have a servo seesawing a chopstick back and forth on the table as one might nervously twiddle a pencil. That didn’t work out so well, so he switched to the solenoid and printed a thing to hold it upright, and we absolutely love it. The drum is controlled with the rotary encoder: push to turn the beat on or off and crank it to change the BPM.

To make it easier to connect up the solenoid and speaker, [Jeremy] had a little I²C helper board fabricated. There’s one SVG connection and another with power and ground swapped in the event it is needed. If you’re interested in the JC Pro Macro, you can pick it up in various forms over on Tindie. Of course, you might want to wait for version 2, which is coming to Kickstarter in October.

There are many ways to make a macro keyboard. Here’s one that also takes gesture input.

Continue reading “Meet The Marvelous Macro Music Maker”

Sparkpad Sparks Joy For Streamers

The best streamers keep their audience constantly engaged. They might be making quips and doing the funny voices that everyone expects them to do, but they’re also busy reading chat messages aloud and responding, managing different scenes and transitions, and so on. Many streamers use a type of macro keyboard called a stream deck to greatly improve the experience of juggling all those broadcasting balls.

Sure, there are dedicated commercial versions, but they’re kind of expensive. And what’s the fun in that, anyway? A stream deck is a great candidate for DIY because you can highly personalize the one you make yourself. Give it clicky switches, if that’s what your ears and fingers want. Or don’t. It’s your macro keyboard, after all.

[Patrick Thomas] and [James Wood] teamed up to build the perfect stream deck for [James]’ Twitch channel. We like the way they went about it, which was to start by assessing a macro pad kit and use what they learned from building and testing it to design their ideal stream deck. The current version supports both the Arduino Pro Micro and the ESP32. It has twelve key switches, a rotary encoder, an LED bar graph, and an OLED screen for choosing between the eight different color schemes.

If you’d rather have dynamic screens instead of cool keycaps, you can do it cheaper by making non-touch screens actuate momentaries.

Nixie Robot Head with LED eyes and retro-futuristic design

Artful Nixie Bot Sculpture Sees, Thinks, And Talks

When [Tavis] and his father were inspired to lend their talents to building a robot sculpture, they split the duties. [Tavis]’ father built a robot head, and [Tavis] utilized designs old and new to breathe life into their creation.

Many a hardware hacker has been inspired by robotic art over the years. Whether it’s the vivid descriptions by the likes of Asimov and Clarke, the magnificent visuals from the formative 1927 film Metropolis, or the frantic arm-waving Robot from Lost In Space, the robots of Science Fiction have impelled many to bring their own creations to life.

For [Travis]’s creation, Two rare Russian Nixie Tubes in the forehead convey what’s on the robot’s mind, while dual 8×8 LED matrices from Adafruit give the imagination a window to the binary soul. A sound board also from Adafruit gives voice to the automaton, speaking wistful words in a language known only to himself.

A DC to DC converter raises the LiPo supplied 3.7v to the necessary 170v for the Nixies, and a hidden USB-C port charges the battery once its two-hour life span has expired. Two custom Nixie driver boards are each host to an Arduino Pro Micro, and [Tavis] has made the PCB design available for those wishing to build their own Nixie projects.

As you can see in the video below the break, the results are nothing short of mesmerizing!

Of course, we’re no strangers to robots here at Hackaday. Perhaps we can interest you in a drink created by the industrial-grade Robotic Bartender while you consider the best way to Stop the Robot Uprising. And remember, if you spot any awesome hacks, let us know via the Tip Line!

Continue reading “Artful Nixie Bot Sculpture Sees, Thinks, And Talks”

Turning GameCube & N64 Pads Into MIDI Controllers

It’s fair to say that the Nintendo 64 and GameCube both had the most unique controllers of their respective console generations. The latter’s gamepads are still in high demand today as the Smash Bros. community continues to favor its traditional control scheme. However, both controllers can easily be repurposed for musical means, thanks to work by [po8aster].

The project comes in two forms – the GC MIDI Controller and the N64 MIDI Controller, respectively. Each uses an Arduino Pro Micro to run the show, a logic level converter, and [NicoHood’s] Nintendo library to communicate with the controllers. From there, controller inputs are mapped to MIDI signals, and pumped out over traditional or USB MIDI.

Both versions come complete with a synth mode and drum mode, in order to allow the user to effectively play melodies or percussion. There’s also a special mapping for playing drums using the Donkey Konga Bongo controller with the GameCube version. For those eager to buy a working unit rather than building their own, they’re available for purchase on [po8aster’s] website.

It’s a fun repurposing of video game hardware to musical ends, and we’re sure there’s a few chiptune bands out there that would love to perform with such a setup. We’ve seen other great MIDI hacks on Nintendo hardware before, from the circuit-bent SNES visualizer to the MIDI synthesizer Game Boy Advance. Video after the break.

Continue reading “Turning GameCube & N64 Pads Into MIDI Controllers”

Redox Redux: Split Keeb Gets A Num Pad

What’s the worst thing about split keyboards? If they have one general fault, it’s that almost none of them have a number pad. If you can fly on that thing, but struggle with using the top row numbers, you will miss the num pad terribly, trust us. So what’s the answer? Design your own keyboard, of course. [ToasterFuel] had enough bread lying around to cook up a little experiment for his first keyboard build, and we think the result is well done, which is kind of rare for first keebs.

This design is based on the Redox, itself a remix of the ErgoDox that aims to address the common complaints about the latter — it’s just too darn big, and the thumb clusters are almost unusable. We love how customized this layout is, with its sprinkling of F keys and Escape in the Caps Lock position. Under those keycaps you’ll find 100% Cherry MX greens, so [ToasterFuel] must have pretty strong fingers to pound those super clackers.

Everything else under the hood is pretty standard, with a pair of Arduino Pro Micros running the show. [ToasterFuel] had to wire up the whole thing by hand because of the num pad, and we’re impressed that he built this entire project in just three weeks. And that includes writing his own firmware!

Already found or built a split you love, but still miss the num pad? Why not build one to match your keyboard?

Go Ape With A Banana Macropad

The super fun thing about macro pads is that they’re inherently ultra-personalized, so why not have fun with them? This appealing little keeb may have been a joke originally, but [dapperrogue] makes a valid point among a bunch of banana-related puns on the project page — the shape makes it quite the ergonomic little input device.

Inside this open-source banana is that perennial favorite for macro pads, the Arduino Pro Micro, and eight switches that are wired up directly to input pins. We’re not sure what flavor of Cherry those switches are, hopefully brown or green, but we suddenly wish Cherry made yellow switches. If you want to build your own, the STLs and code are available, and we know for a fact that other switch purveyors do in fact make yellow-stemmed switches.

Contrary to what the BOM says, we believe the sticker is mandatory because it just makes the build — we imagine there would be fewer double takes without it. Hopefully this fosters future fun keyboard builds from the community, and we can’t wait to sink our teeth into the split version!

There are a bunch of ways to make a macropad, including printing everything but the microcontroller.

Via r/mk and KBD