Remembering The MUDdiest Of Times With The MUD1 And MUD2 Online RPGs

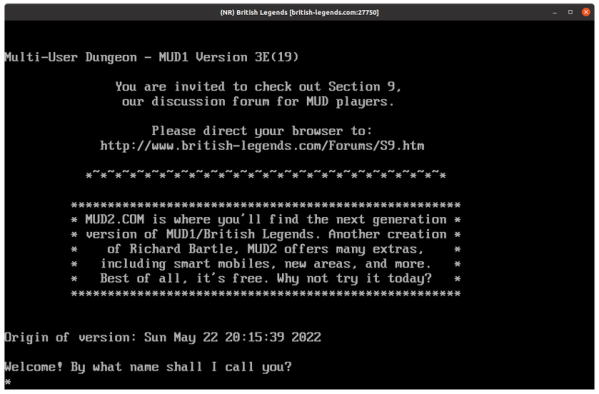
Before there were massively multiplayer online role-playing games (MMORPGs) like EverQuest, the genre was called a Multi-User Dungeon (MUD), following in the trend of calling text adventures at that time ‘dungeon crawlers’. These multi-player games required you to bring along your own imagination, for these were purely text-based affairs. Despite the first of these (MUD1) having been released all the way back in 1978 for the DEC PDP-10, these games are still being played today, long after they stopped being in the (game) news cycle.

The brief history and today’s status of MUD1 is covered in a recent article by [Bryan Lunduke], following its creation in 1979 in the UK by [Richard Bartle] and [Roy Trubshaw], its struggles and eventual renaming to ‘British Legends

Technically all you need to play is a telnet client, though you can always use a graphical web browser to log into a text adventure. Much like playing a game like Zork — which heavily inspired MUDs — you got to use your wits and map drawing skills to figure out how to navigate around the world. You can also play the new and improved MUD: MUD2. Make sure to take a peek on [Richard]’s aesthetically yellow MUD-related website and the latest gossip in the Muddled Times before joining either the UK MUD2 server or the Canadian one.

Although definitely leaning on one’s imagination more than the advanced graphics of a graphical MUD like EverQuest require, there’s a lot of fun to be had in these MUDs, as well as the plethora of others.

Thanks to [Stephen Walters] for the tip.

Blatano Art Project Tracks Devices In Its Vicinity

Computers, surveillance systems, and online agents are perceiving us all the time these days. Most of the time, it takes place in the shadows, and we’re supposed to be unaware of this activity going on in the background. The Blatano art piece from [Leigh] instead shows a digital being that actively displays its perception of other digital beings in the world around it.

The project is based on an ESP32, using the BLE Scanner library to scan for Bluetooth devices in the immediate vicinity. Pwnagochi and Hash Monster tools are also used to inspect WiFi traffic, while the CovidSniffer library picks up packets from contact-tracking apps that may be operating in the area.

This data is used to create profiles of various devices that the Blatano can pick up. It then assigns names and little robotic images to each “identity,” and keeps tabs on them over time. It’s an imperfect science, given that some devices regularly change their Bluetooth identifiers and the like. Regardless, it’s interesting to watch a digital device monitor the scene like a wallflower watching punters at a house party.

If you’ve built your own art-surveillance devices to comment on the state of modernity, don’t hesitate to drop us a line!

Interactive Chameleon Lamp Changes Color At Your Whim

You never forget your first diorama, especially when it’s interactive. Although admittely a bit late to celebrate Erntedankfest (Germanic Thanksgiving), [Markus Bindhammer] is ahead of the curve when it comes to the American version.

This interactive diorama lamp features a cute chameleon that [Markus sculpted from a wire frame and a lump of clay]. In the chameleon’s midsection is a ping pong ball that does the work of diffusing an RGB LED. Wires run out the far side and through the bamboo stand and connect to a TCS34725 RGB color sensor and an Arduino Pro Micro.

The lamp does what you think — hold any colored object up to the color sensor, and the chameleon will change colors to match. When no one is interacting with the lamp, it slowly runs through a rainbow of colors. Be sure to check out the build video after the break.

Don’t have a color sensor? You can roll your own with an RGB LED, a photocell, and not much else. If you’re wondering how they work, we’ve seen the color sensor demystified.

Continue reading “Interactive Chameleon Lamp Changes Color At Your Whim”

Tim’s Draw Bot Gets Around With A Pen

If you grew up playing with LOGO on an old 8-bit computer, you’re probably familiar with the concept of a drawbot. It’s a simple robot that drags a pen around to draw on paper. [Tim] decided to build one that uses a simple skid-steer design to get around the page. 

An Arduino Nano is the brains of the operation, paired with a CNC Shield that allows it to drive a pair of stepper motors. The stepper motors drive the wheels via cogged belts, with the 3D-printed rims fitted with square rubber drive belts used as tires for additional grip. A third jockey wheel is used for balance, in addition to the two main driven wheels. A servo is used to raise and lower the pen as needed. All the hardware is mounted on to a simple tray chassis, which was 3D printed along with most of the other basic componentry.

The robot does a good job of plotting out a drawing on a small scale, with [Tim] using it to outline his name on paper. We’ve featured some other great drawbots before, too, including this nifty spray-can version. Video after the break.

Continue reading “Tim’s Draw Bot Gets Around With A Pen”

A Tiny Board For Driving LEDs In…Whatever

Whether you’re into chiptune or just playing Tetris on original hardware, you might like rocking a heavily-customized Game Boy. Lovely flashing LEDs can only improve the aesthetic, so if that’s what you’re after, you might consider the ARCCore board from [NatalieTheNerd].

The board is a compact and easy way to drive some addressable LEDs, with a form factor designed to take up a small amount of space when stuffed into a Game Boy or other game console. It rocks an RP2040 microcontroller set up to drive a strip of WS2812B LEDs. Three buttons are used to configure the color and brightness settings. The board is designed to run on 3.3 to 5 V, thanks to an onboard buck converter. It’s capable of delivering enough juice to run up to 10 RGB LEDs, though you could potentially use more if you ran them from external power.

You can use just about any microcontroller on the market today to run addressable LEDs if you so desire. If you want a compact drop-in solution that takes up less space, though, you might find the ARCCore useful. If you’ve got your own nifty kit for running addressable LEDs, don’t hesitate to share it with the broader hacker massive — hit the tipsline!

Simple Badge Is Simple, But It’s Yours

Making conference badges, official or unofficial, has become an art form. It can get pretty serious. #badgelife.

But DEFCON-goers aren’t the only people making fancy personalized nametags. Hams often had callsign badges going back as far as I can remember. Most were made of engraved plastic, but, at some point, it became common to put something like a flashing LED on the top of the engraved antenna tower or maybe something blinking Morse code.

Going back to that simpler time, I wanted to see if I could make my own badge out of easily accessible modules. How easy can it be? Let’s find out. Along the way, we’ll talk about multicore programming, critical sections, namespaces, and jamming images into C++ code. I’ll also show you how to hijack the C preprocessor to create a little scripting language to make the badge easier to configure.

Bottom Line Up Front

The photo shows the Pico badge. It has an RP2040 CPU but not a proper Raspberry Pi Pico. The Waveshare RP2040-Plus clone has a battery connector and charger. It also has a reset button, and this one has 16 MB of flash, but you don’t need that much. The LCD is also a Waveshare product. (This just happened to work out. I bought all of this stuff, and I don’t even know anyone at Waveshare.) The only other thing you need is a USB C cable and a battery with an MX 1.25 connector on it with the correct polarity. Hardware done! Time for software.

Continue reading “Simple Badge Is Simple, But It’s Yours”

Simple Hack Lets Smartphone Take Resin Printer Time-Lapses

With how cheap they’re getting, everyone seems to be jumping on the resin printer bandwagon. They may not be able to fully replace your trusty old FDM printer, but for certain jobs, they just can’t be beaten. Sadly though, creating those smooth time-lapse videos of your prints isn’t quite as easy to do as it is on their filament-based counterparts.

Not as easy, perhaps, but not impossible. [Fraens] found a way to make time-lapses on any resin printer, and in a wonderfully hacky way. First, you need to find a smartphone, which shouldn’t be too hard, given how often we all tend to upgrade. [Fraens] recommends replacing the standard camera app on the phone with Open Camera, to prevent it from closing during the long intervals with nothing happening. The camera is triggered by any readily available Bluetooth dongle, which is connected via a simple transistor circuit to an Arduino output. To trigger the shutter, a light-dependent resistor (LDR) is connected to one of the microcontroller’s inputs. The LDR is placed inside the bed of the resin printer — an Anycubic Photon in this case — where light from the UV panel used to cross-link the resin can fall on it. A simple bit of Arduino code triggers the Bluetooth dongle at the right moment, capturing a series of stills which are later stitched together using DaVinci Resolve.

The short video below shows the results, which look pretty good to us. There are other ways to do this, of course, but we find the simplicity of this method pleasing.

Continue reading “Simple Hack Lets Smartphone Take Resin Printer Time-Lapses”