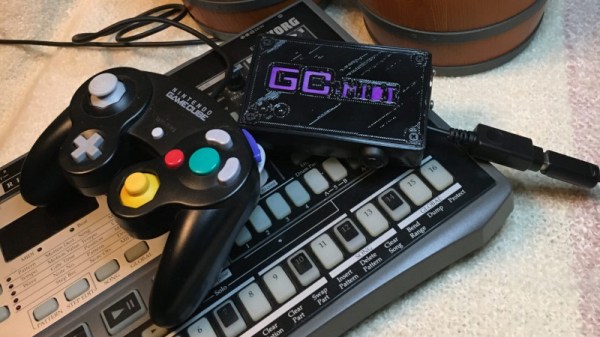
Redox Redux: Split Keeb Gets A Num Pad

What’s the worst thing about split keyboards? If they have one general fault, it’s that almost none of them have a number pad. If you can fly on that thing, but struggle with using the top row numbers, you will miss the num pad terribly, trust us. So what’s the answer? Design your own keyboard, of course. [ToasterFuel] had enough bread lying around to cook up a little experiment for his first keyboard build, and we think the result is well done, which is kind of rare for first keebs.

This design is based on the Redox, itself a remix of the ErgoDox that aims to address the common complaints about the latter — it’s just too darn big, and the thumb clusters are almost unusable. We love how customized this layout is, with its sprinkling of F keys and Escape in the Caps Lock position. Under those keycaps you’ll find 100% Cherry MX greens, so [ToasterFuel] must have pretty strong fingers to pound those super clackers.

Everything else under the hood is pretty standard, with a pair of Arduino Pro Micros running the show. [ToasterFuel] had to wire up the whole thing by hand because of the num pad, and we’re impressed that he built this entire project in just three weeks. And that includes writing his own firmware!

Already found or built a split you love, but still miss the num pad? Why not build one to match your keyboard?

Go Ape With A Banana Macropad

The super fun thing about macro pads is that they’re inherently ultra-personalized, so why not have fun with them? This appealing little keeb may have been a joke originally, but [dapperrogue] makes a valid point among a bunch of banana-related puns on the project page — the shape makes it quite the ergonomic little input device.

Inside this open-source banana is that perennial favorite for macro pads, the Arduino Pro Micro, and eight switches that are wired up directly to input pins. We’re not sure what flavor of Cherry those switches are, hopefully brown or green, but we suddenly wish Cherry made yellow switches. If you want to build your own, the STLs and code are available, and we know for a fact that other switch purveyors do in fact make yellow-stemmed switches.

Contrary to what the BOM says, we believe the sticker is mandatory because it just makes the build — we imagine there would be fewer double takes without it. Hopefully this fosters future fun keyboard builds from the community, and we can’t wait to sink our teeth into the split version!

There are a bunch of ways to make a macropad, including printing everything but the microcontroller.

Via r/mk and KBD

Arduino Micro Pushes Animal Crossing’s Buttons

Repetitive tasks in video games often find a way of pushing our buttons. [Facelesstech] got tired of mashing “A” while catching shooting stars in Animal Crossing, so he set out to automate his problem away. After briefly considering rigging up a servo to do the work for him, he recalled a previous effort that used an Arduino Teensy to automate a bowling mini-game in Zelda: Breath of the Wild and decided to use a microcontroller to catch stars for him.

[Facelesstech] programmed an Arduino Pro Micro to fake controller button presses. It starts with a couple of presses to identify itself to the Switch, before generating an endless stream of button presses that automatically catch every shooting star. Hooking it up is easy—an on-the-go adapter allows the Switch’s USB-C port to connect directly to the Arduino’s Micro-USB port, even supplying power!

[Facelesstech] also designed a compact 3D-printed case that packages up the Arduino Pro Micro along with an ISP header for easy updating. The case even lets the Arduino’s power LED shine through so you know that it’s working!

If you, too, need to automate video game button-pushing, [Facelesstech] has kindly uploaded the source code and 3D designs for you to try. If you’d prefer something a little more low-tech, perhaps you might try a mechanical button pusher.

Continue reading “Arduino Micro Pushes Animal Crossing’s Buttons”

Dynamic Macro Keyboard Controls All The Things

Keyboard shortcuts are great. Even so, a person can only be expected to remember so many shortcuts and hit them accurately while giving a presentation over Zoom. [Sebastian] needed a good set of of shortcuts for OBS and decided to make a macro keyboard to help out. By the time he was finished, [Sebastian] had macro’d all the things and built a beautiful and smart peripheral that anyone with a pulse would likely love to have gracing their desk.

The design started with OBS, but this slick little keyboard turned into a system-wide assistant. It assigns the eight keys dynamically based on the program that has focus, and even updates the icon to show changes like the microphone status.

This is done with a Python script on the PC that monitors the running programs and updates the macro keeb accordingly using a serial protocol that [Sebastian] wrote. Thanks to the flexibility of this design, [Sebastian] can even use it to control the office light over MQTT and make the CO2 monitor send a color-coded warning to the jog wheel when there’s trouble in the air.

This project is wide open with fabulous documentation, and [Sebastian] is eager to see what improvements and alternative enclosure materials people come up with. Be sure to check out the walk-through/build video after the break.

Inspired to make your own, but want to start smaller? There are plenty to admire around here.

Continue reading “Dynamic Macro Keyboard Controls All The Things”

Rhythm Game Controller Can’t Be Beat

There’s this whole class of vertically scrolling rhythm games that take both hands and look really fun to play, albeit hard on the joints. You can buy specialized controllers for them, but they’re ridiculously expensive for what they are — just a handful of switches and two knobs. It’s exactly the kind of thing you should build to your taste for far less money.

Inspired by a pocket version of the Voltex controller that is also pretty darned expensive, [OmniSaiRen] set out to make their own on the cheap by building an awesome little macro keyboard that’s smaller and easier to use than the specialized controller. Inside there’s an Arduino Pro Micro taking input from eight Cherry MX switches and two optical encoders. The game treats the encoders as vertical and horizontal mouse movements, so [OmniSaiRen]’s code scans the encoders for their positions.

[OmniSaiRen] wrote their own matrix code and says it’s ugly, but it works well enough to play the game. What more can you ask for? A cool sticker to go on the top? Done. It’s too cold outside to paint, anyway. If it’s a one-handed game pad you need, check out this sweet little thing.

Via r/duino

New Micro YARH.IO Designed For Skilled Operators

A few months back we brought you word of the YARH.IO, an extremely impressive Raspberry Pi portable that featured rugged good looks and a unique convertible design made possible by a removable keyboard. One of the most appealing aspects of the design was that everything was built from off-the-shelf modules; it only took a couple jumper wires and some scrap perfboard to get everything wired up inside the 3D printed enclosure.

The downside of this construction style was that the finished product was a bit chunkier than was strictly necessary. But that’s not the case with the new YARH.IO Micro. The palm-sized portable looks almost exactly like the original, though it had to ditch the removable keyboard in the shrinking process. Gone as well is the touch pad, though with the touch screen capabilities of the Pimoroni Hyper Pixel four inch IPS display, that’s not much of a problem.

What’s the catch? Well, at a glance we can tell you this one is considerably harder to build. For one thing, you’ll need to remove the Ethernet and USB connectors from the Pi 3B+. The USB ports get relocated, but Ethernet understandably has to be left on the cutting room floor. Nothing to worry about with the GPIO pins, the display takes up all of those, but you’ll probably want to wire the I2C lines to the female header on the side of the case so you can add external hardware and sensors.

You also need to nestle an Arduino Pro Micro in there to communicate status information about the battery to the operating system over I2C. If you wanted to save a little wiring you could probably leave off the DS3231 RTC module, but it depends on how often you’ll be able to sync up with NTP.

While it may be more difficult to assemble than its predecessor, it’s certainly not unapproachable. Once again, no custom PCBs or exotic components are required. You might be doing a lot more soldering (and desoldering) than you would have before, but it’s nothing that the average Hackaday reader isn’t capable of. For your troubles, you’ll get a exceptionally portable Linux machine that’s ripe for hacking and modification.

If the time and effort it will take to put together a YARH.IO is a bit more than you’re willing to invest right now, there’s always commercial alternatives like the DevTerm. But whether you go with the original or this new Micro edition, we think the satisfaction of having built the whole thing yourself will be more than worth it.

PinePhone Gets 3D Printed Mechanical Keyboard

Do you remember when smartphones had real physical keyboards? Working the command line on some remote machine over SSH was a breeze, and you could even knock out a few lines of code if you were so inclined. But these days you’ve either got to lug around an external keyboard, or suffer through pecking out a few words per minute on a piece of glass. Doesn’t sound much like progress to us.

By the looks of it, [James Williams] doesn’t think so either. He’s designed a physical keyboard add-on that snaps onto the back of the PinePhone to deliver a proper, albeit condensed, typing experience. This is no repurposed BlackBerry board either; he’s created a custom mechanical keyboard that manages to fold into an incredibly small size thanks to resin printed keycaps and Kailh low profile switches. Other than the hand-drawn legends, it’s probably not a stretch to say this is a better keyboard than what many people have on their actual computers.

In addition to the 3D printed frame and Kailh switches, there’s also an Arduino Pro Micro onboard to communicate with the phone. Rather than use USB, the keyboard is wired to the I2C accessory port on the rear of the PinePhone. It sounds like [James] needs a little more time to polish his QMK build before its ready to release, so you might want to wait a bit before you start printing off your own copy of the parts.

Those following along with the development of the PinePhone know there’s supposedly an official keyboard accessory in the works, but who wants to wait when we’re so close to mobile Linux nirvana? Besides, we doubt it will be nearly as pleasant to type on as the board [James] has put together.